
Inventory Transfers on the POS let you move stock from one of your store locations to another without leaving the register, using the same send-and-receive workflow as the web backend. The sending store builds and sends the transfer, the receiving store confirms what actually arrived, and inventory updates automatically at both ends. Every transfer keeps a timeline of who created it, when it was sent, and when it is expected, so a shortage or discrepancy leaves a documented trail instead of a phone call nobody remembers.
📝 Note. Transfers require more than one store location on your account. Single-store merchants have no destination to send to.
📝 Note. A transfer is always received at its destination store. To receive a transfer you sent, switch the POS to the destination store first.
Where to find it
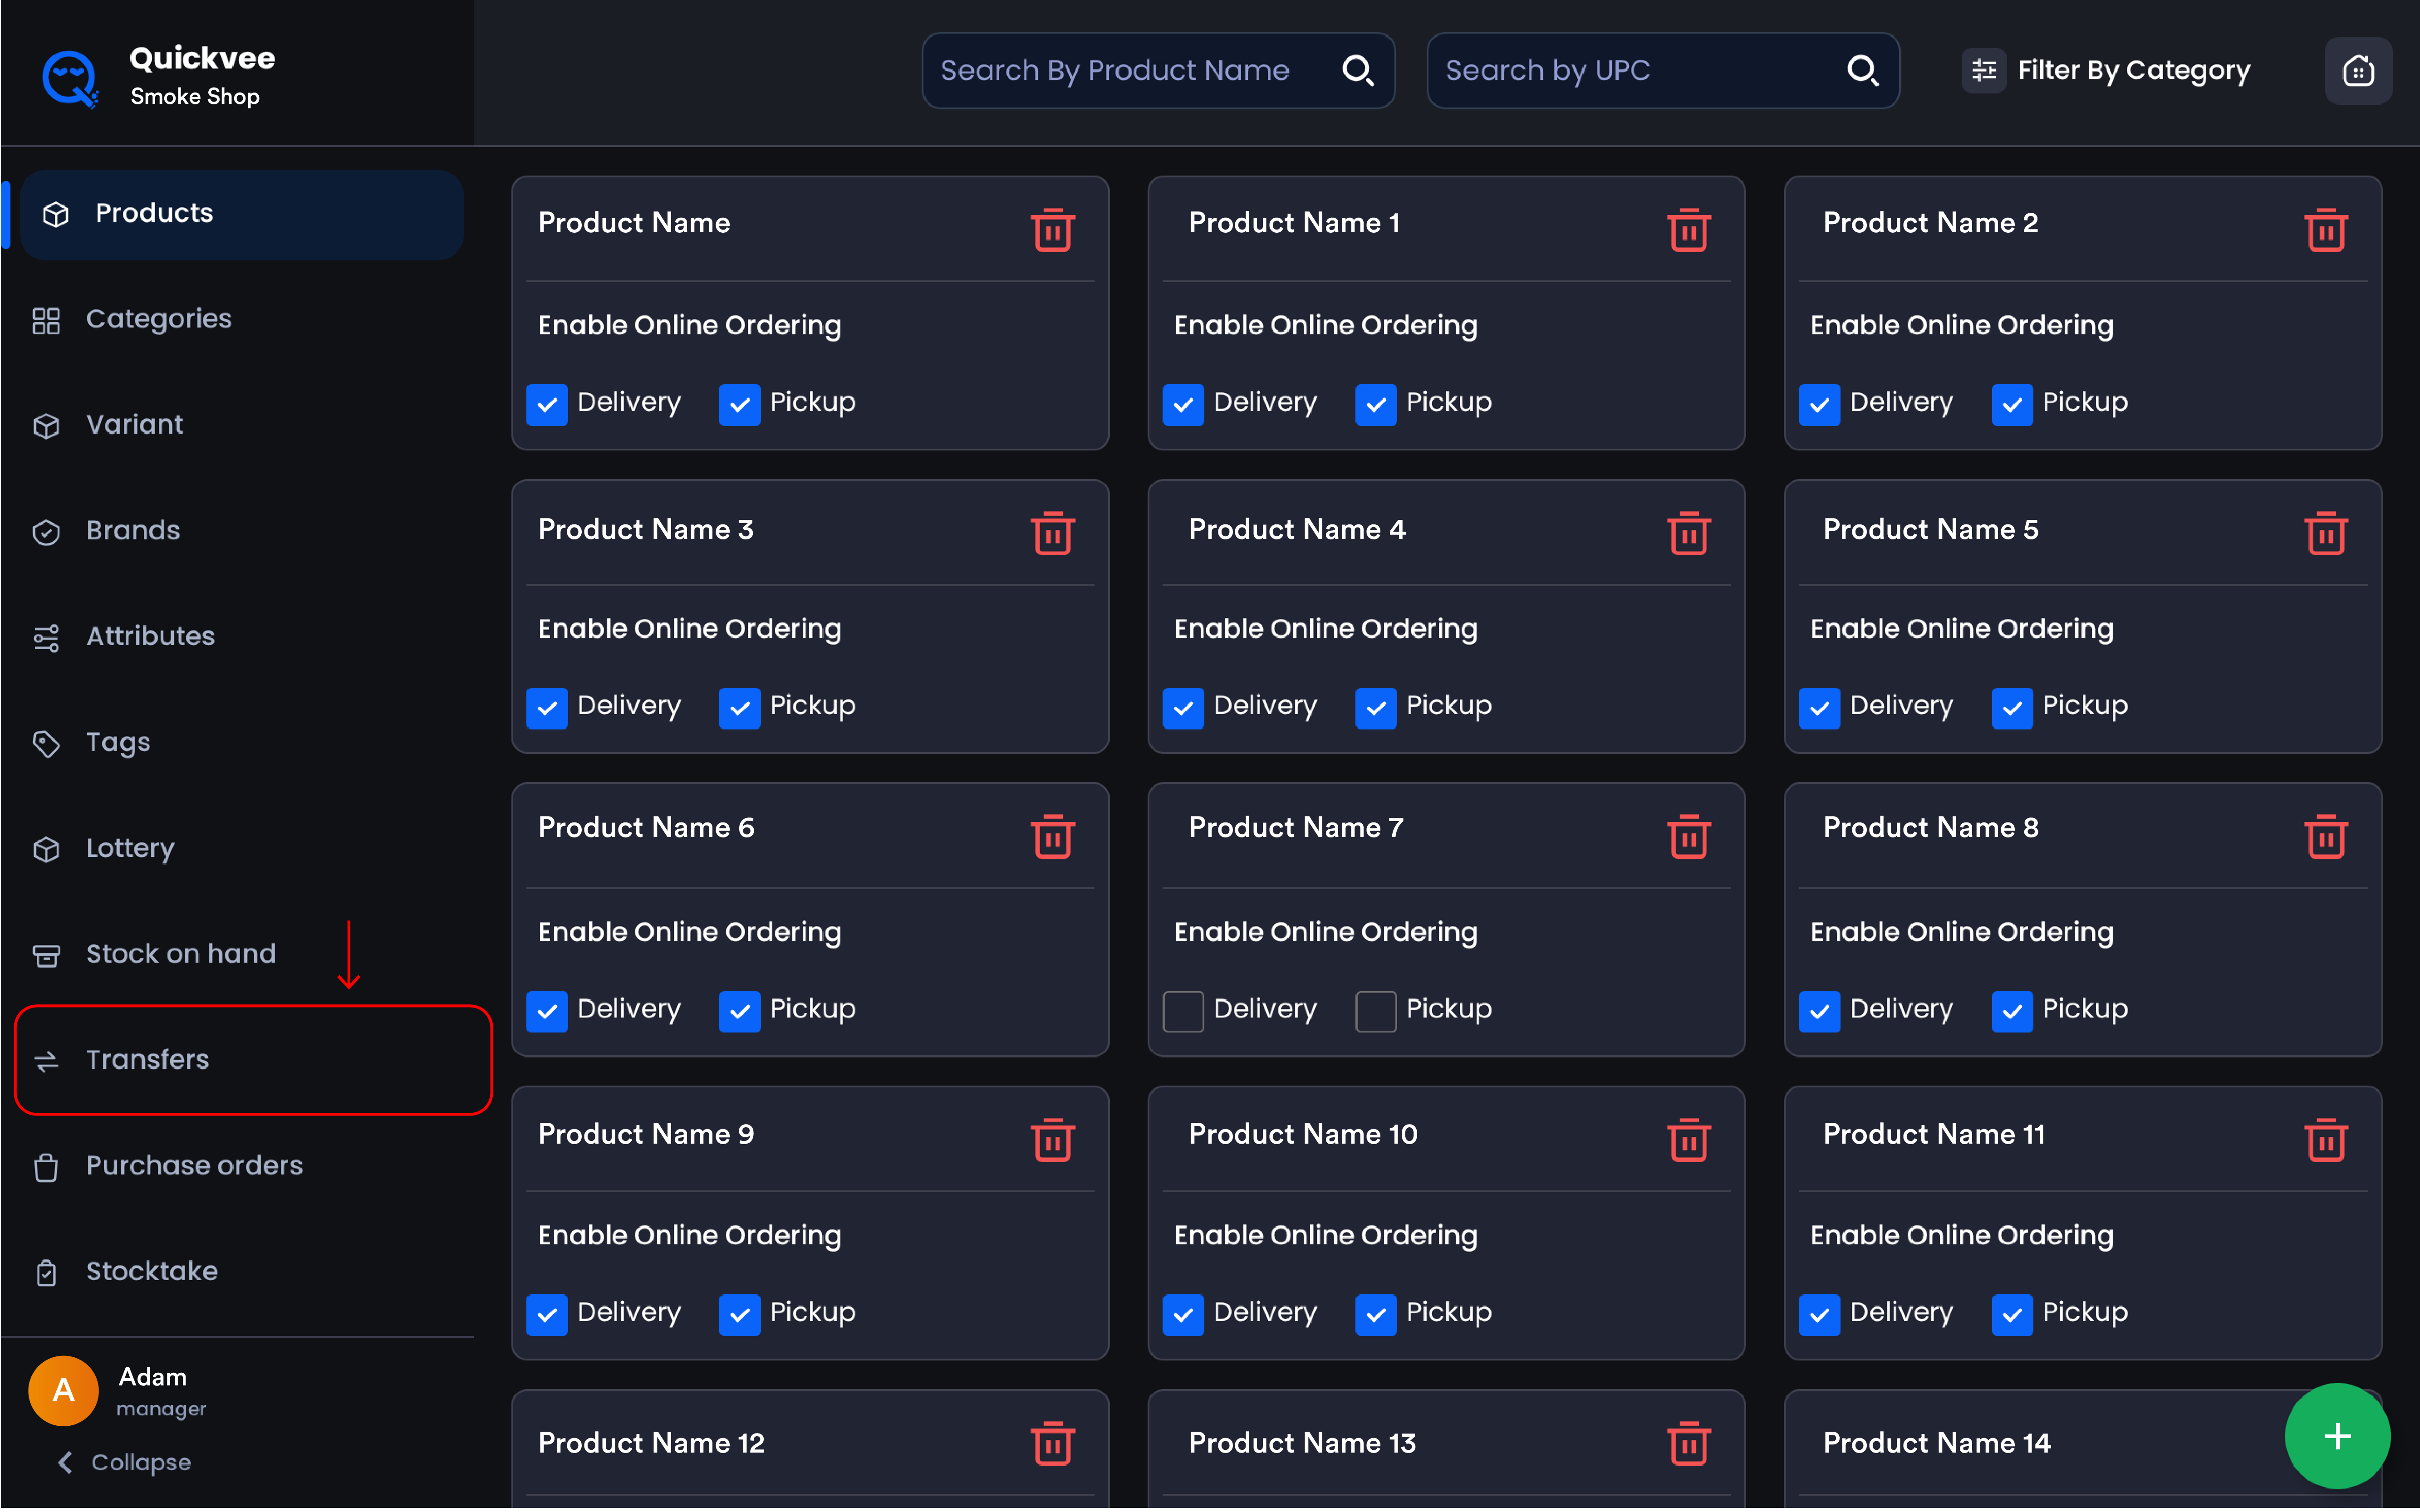
Tap Transfers in the left navigation of the POS, alongside Stock on hand and Purchase orders. The header shows your store name with a count of incoming and outgoing transfers, and two summary tiles, Incoming and Outgoing, each showing the number of transfers and the total units involved.
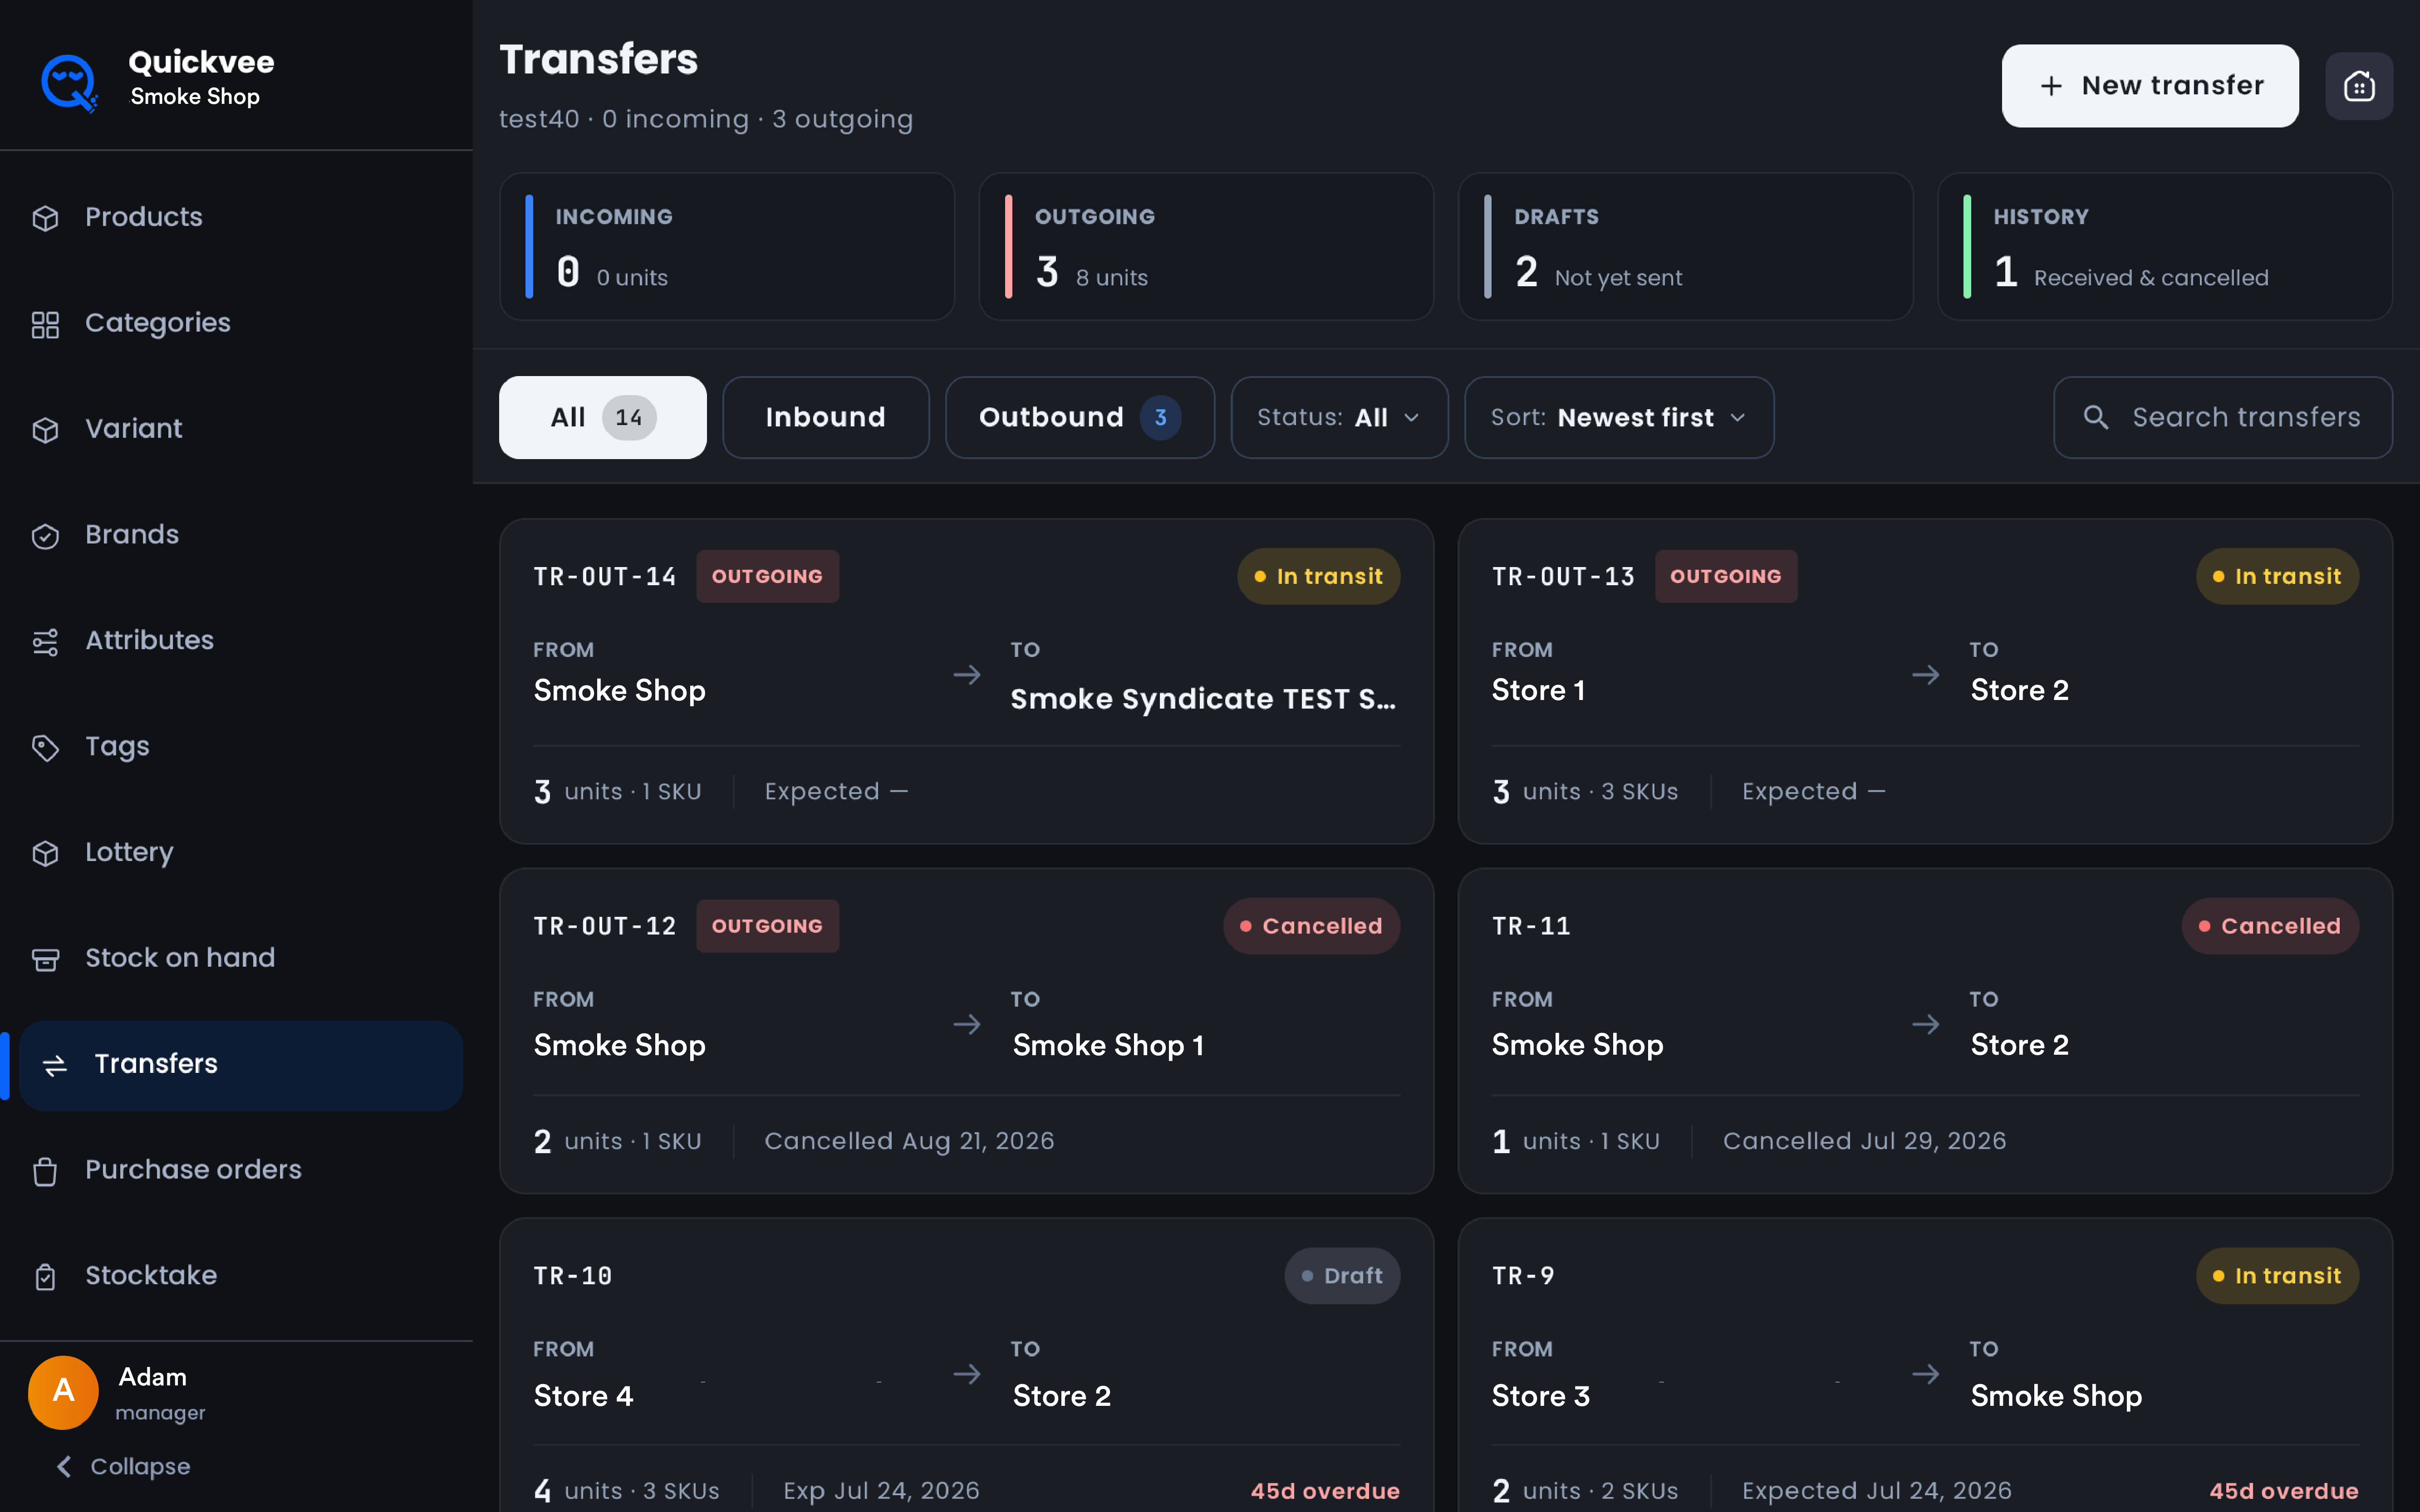
Below the tiles, filter chips narrow the list to All, Inbound, or Outbound, each with a live count. Every transfer card shows its reference (for example TR-38 or TR-OUT-68), an INCOMING or OUTGOING badge, the source and destination stores, units and SKU count, the expected arrival date, and the current status. Incoming transfers in transit show Tap to receive, and a transfer past its expected date is flagged as overdue.
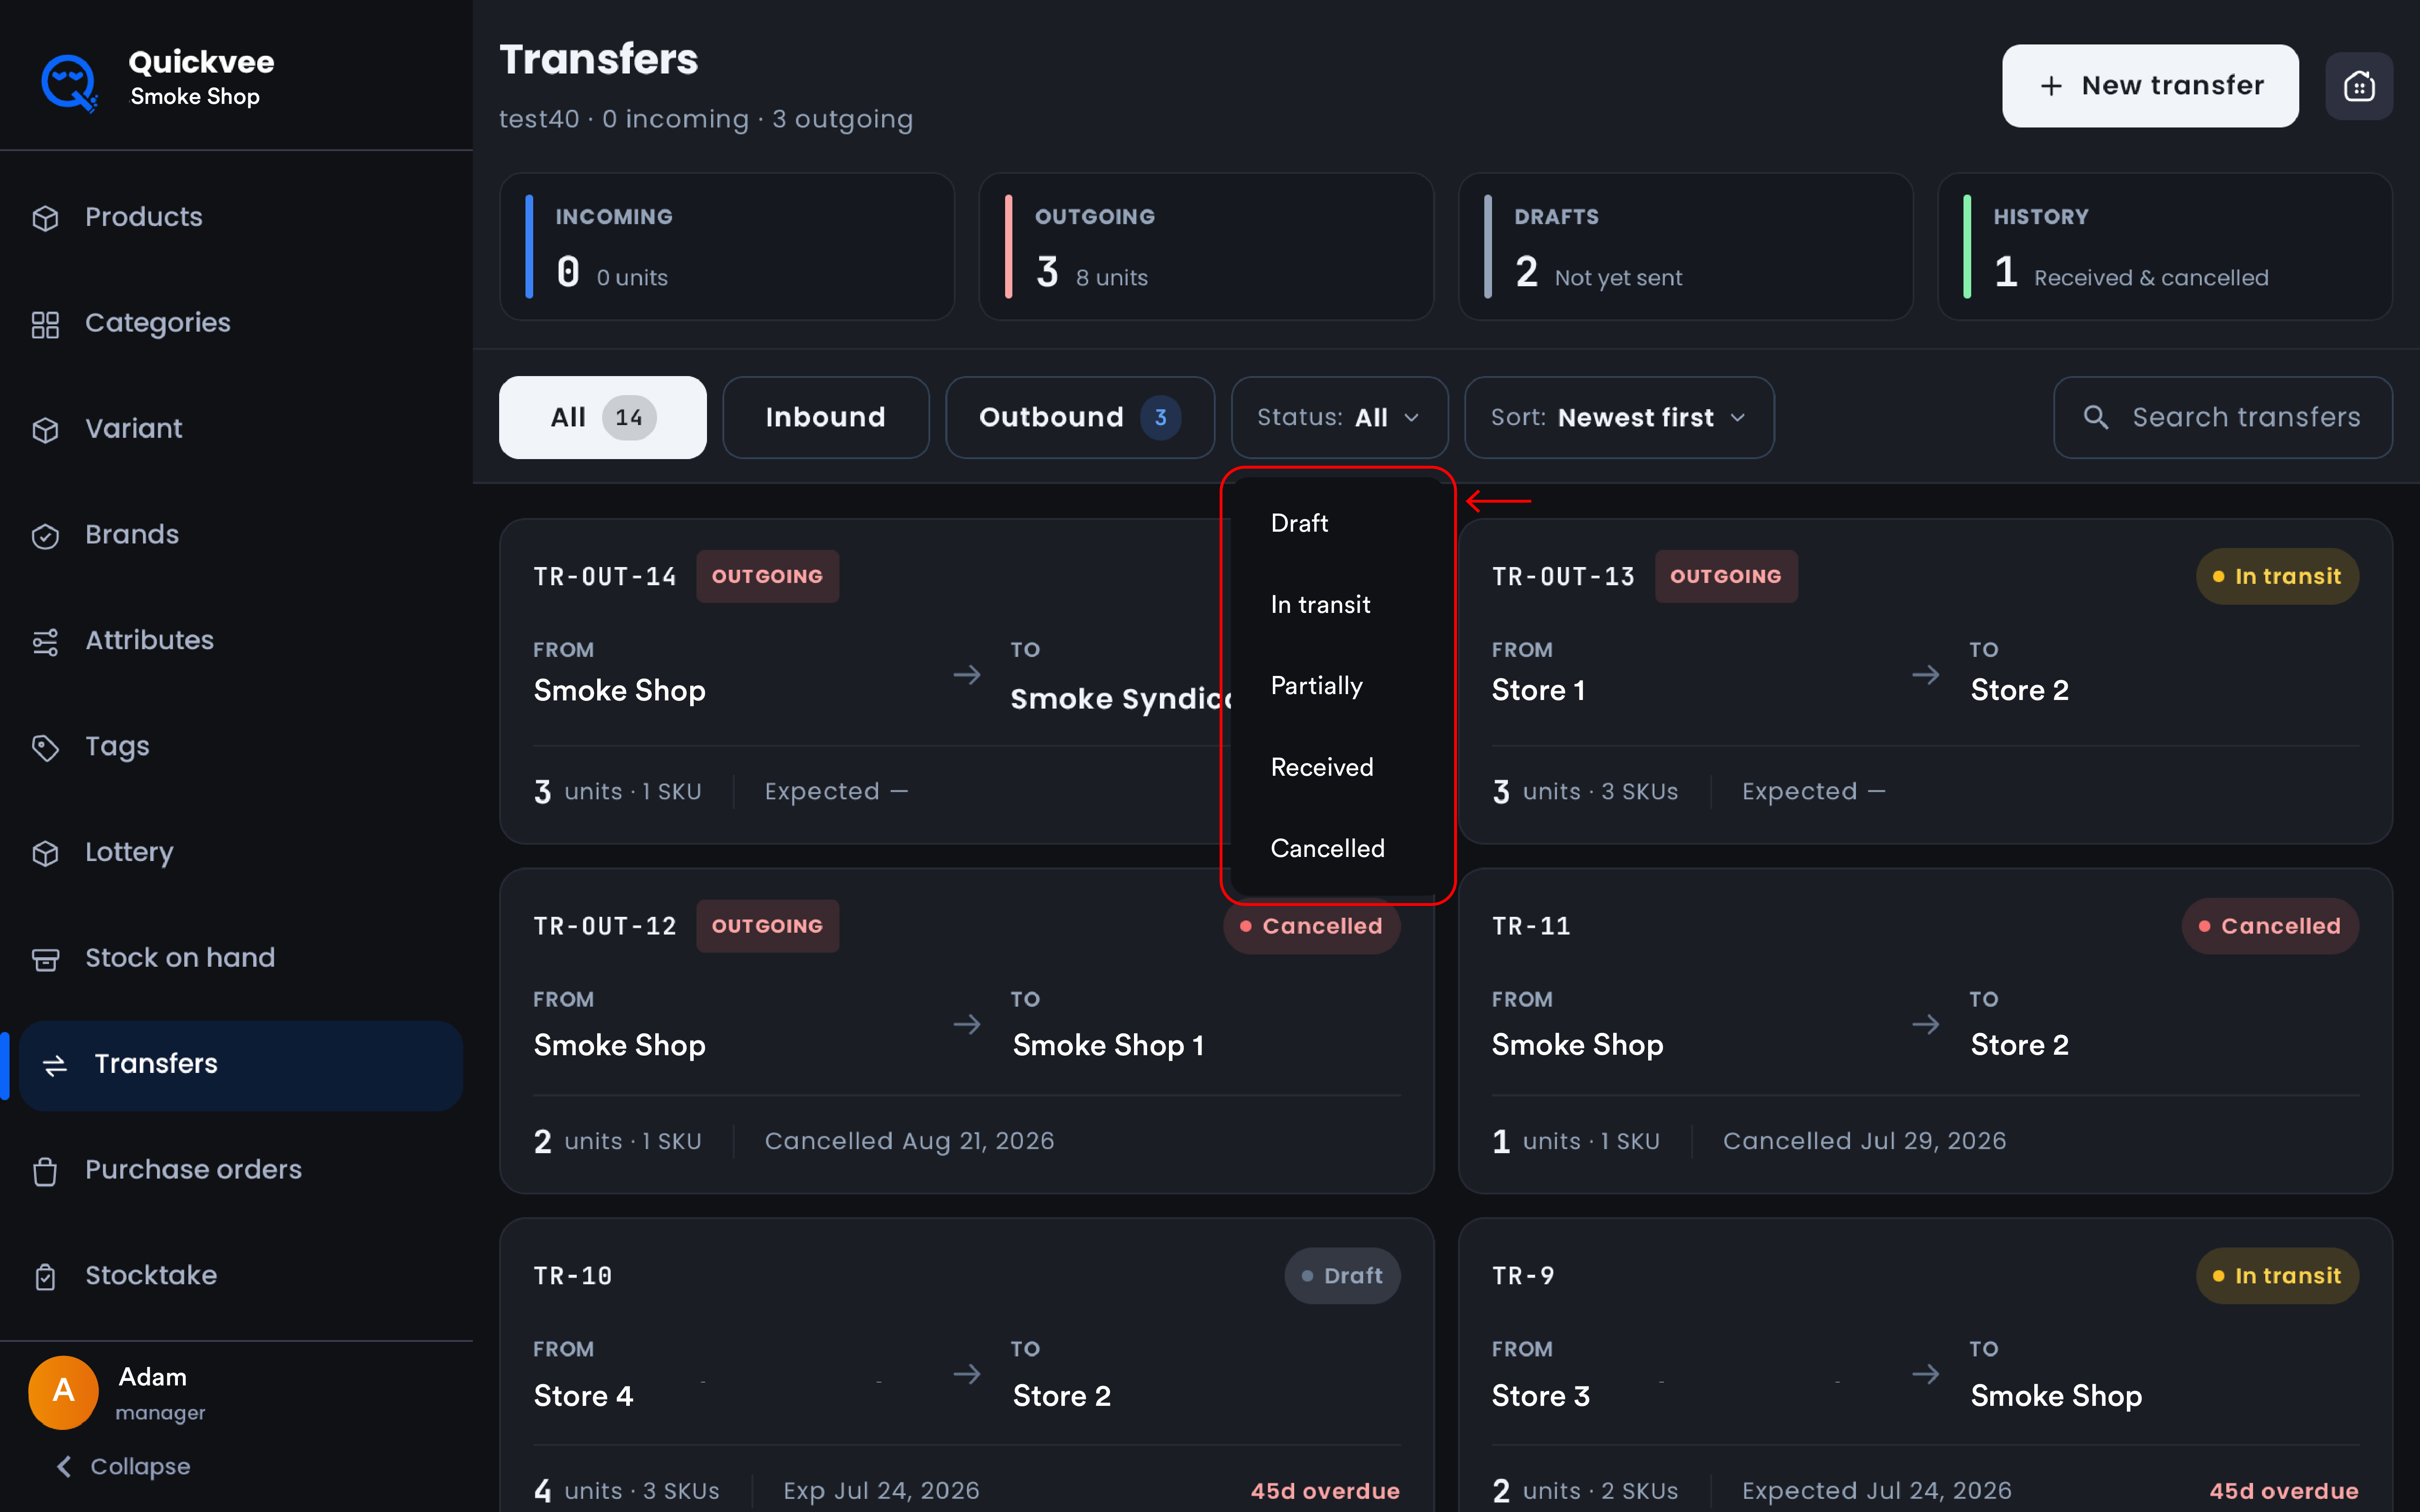
Transfer statuses
|
Status |
Meaning |
|---|---|
|
Draft |
Built but not yet sent. Stock has not moved. |
|
In transit |
Sent by the source store, awaiting receipt. Stock is already deducted from the sending store. |
|
Partially received |
Some quantity received; the remainder is still outstanding. |
|
Received |
Fully received. Stock added at the destination. |
|
Closed with shortage |
Closed with less than the sent quantity received, with a documented reason. |
|
Cancelled |
Voided before completion. |
Creating and sending a transfer
-
Tap + New transfer on the Transfers screen.
-
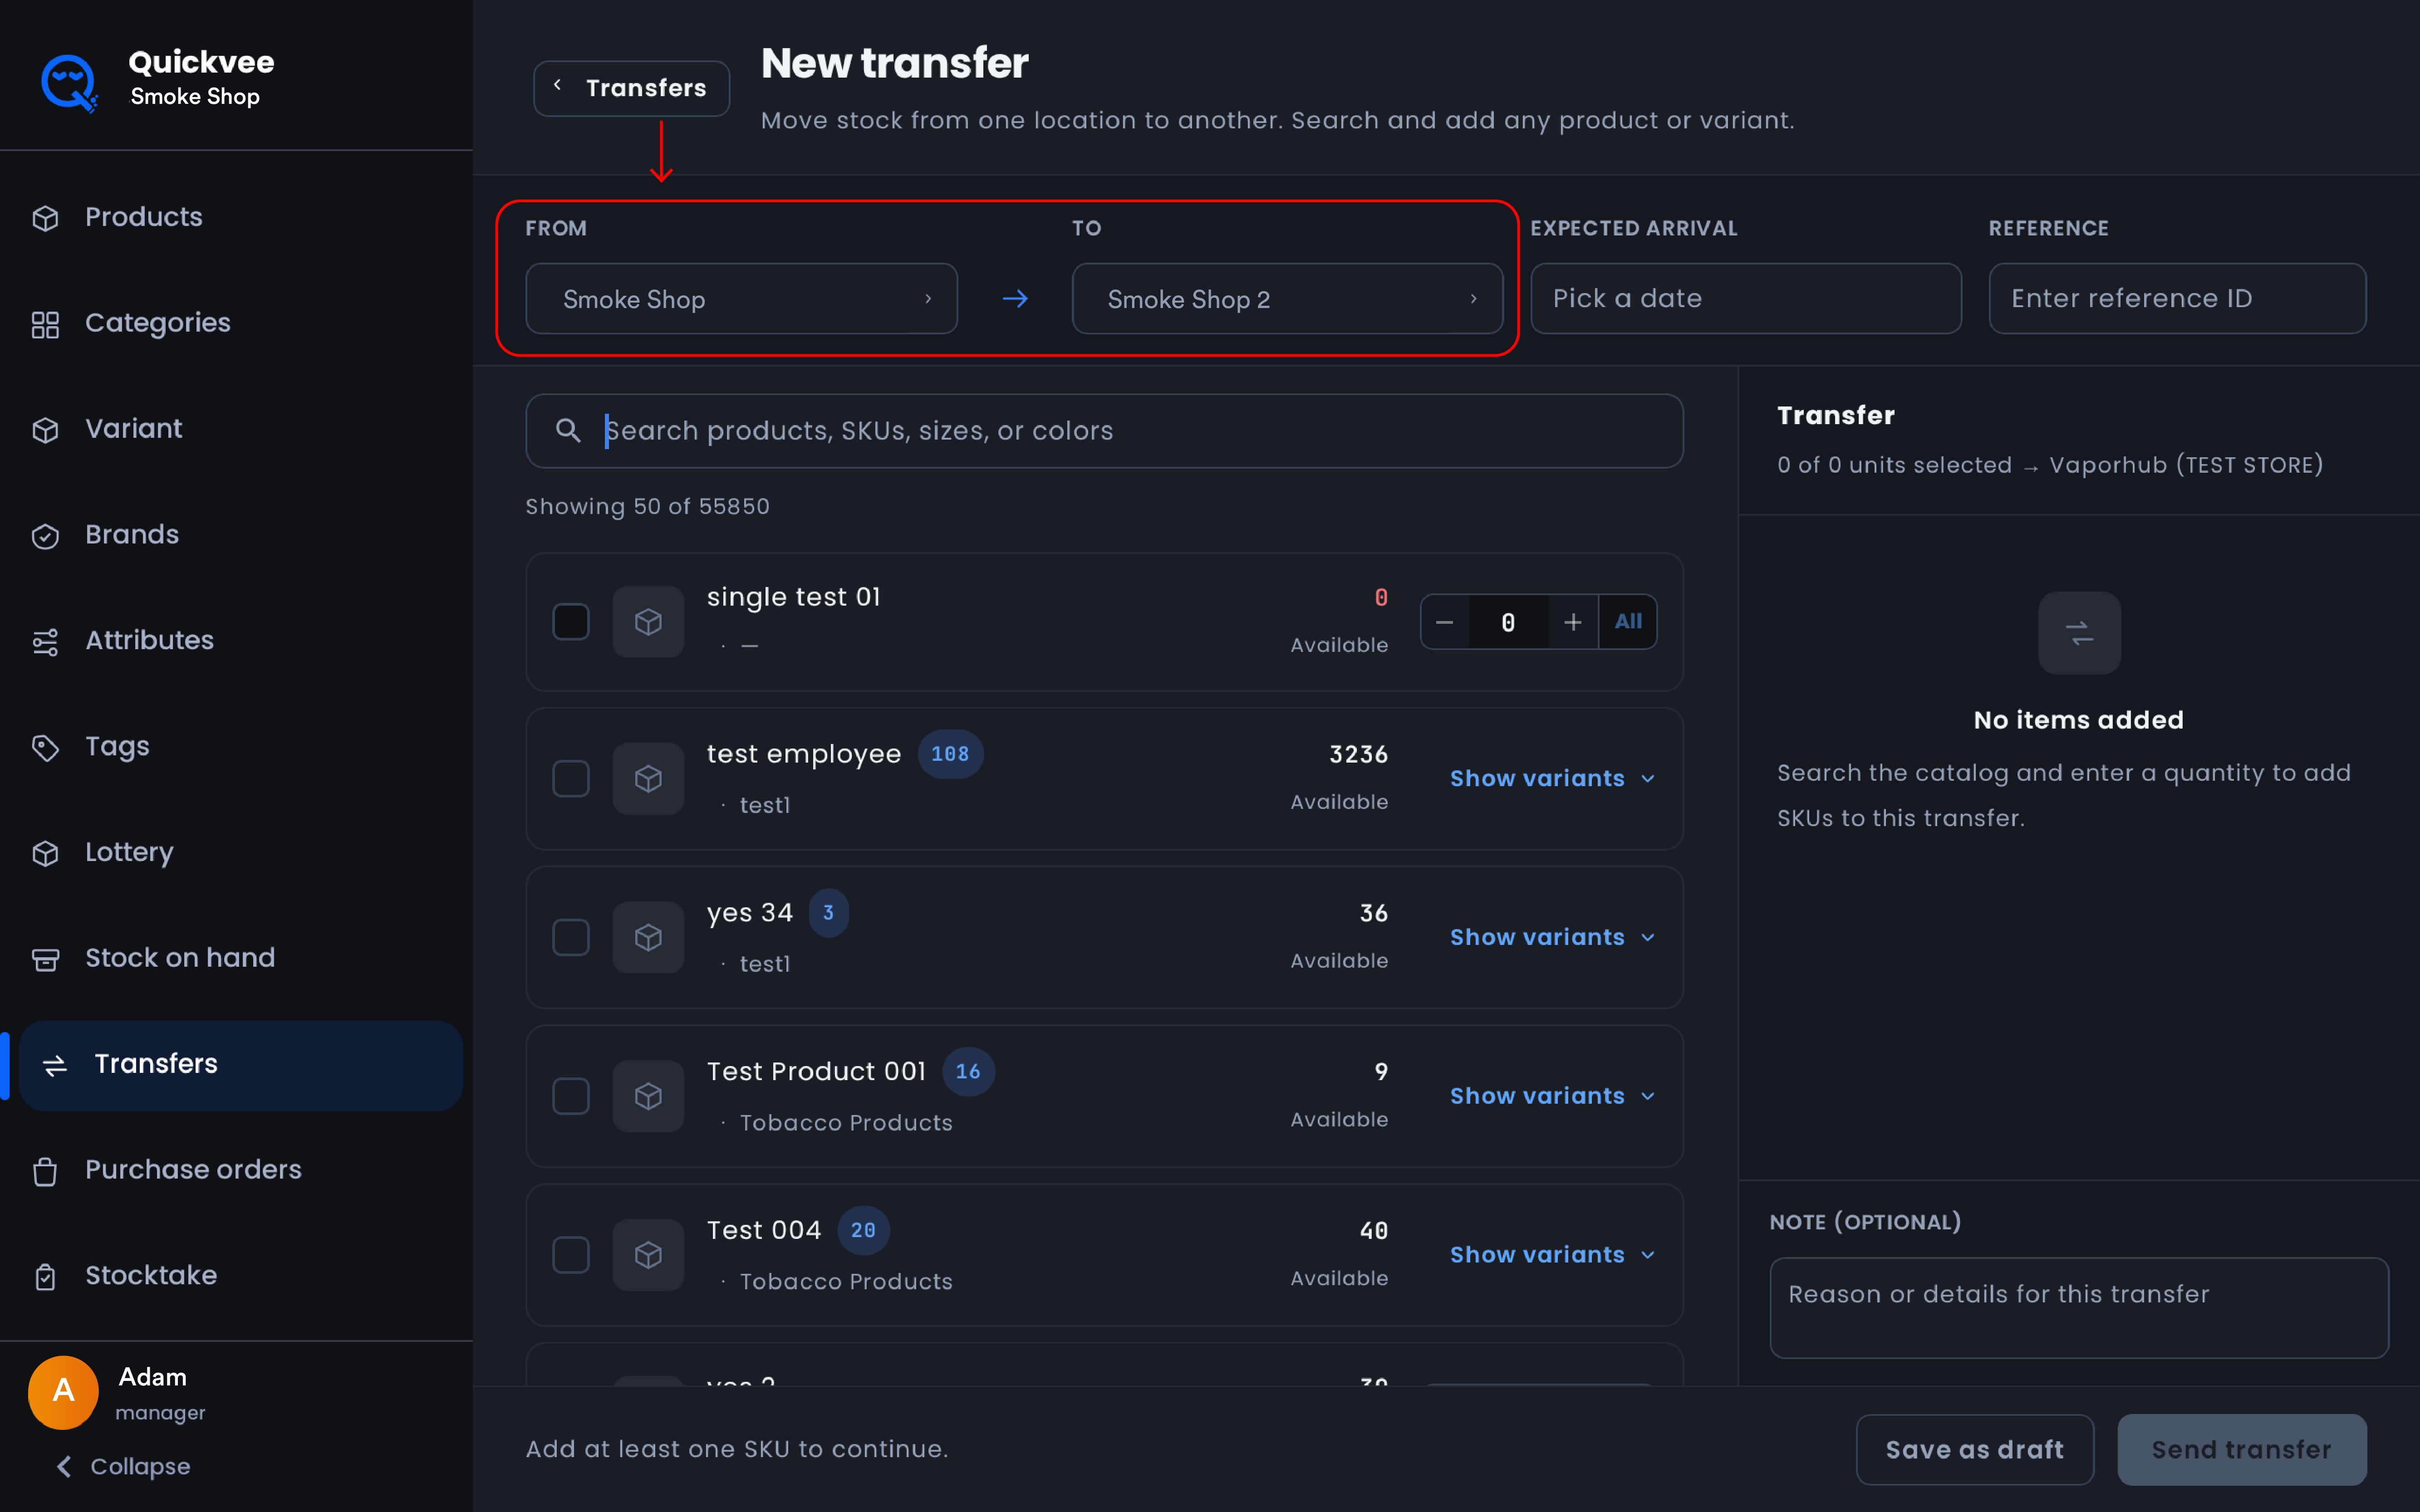
From shows your current store. Choose the destination store in To.
-
Optionally pick an Expected arrival date and enter a Reference ID of your own, a shipment or box number, for example.
-
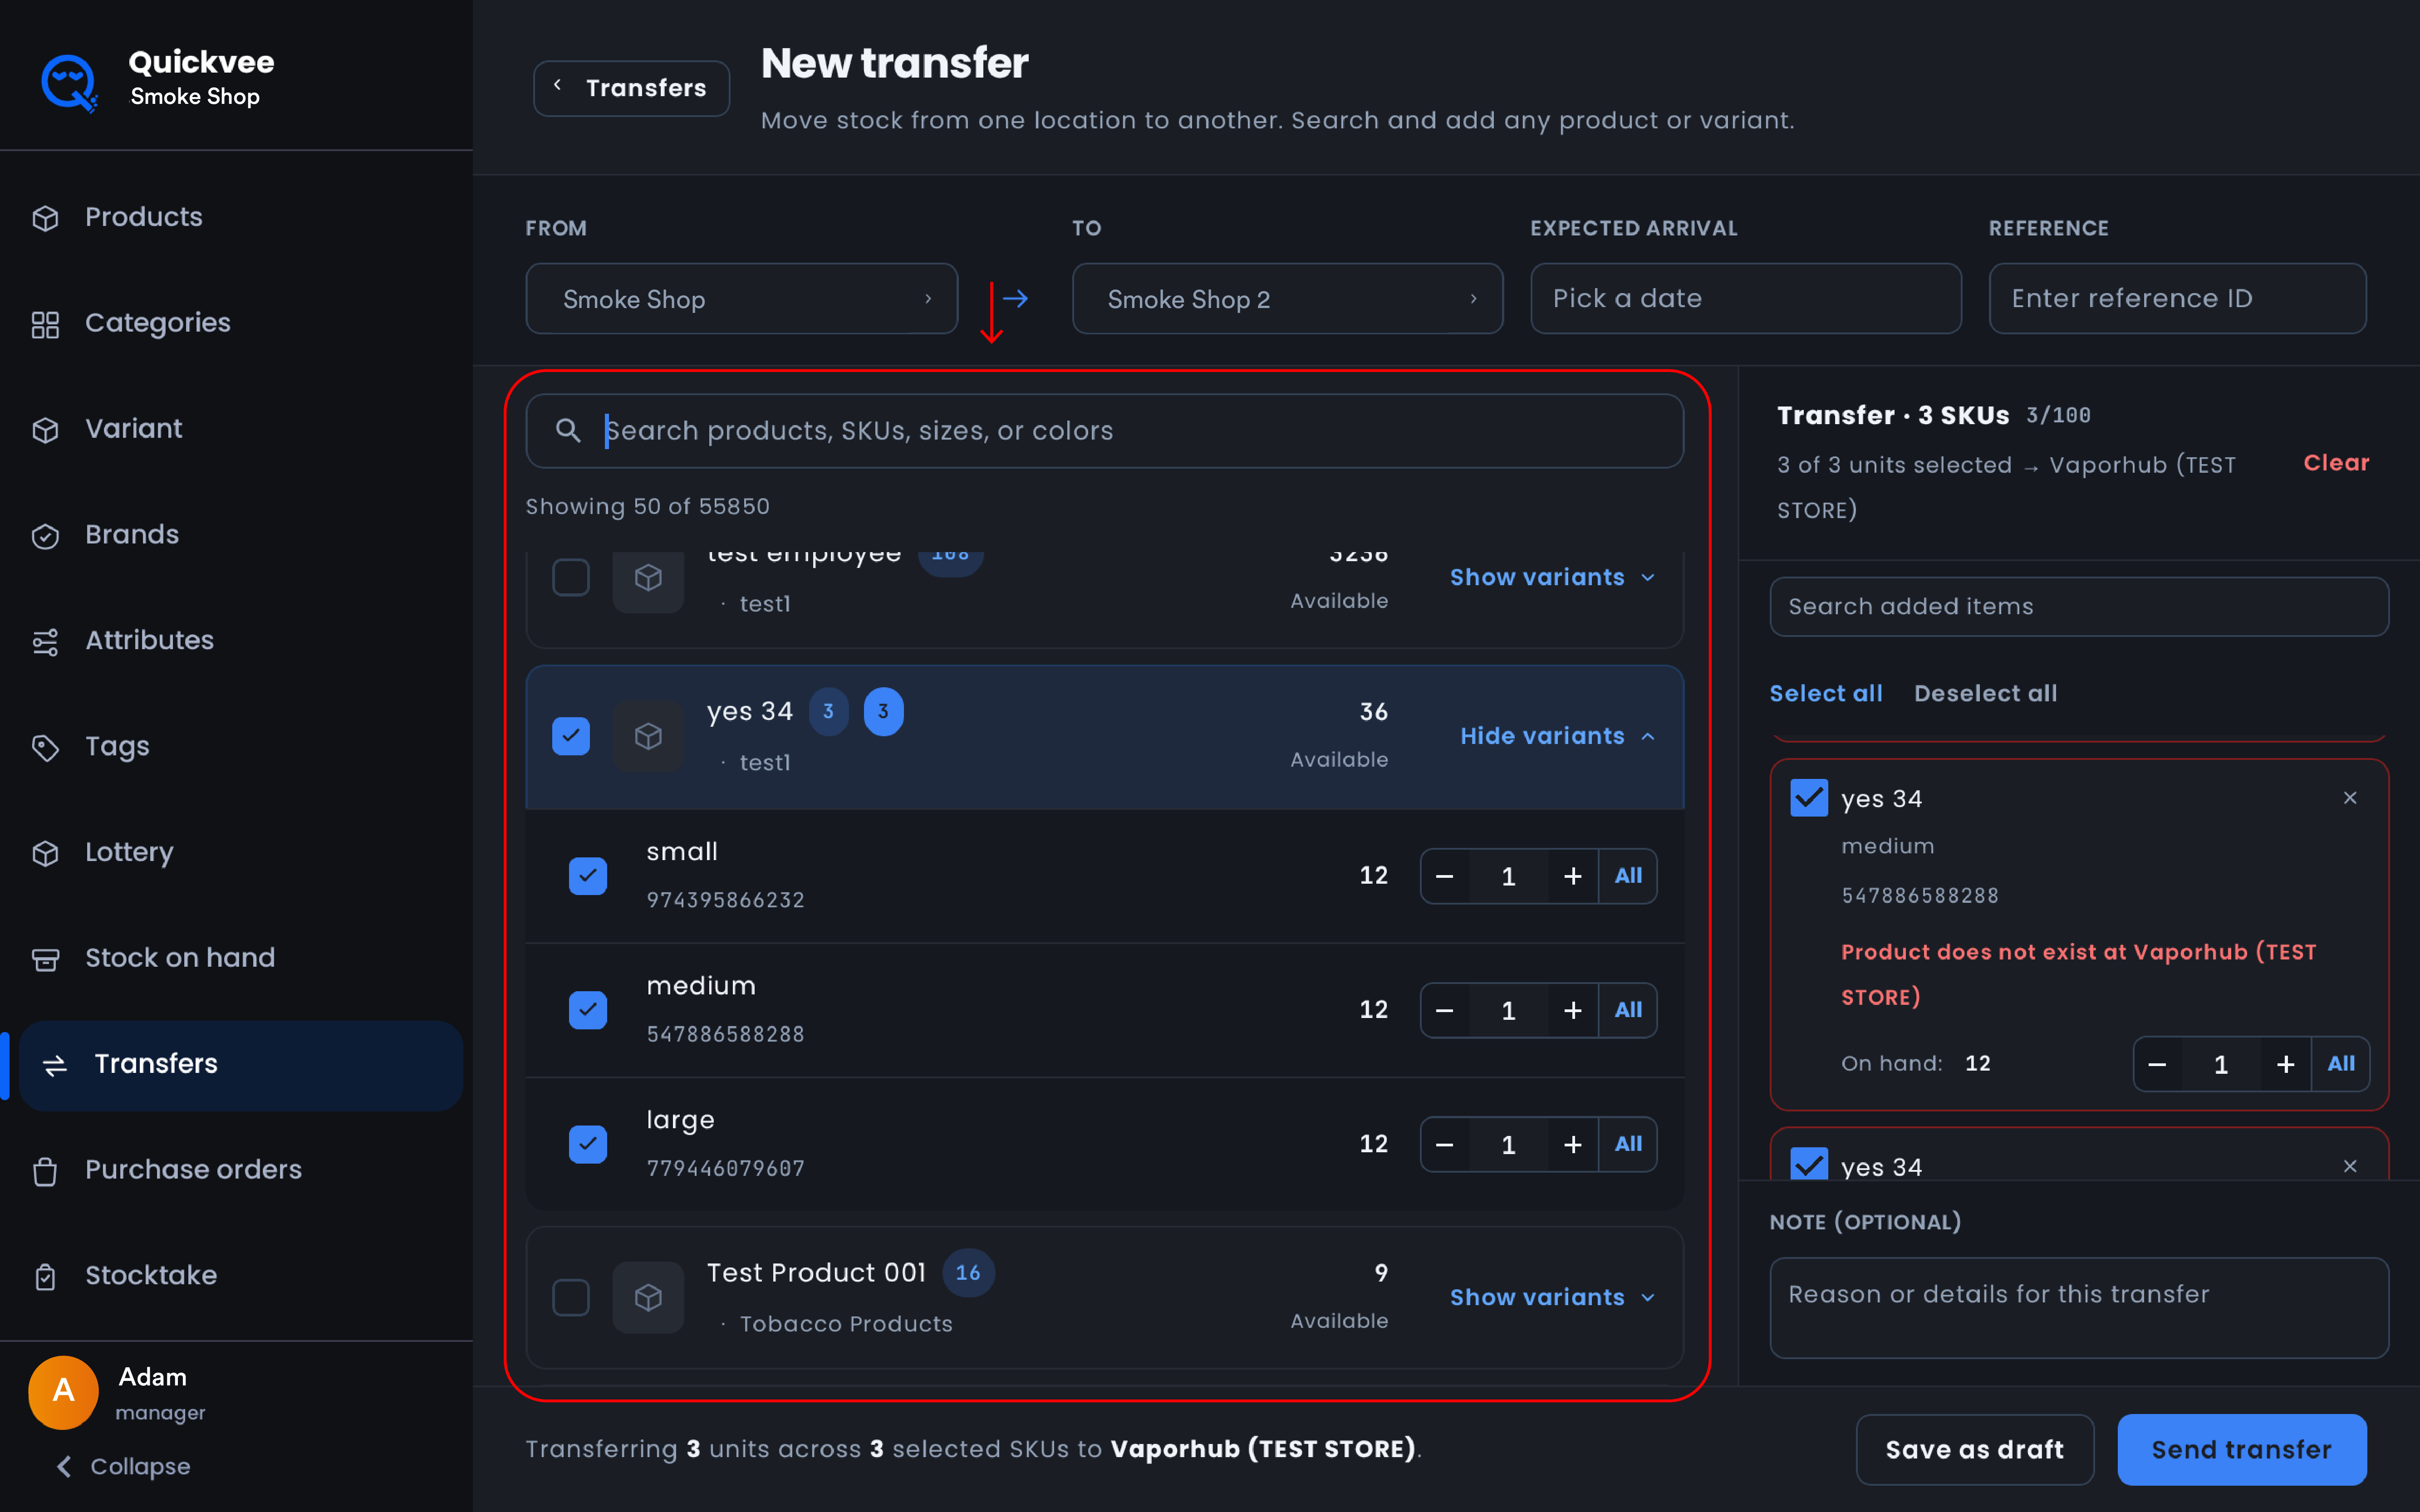
Search by product name, SKU, size, or color. Each row shows how many units are Available at your store. Tick a product and set the quantity with − / +, or tap All to send everything available. Products with variants show Show variants, expand them to pick individual variants; each variant transfers as its own line.
-
The Transfer panel on the right totals what you've added, N units across N selected SKUs → store, and lists each item with its UPC and on-hand quantity. Adjust quantities there, remove an item with ×, use Select all / Deselect all, or Clear to start over.
-
Add an optional Note with the reason or details for the transfer.
-
Tap Save as draft to finish later, or Send transfer to dispatch it.
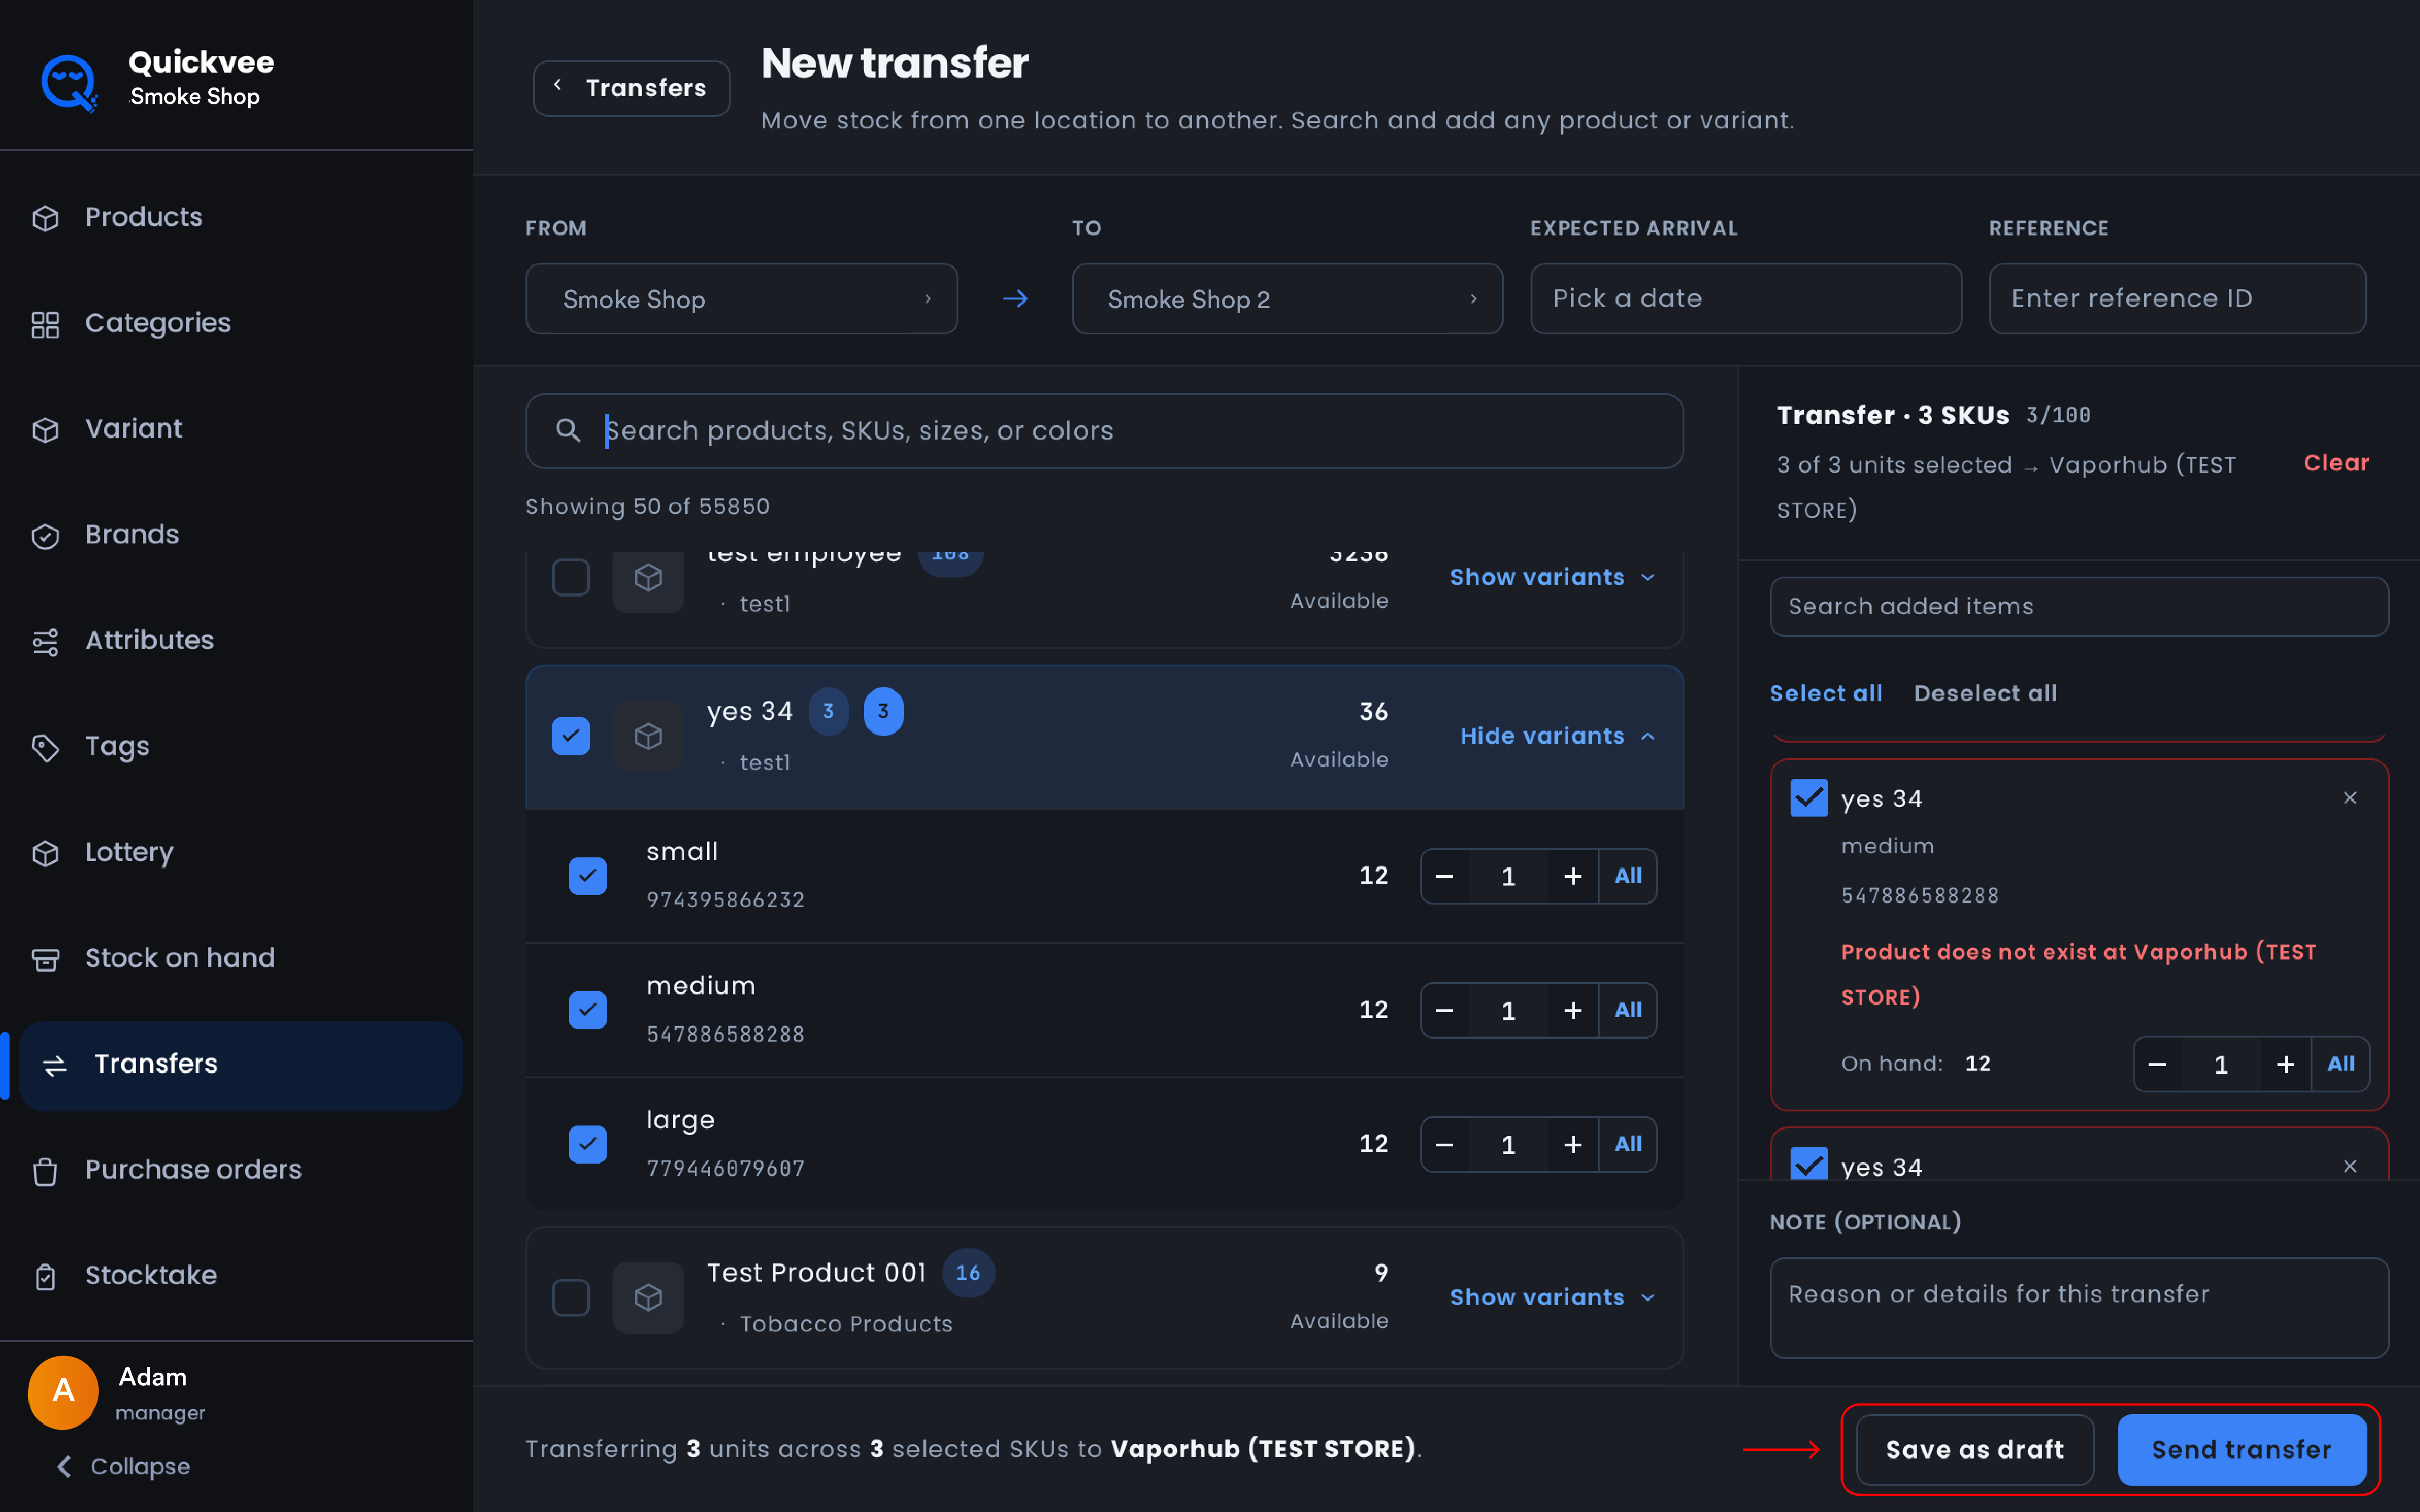
⚠️ Important. One transfer supports a maximum of 100 UPCs. The counter in the Transfer panel (for example 2/100) shows how many you've used. The limit counts UPCs, not parent products, a product with many variants uses one slot per variant.
⚠️ Important. Items with 0 available can't be transferred. Their quantity controls are disabled, and the Transfer panel warns you before sending, for example 4 of 4 selected items can't be transferred (0 available). The quantity you can send is capped at the units Available at your store.
📝 Note. A product the destination store doesn't carry yet is flagged in the Transfer panel, Product does not exist at [store]. You can still send it. The product is created at the destination, matched by UPC along with its variants, when the transfer is sent.
💡 Best practice. Add a note to every transfer. When the receiving store finds a discrepancy days later, the sender's note is the fastest way to reconstruct what was supposed to be in the box.
What happens when you send
-
Stock is deducted from the sending store the moment the transfer is sent.
-
The transfer appears as Incoming in the destination store's Transfers list, in transit and awaiting receipt.
-
Products that don't exist at the destination are created there, matched by UPC including variants, so the receiving store can stock and sell them immediately.
Starting a transfer from Stock on Hand
You can also start a transfer from Stock on hand. In card view, tick the products you want to move (or use Select all) and tap Transfer in the action bar. The New transfer screen opens with your selection already added, choose the destination, set quantities, and send as usual.
💡 Tip. This is the quickest route when you're already looking at what's overstocked. Filter Stock on hand by category or vendor, select the items, and tap Transfer.
Viewing a transfer
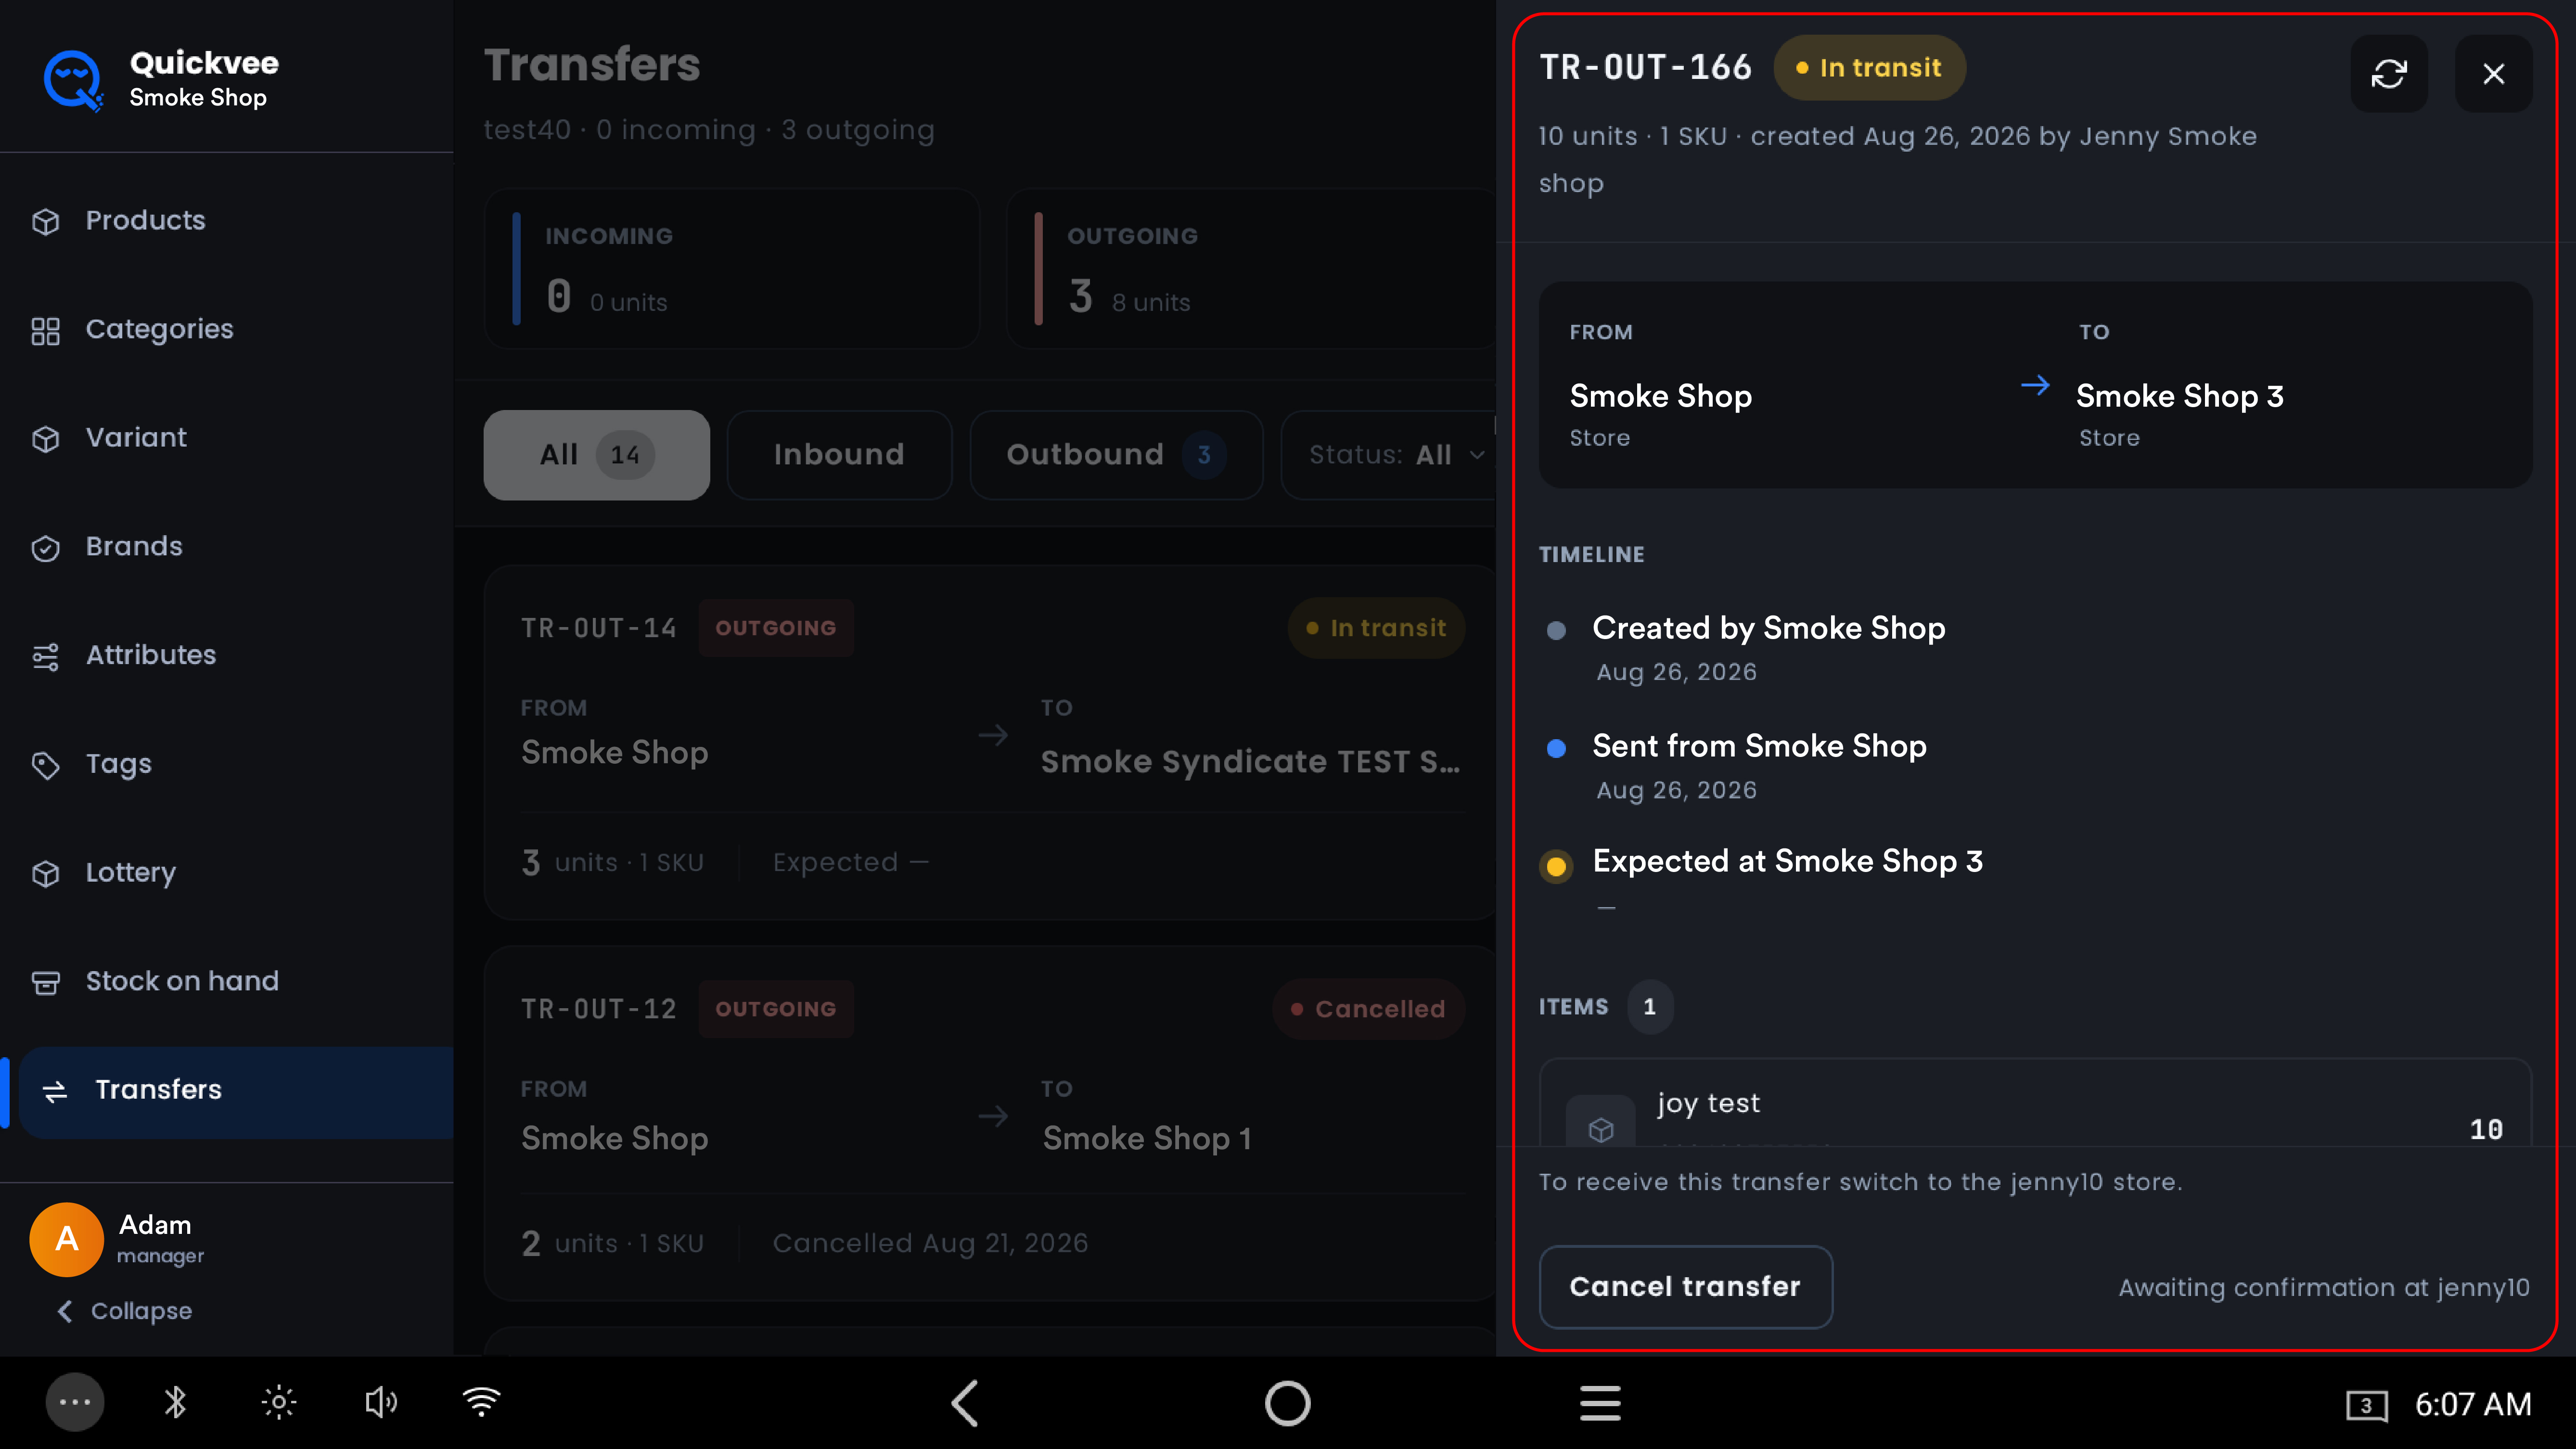
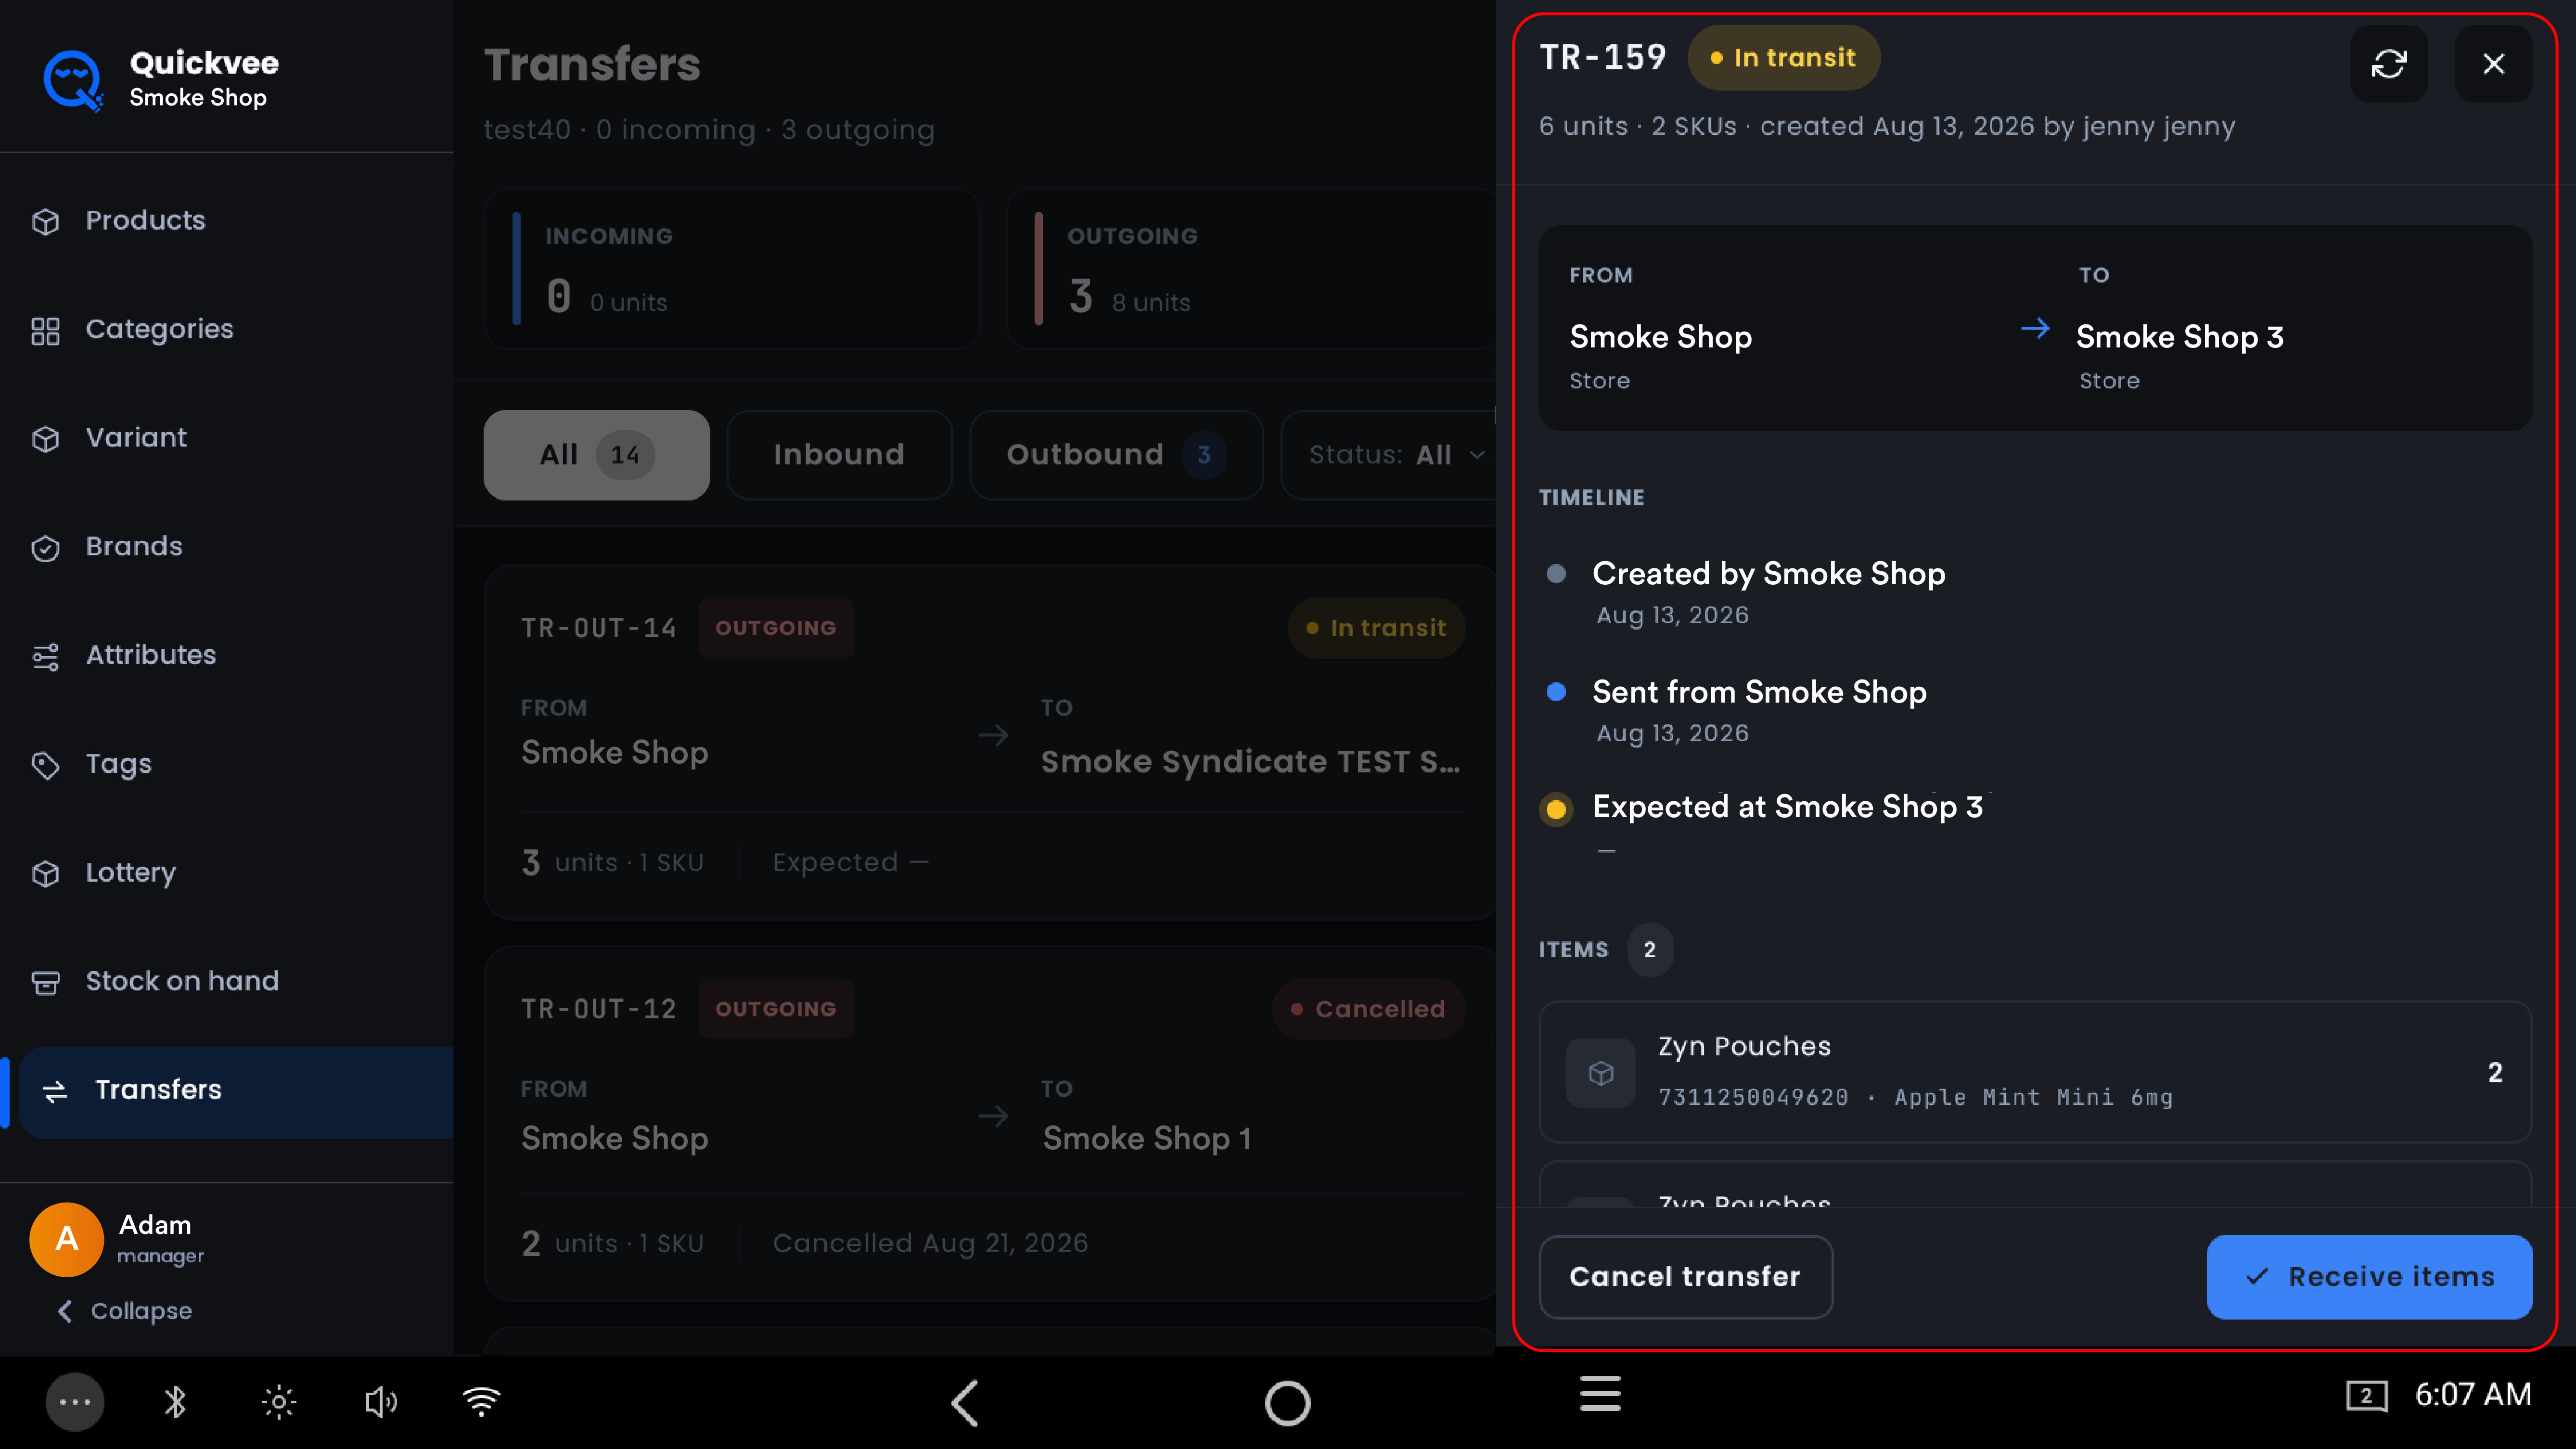
Tap any transfer card to open its details in a side panel:
-
Reference and status, with units, SKU count, and who created the transfer and when.
-
From and To stores.
-
Timeline, when the transfer was created, when it was sent, and when it is expected at the destination.
-
Items, each product with its UPC and the quantity sent.
Incoming transfers offer Receive items. Outgoing transfers show Awaiting confirmation at [store] until the destination receives them. The refresh icon at the top of the panel reloads the transfer's latest state.
Receiving a transfer
At the destination store, open the incoming transfer (or tap Tap to receive on its card) and tap Receive items.
-
For each line, enter the quantity that physically arrived under Receive now using − / +. The After column shows received / sent for that line, for example 1 / 1.
-
Tap Receive all remaining to fill every line with its outstanding quantity, or Clear all to reset your entries.
-
Add an optional Note, for example 2 boxes received, 1 box damaged in transit.
-
Tap Receive N, the button shows the total units you're receiving, to confirm.
Stock is added at your store for the quantities you receive. Anything left over stays open on the transfer until it is received or closed out.
⚠️ Important. Only the actually received quantity is added to stock. If less arrived than was sent, receive what you have, the remainder stays outstanding and can be received later when it lands. Each receipt keeps its own note, building a running history on the transfer rather than overwriting the previous one.
📝 Note. Closing a transfer with a shortage, recording that the outstanding units will never arrive, is done from the web backend under Inventory → Transfers. It requires a note, and the shortage reason becomes part of the permanent transfer record.
Cancelling a transfer
Open the transfer and tap Cancel transfer, then Confirm in the dialog. The dialog warns that the action cannot be undone and will void the transfer.
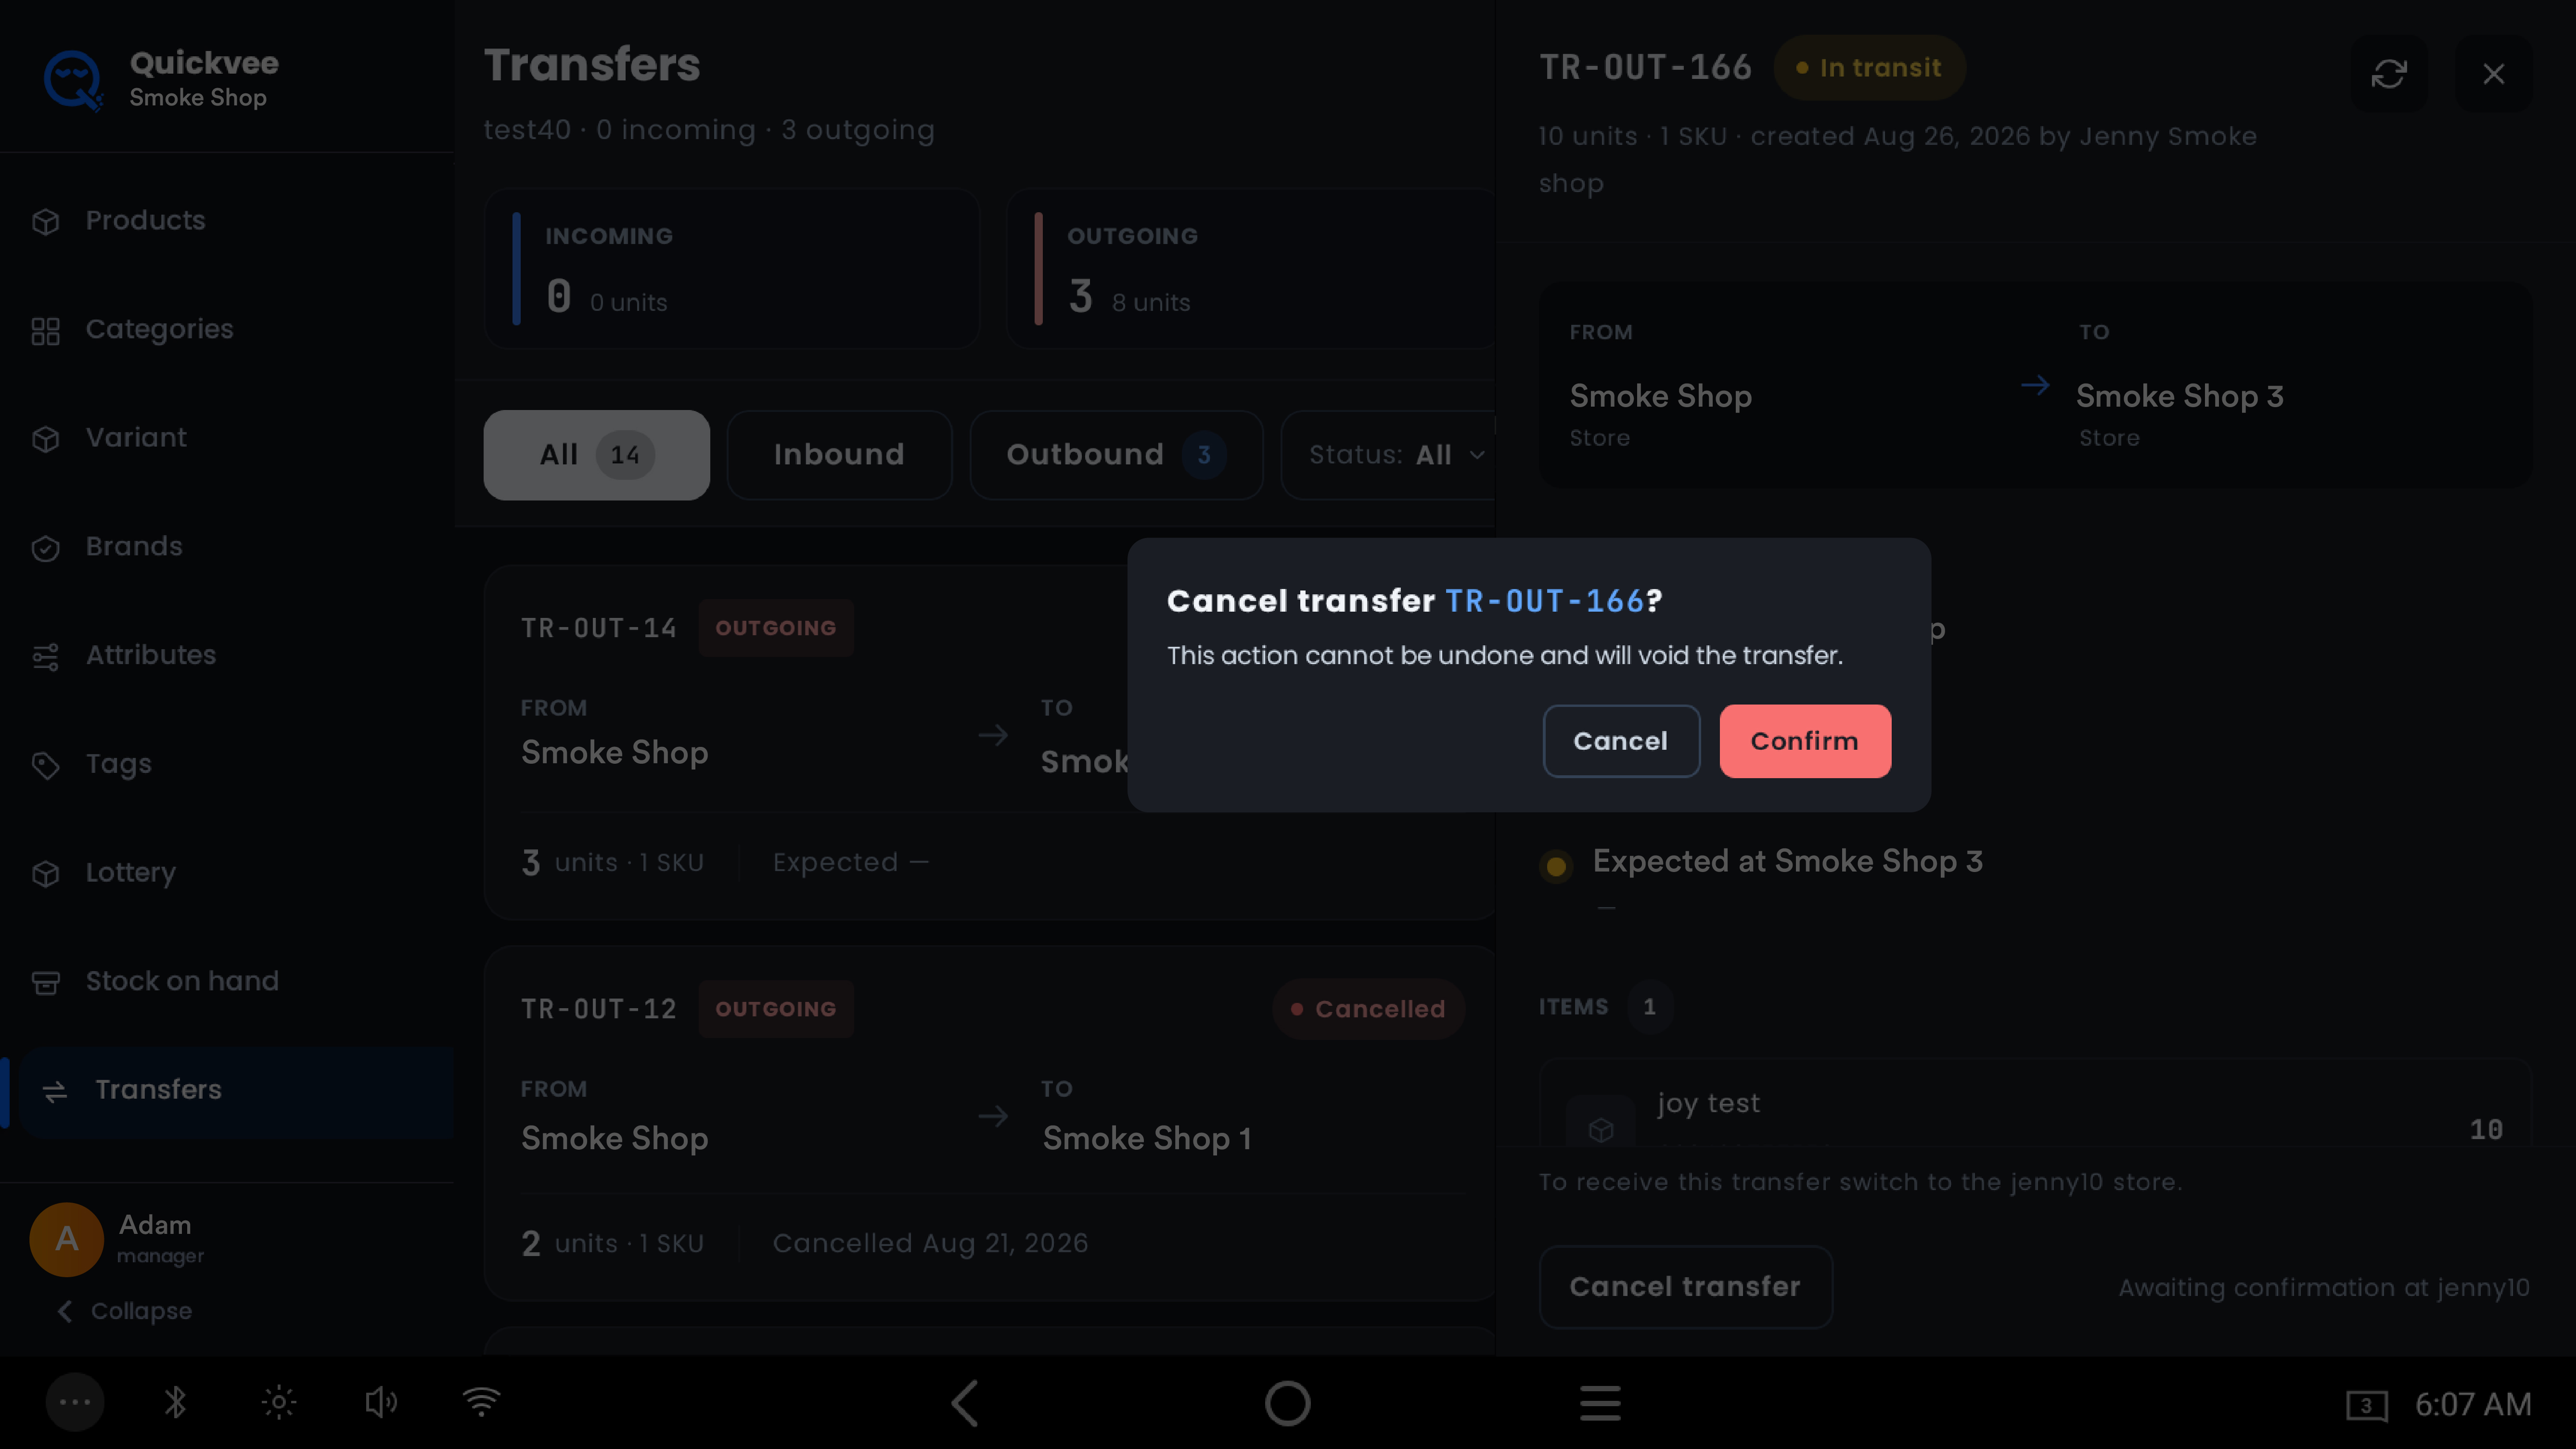
⚠️ Important. Cancelling is permanent. A cancelled transfer cannot be reopened, if the stock still needs to move, create a new transfer.
Effect on inventory and reporting
-
Inventory decreases at the source when the transfer is sent, and increases at the destination when it is received.
-
Only the actually received quantity is added to destination stock, partial receipts and shortages never add more than arrived.
-
Received transfers appear in the destination store's Instant PO Activity Report at the product's cost price, so transferred stock is valued consistently with purchased stock.
-
Transferred products become sellable at the destination on the POS, and on the Online Store where the product is set to be visible.
Frequently asked questions
Can I create and receive transfers on the POS?
Yes. The full send-and-receive workflow is available on both the POS and the web backend, and transfers are shared between them, a transfer created on one can be viewed and received on the other.
Why can't I add a product to the transfer?
It has 0 units available at your store. Only available units can be transferred, units allocated to orders don't count.
Why does the Transfer panel say "Product does not exist at" the destination?
The destination store doesn't carry that product yet. You can still send it, the product is created there automatically, matched by UPC, when the transfer is sent.
I sent a transfer, why can't I receive it on this POS?
Transfers are received at the destination store. Switch the POS to the destination store, open the transfer, and tap Receive items.
Can I edit a transfer after sending it?
No. Once sent, stock has already left your store. Edit while it is still a Draft, or cancel it and create a new one.
What if only part of the shipment arrived?
Receive the quantity that arrived. The remainder stays open on the transfer and can be received when it lands, or closed with a shortage from the web backend.
Can I undo a cancelled transfer?
No. Cancelling voids the transfer permanently.