
The Purchase Orders page in the POS app's Inventory section runs your entire restocking workflow from the tablet — build the order, send it, receive the stock, and watch your inventory update, all in one place. The page opens with a live dashboard of your purchasing position, and every PO moves through a clear lifecycle from draft → active → partial → received.
⚠️ Important. Received stock is added to your inventory the moment you confirm a receipt. Check the quantities in the receive dialog before you tap Receive units, and use the receive note for anything that wasn't a clean delivery.
Where to find it
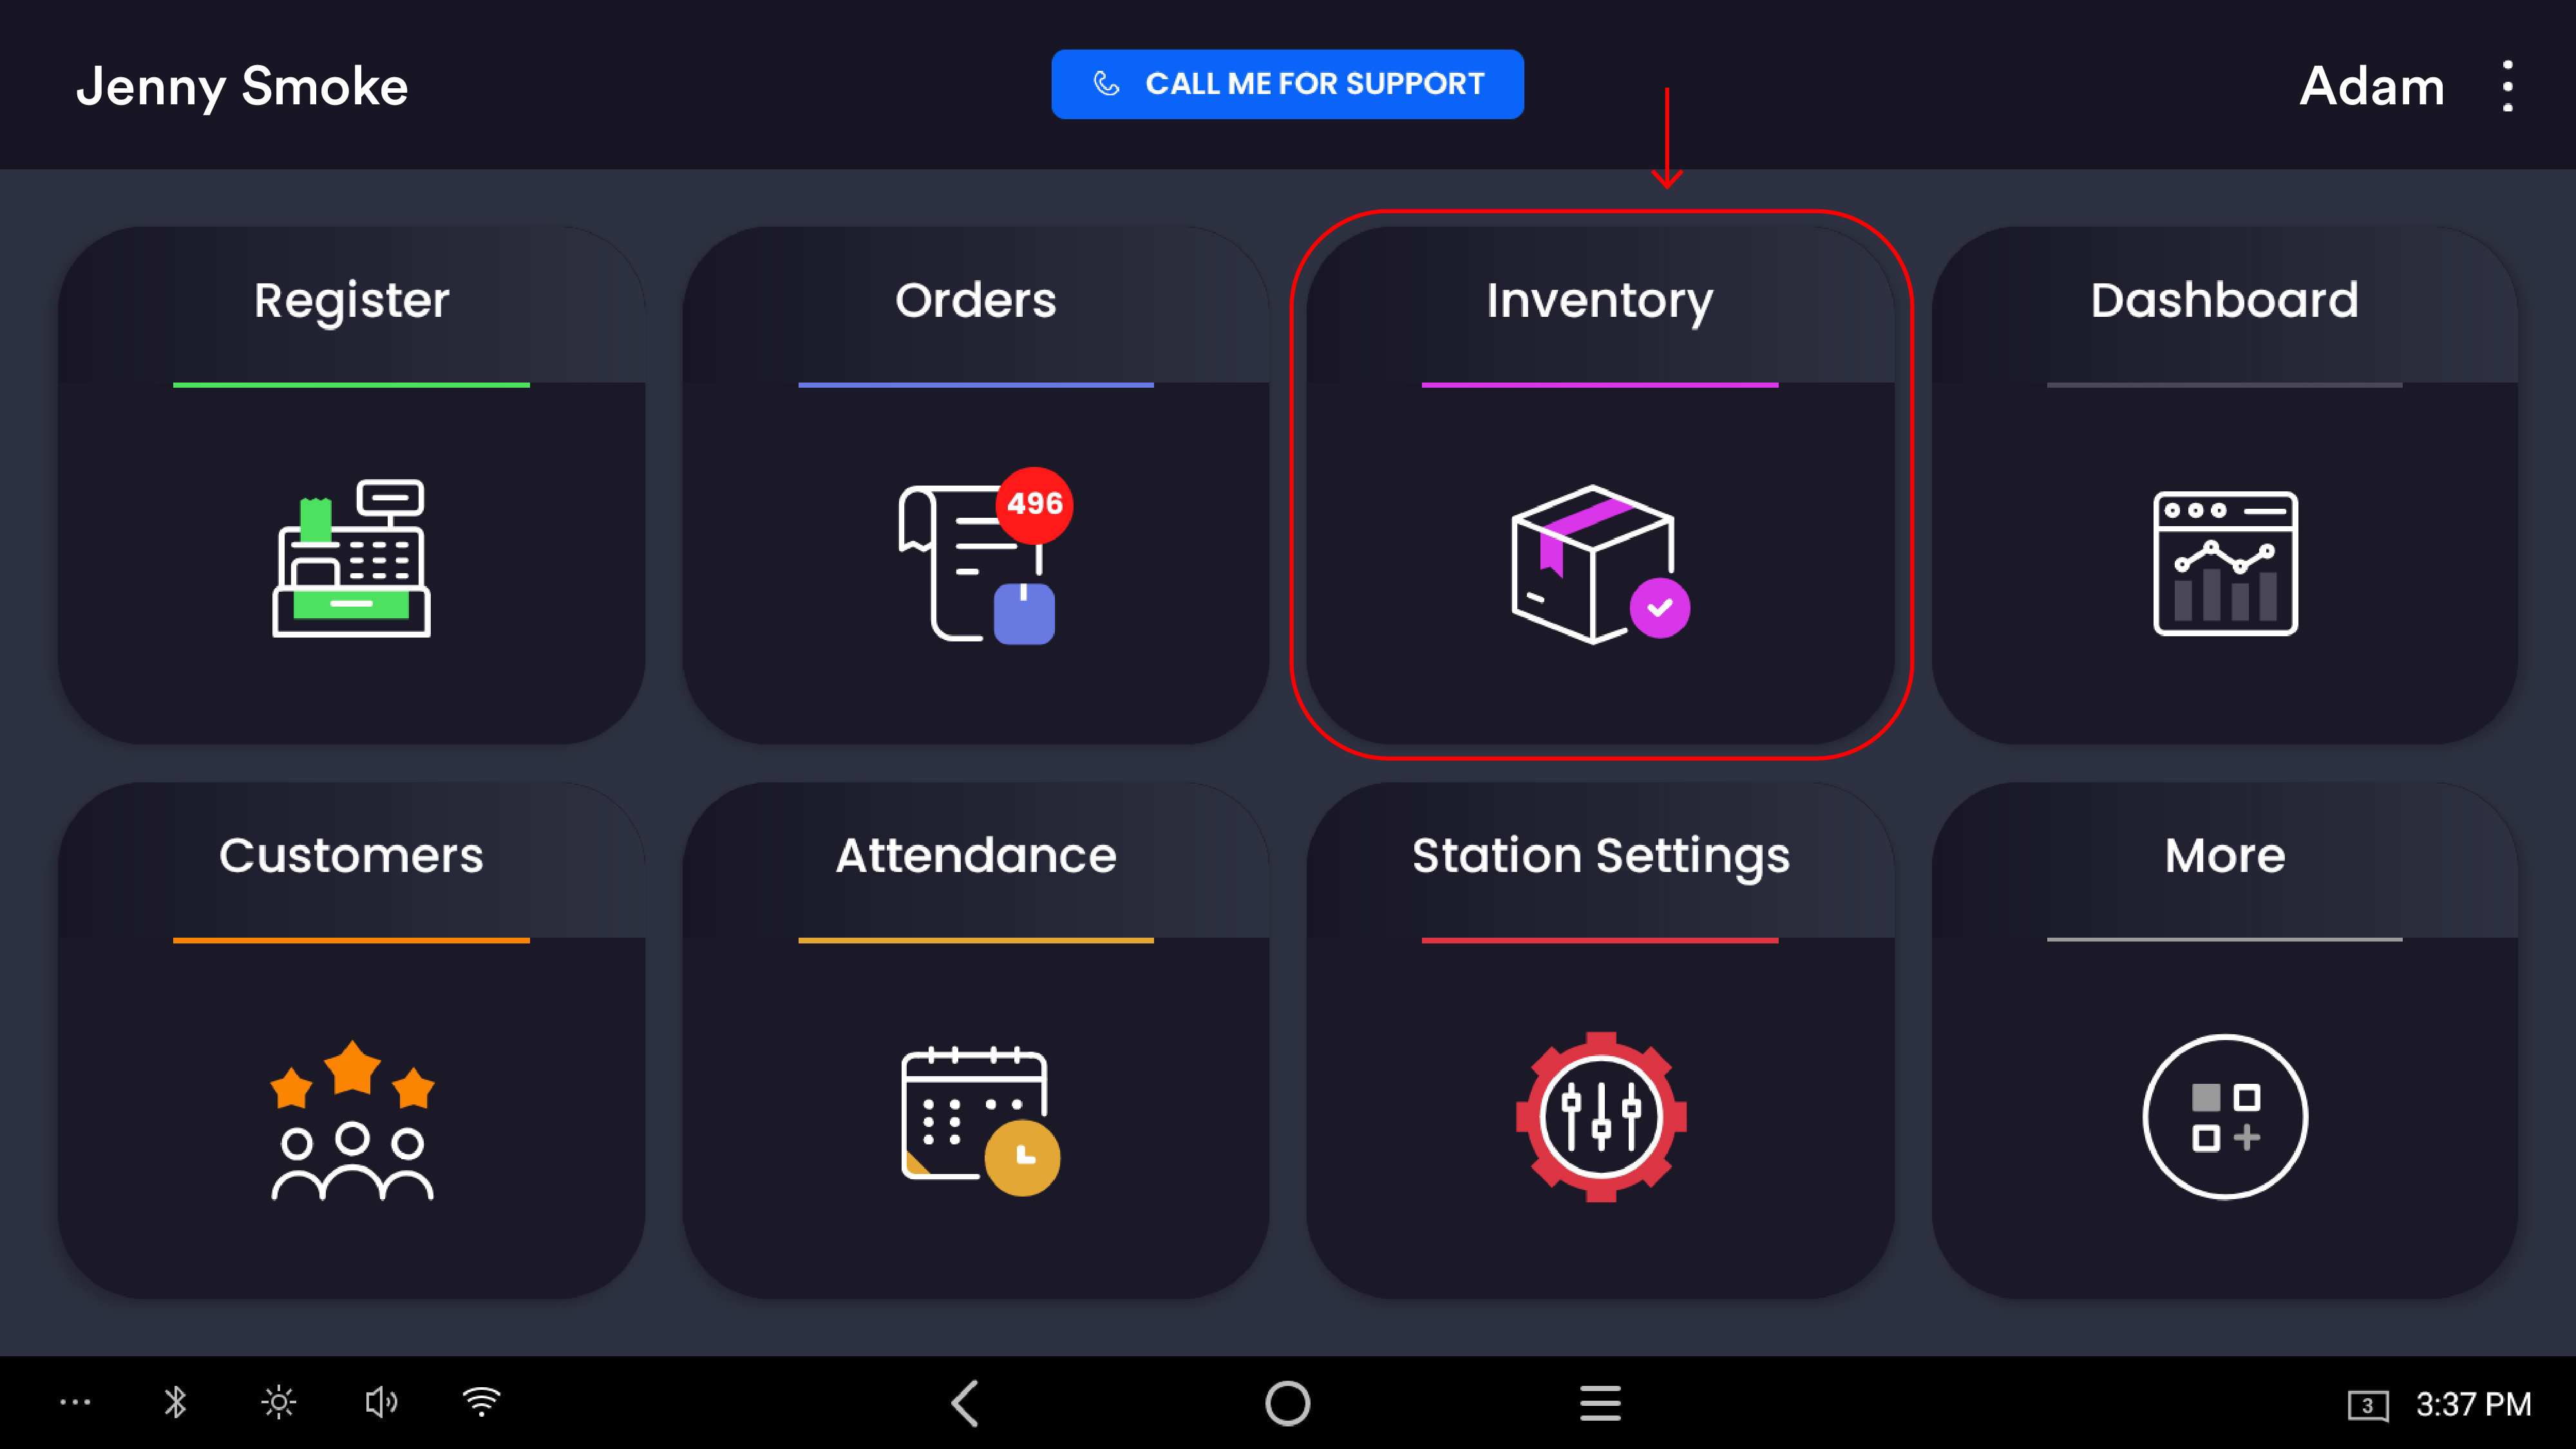
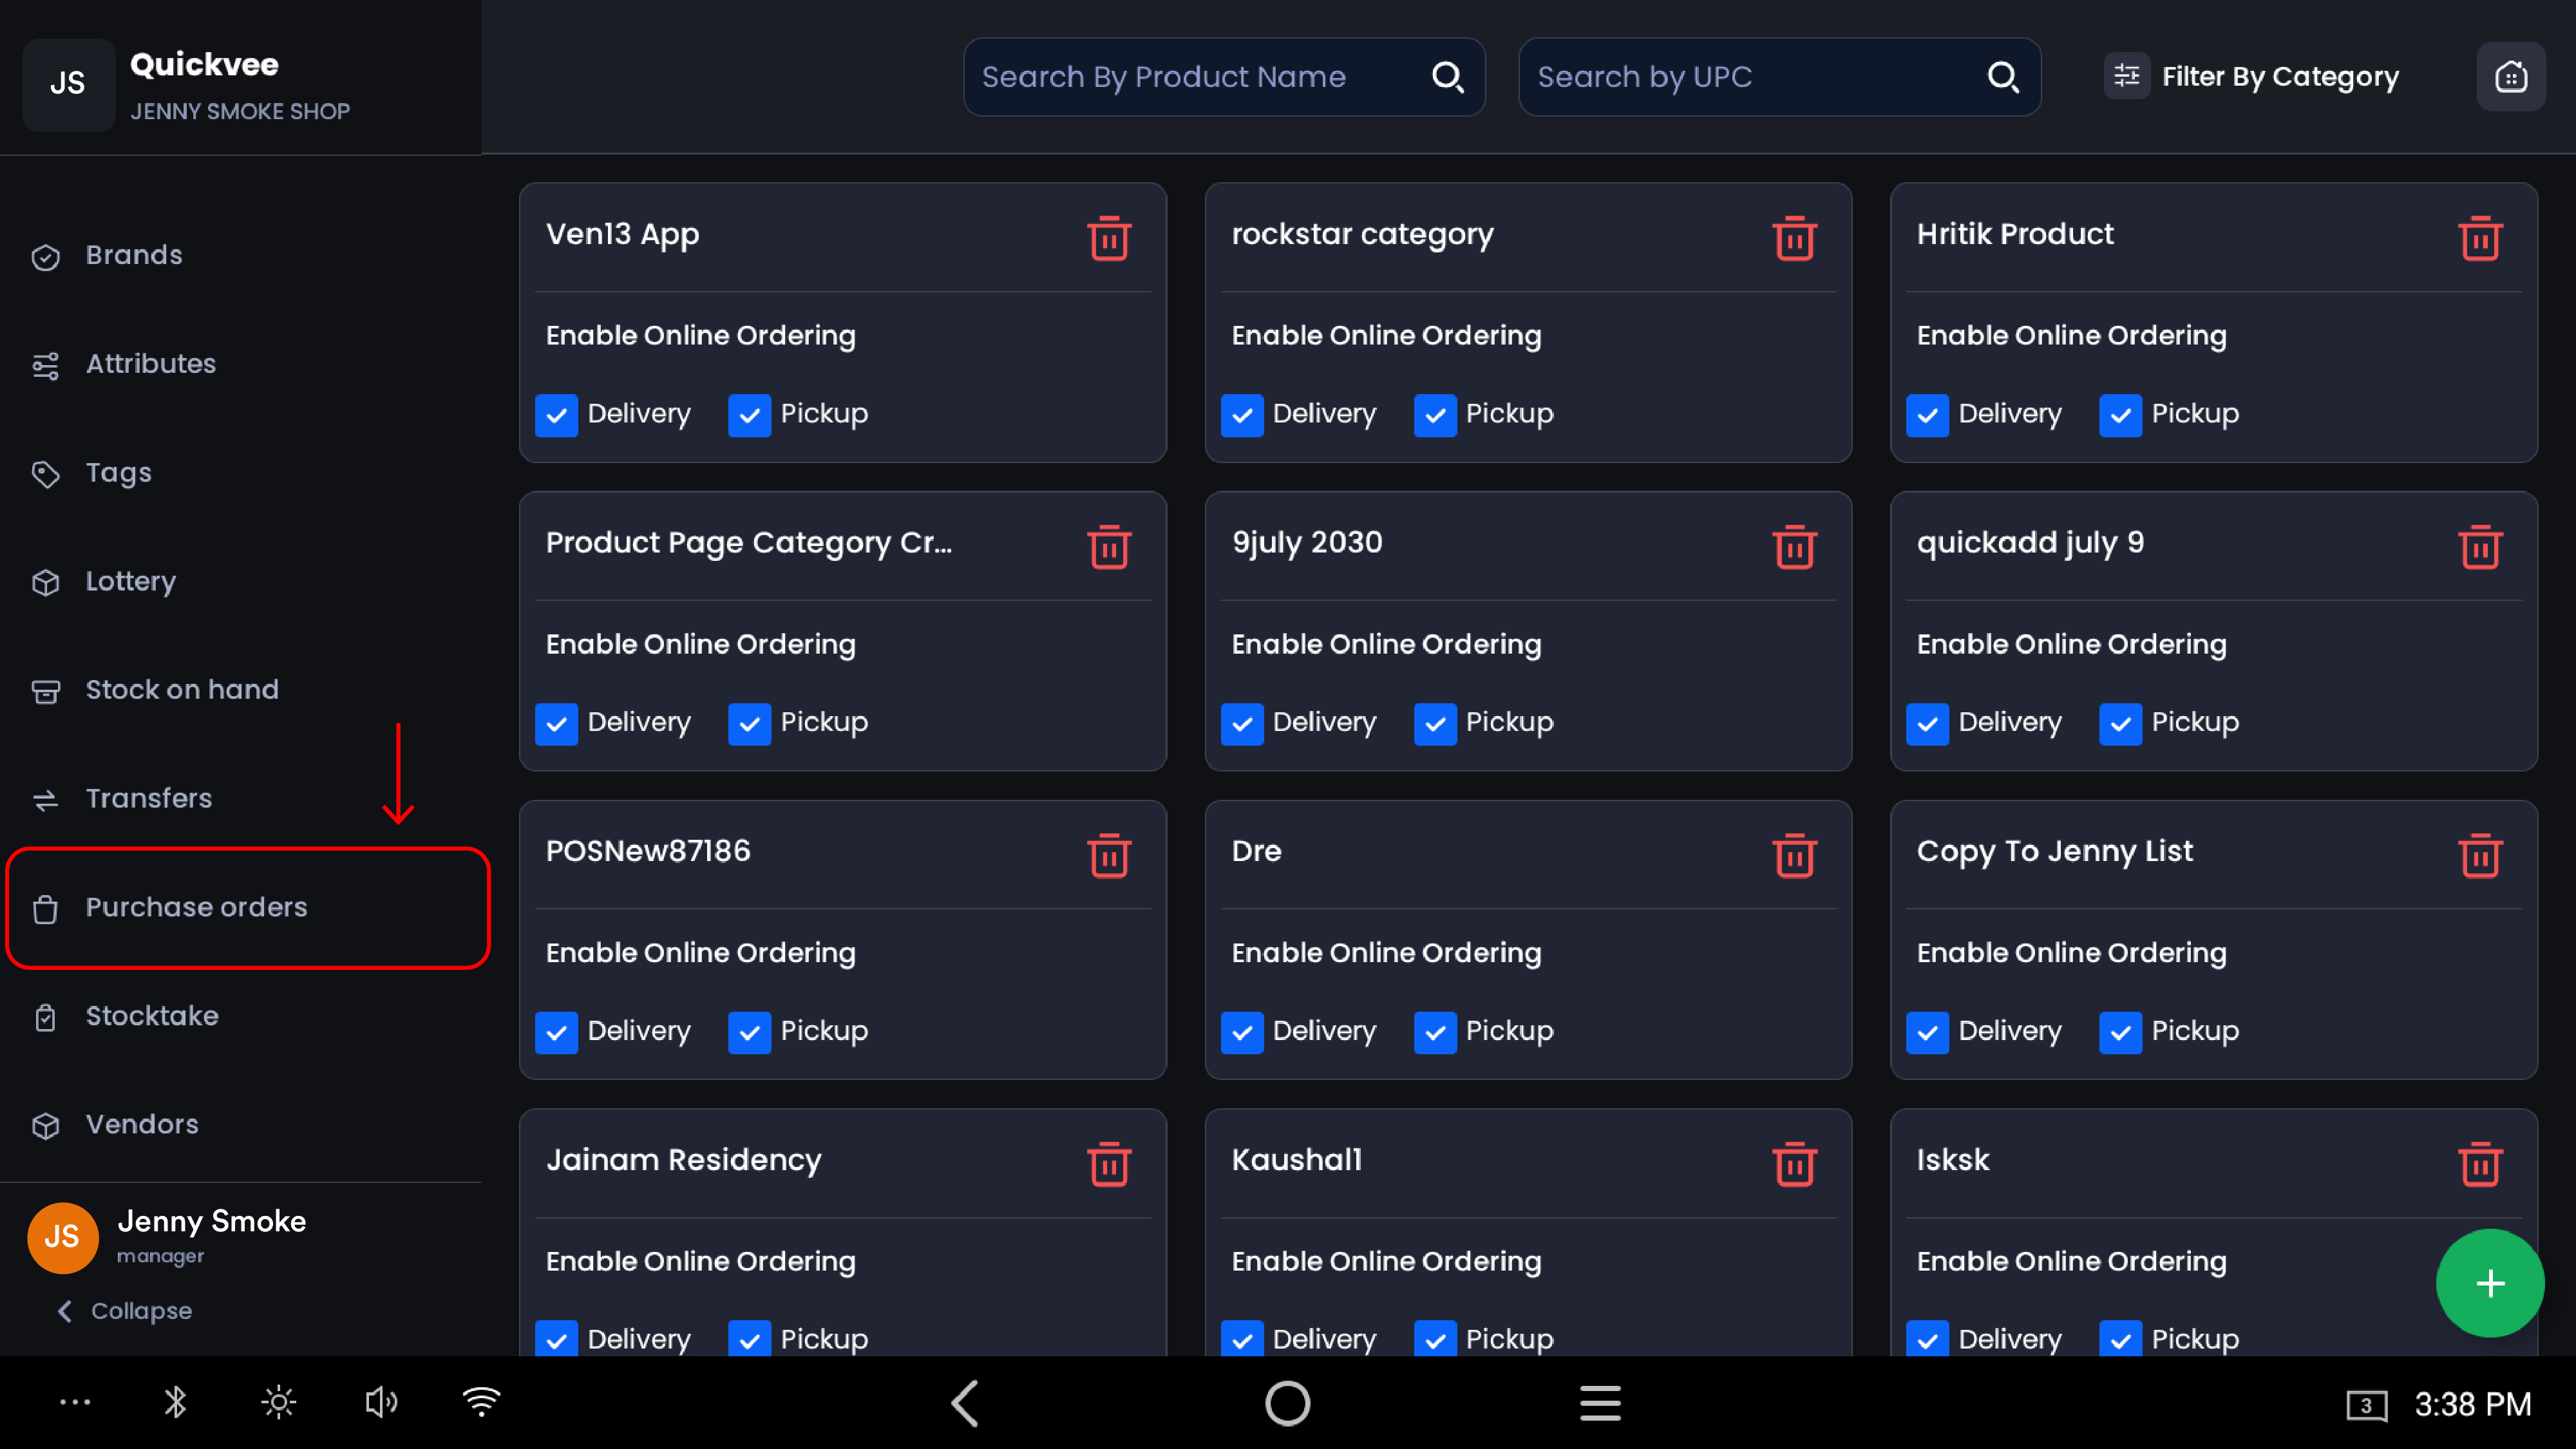
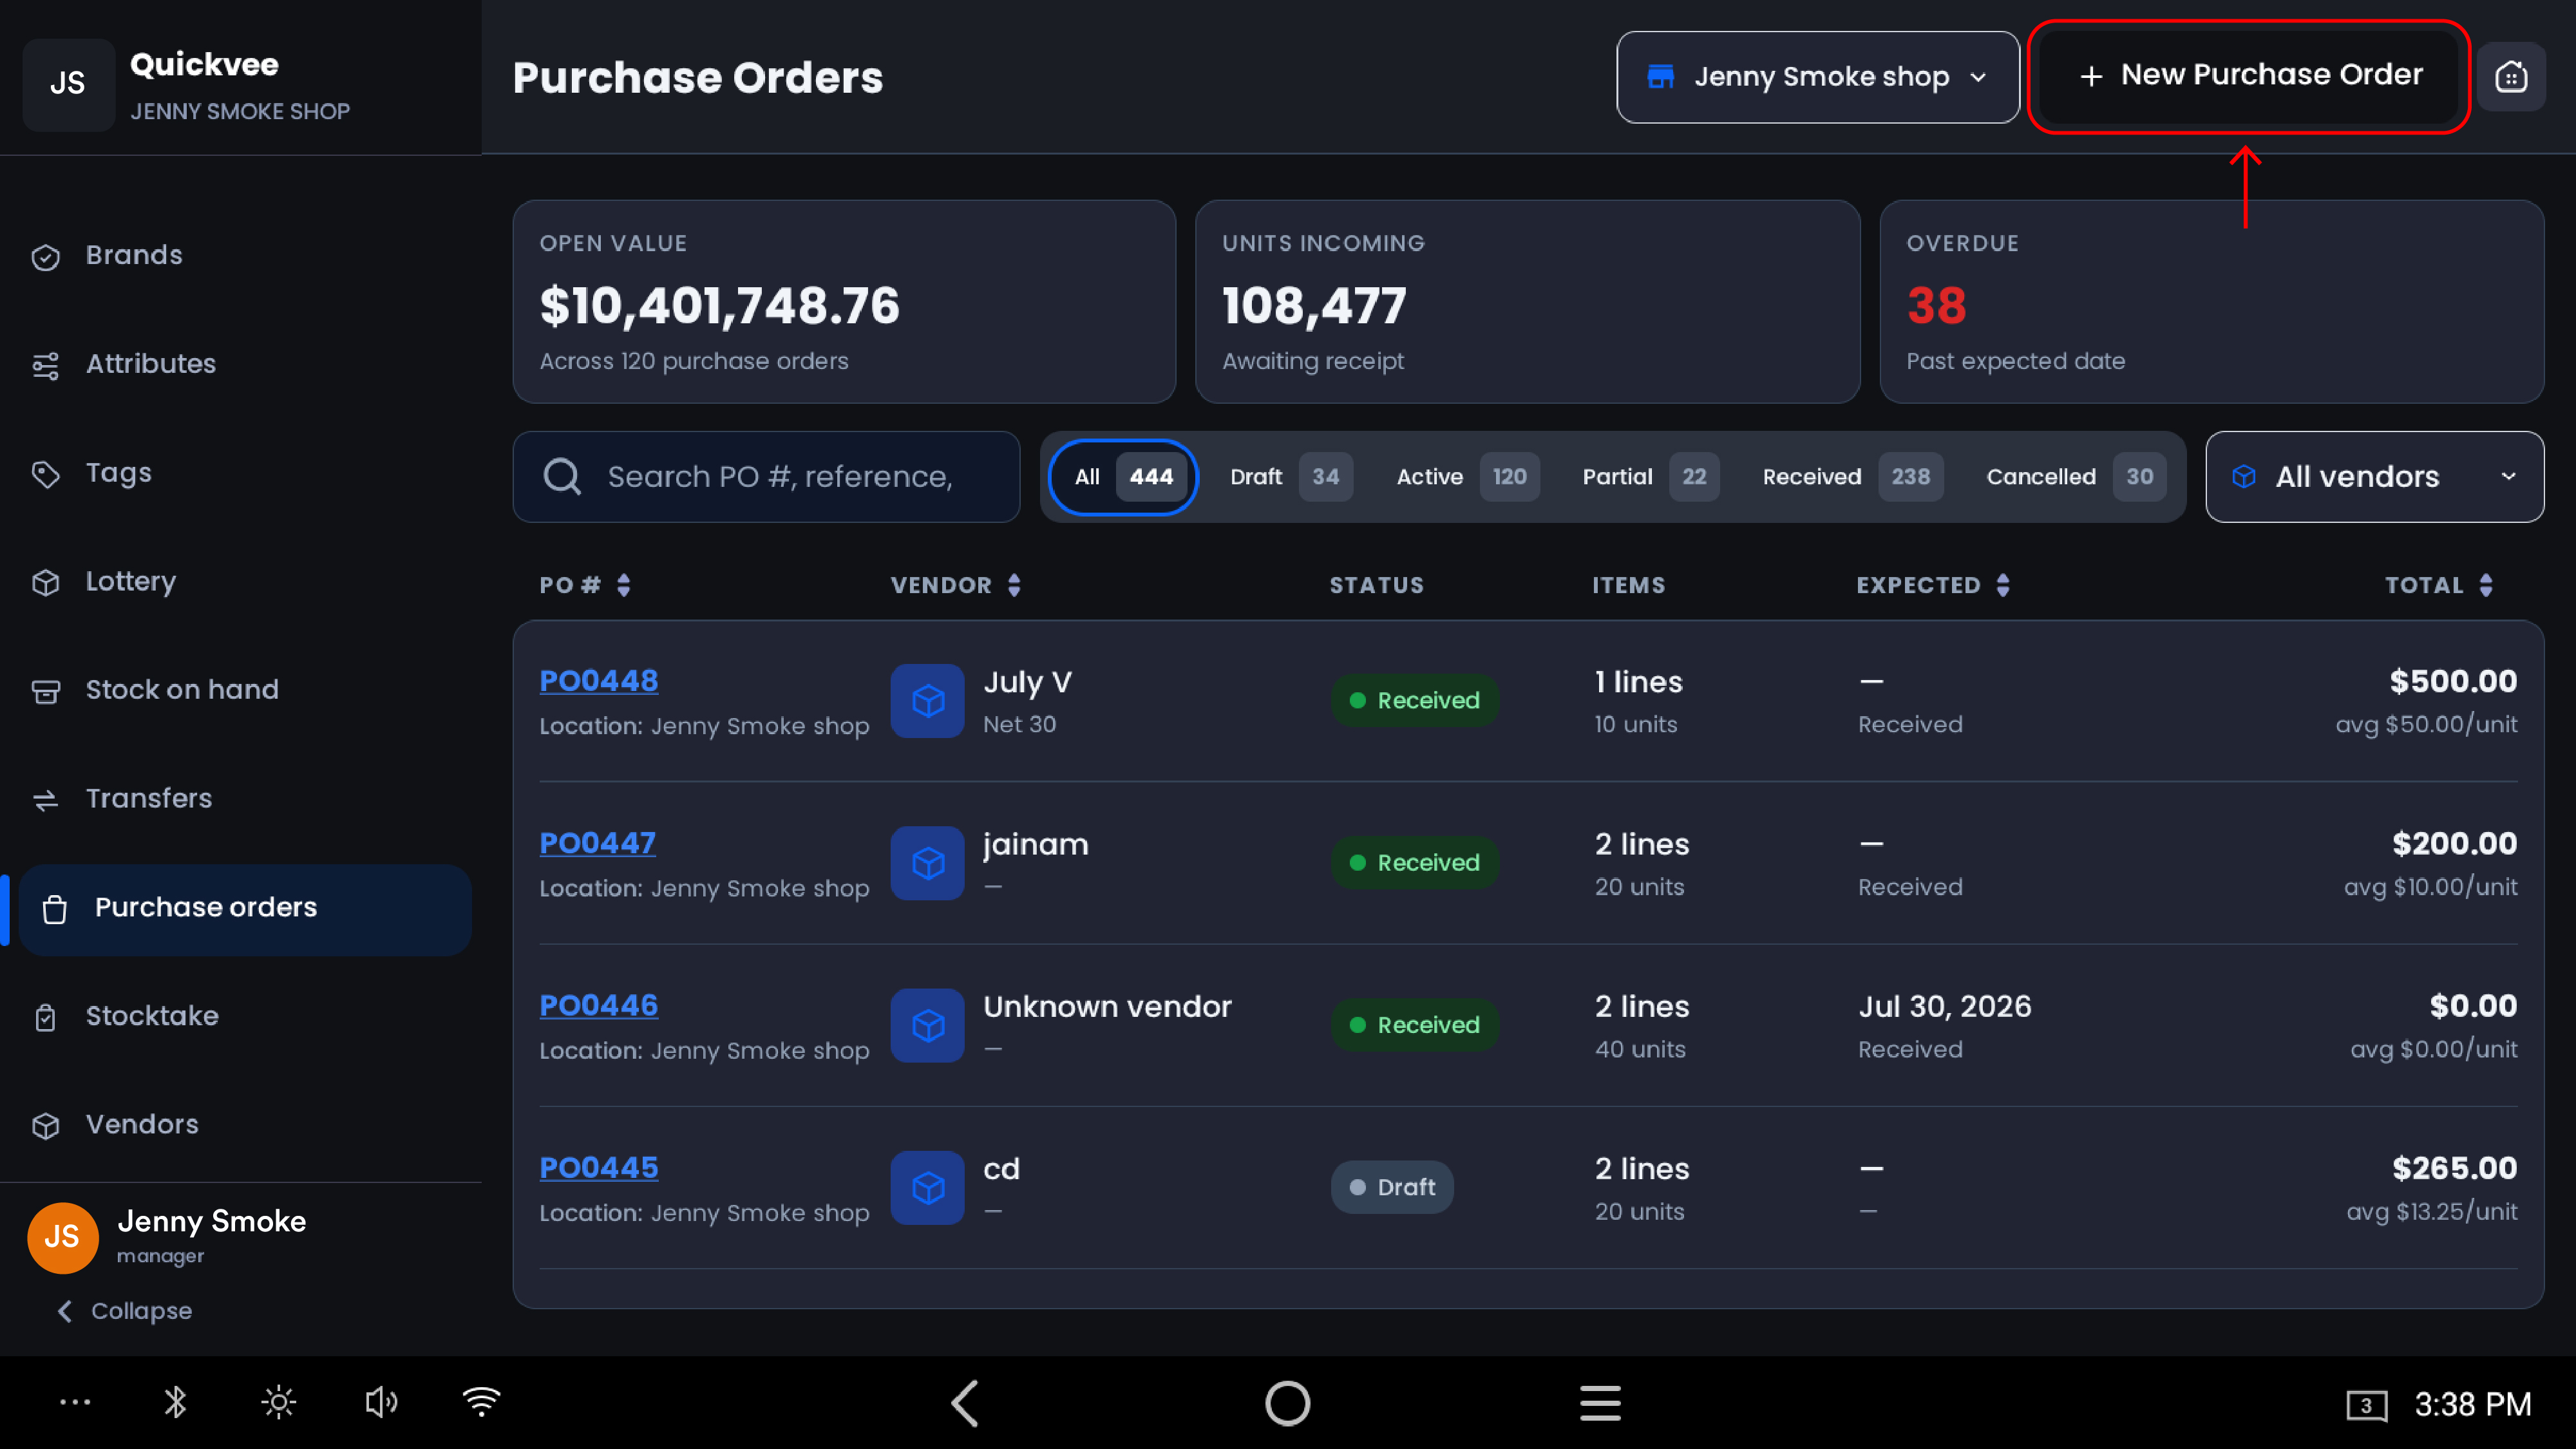
From the POS Home, tap Inventory, then select Purchase orders from the left menu.
The dashboard
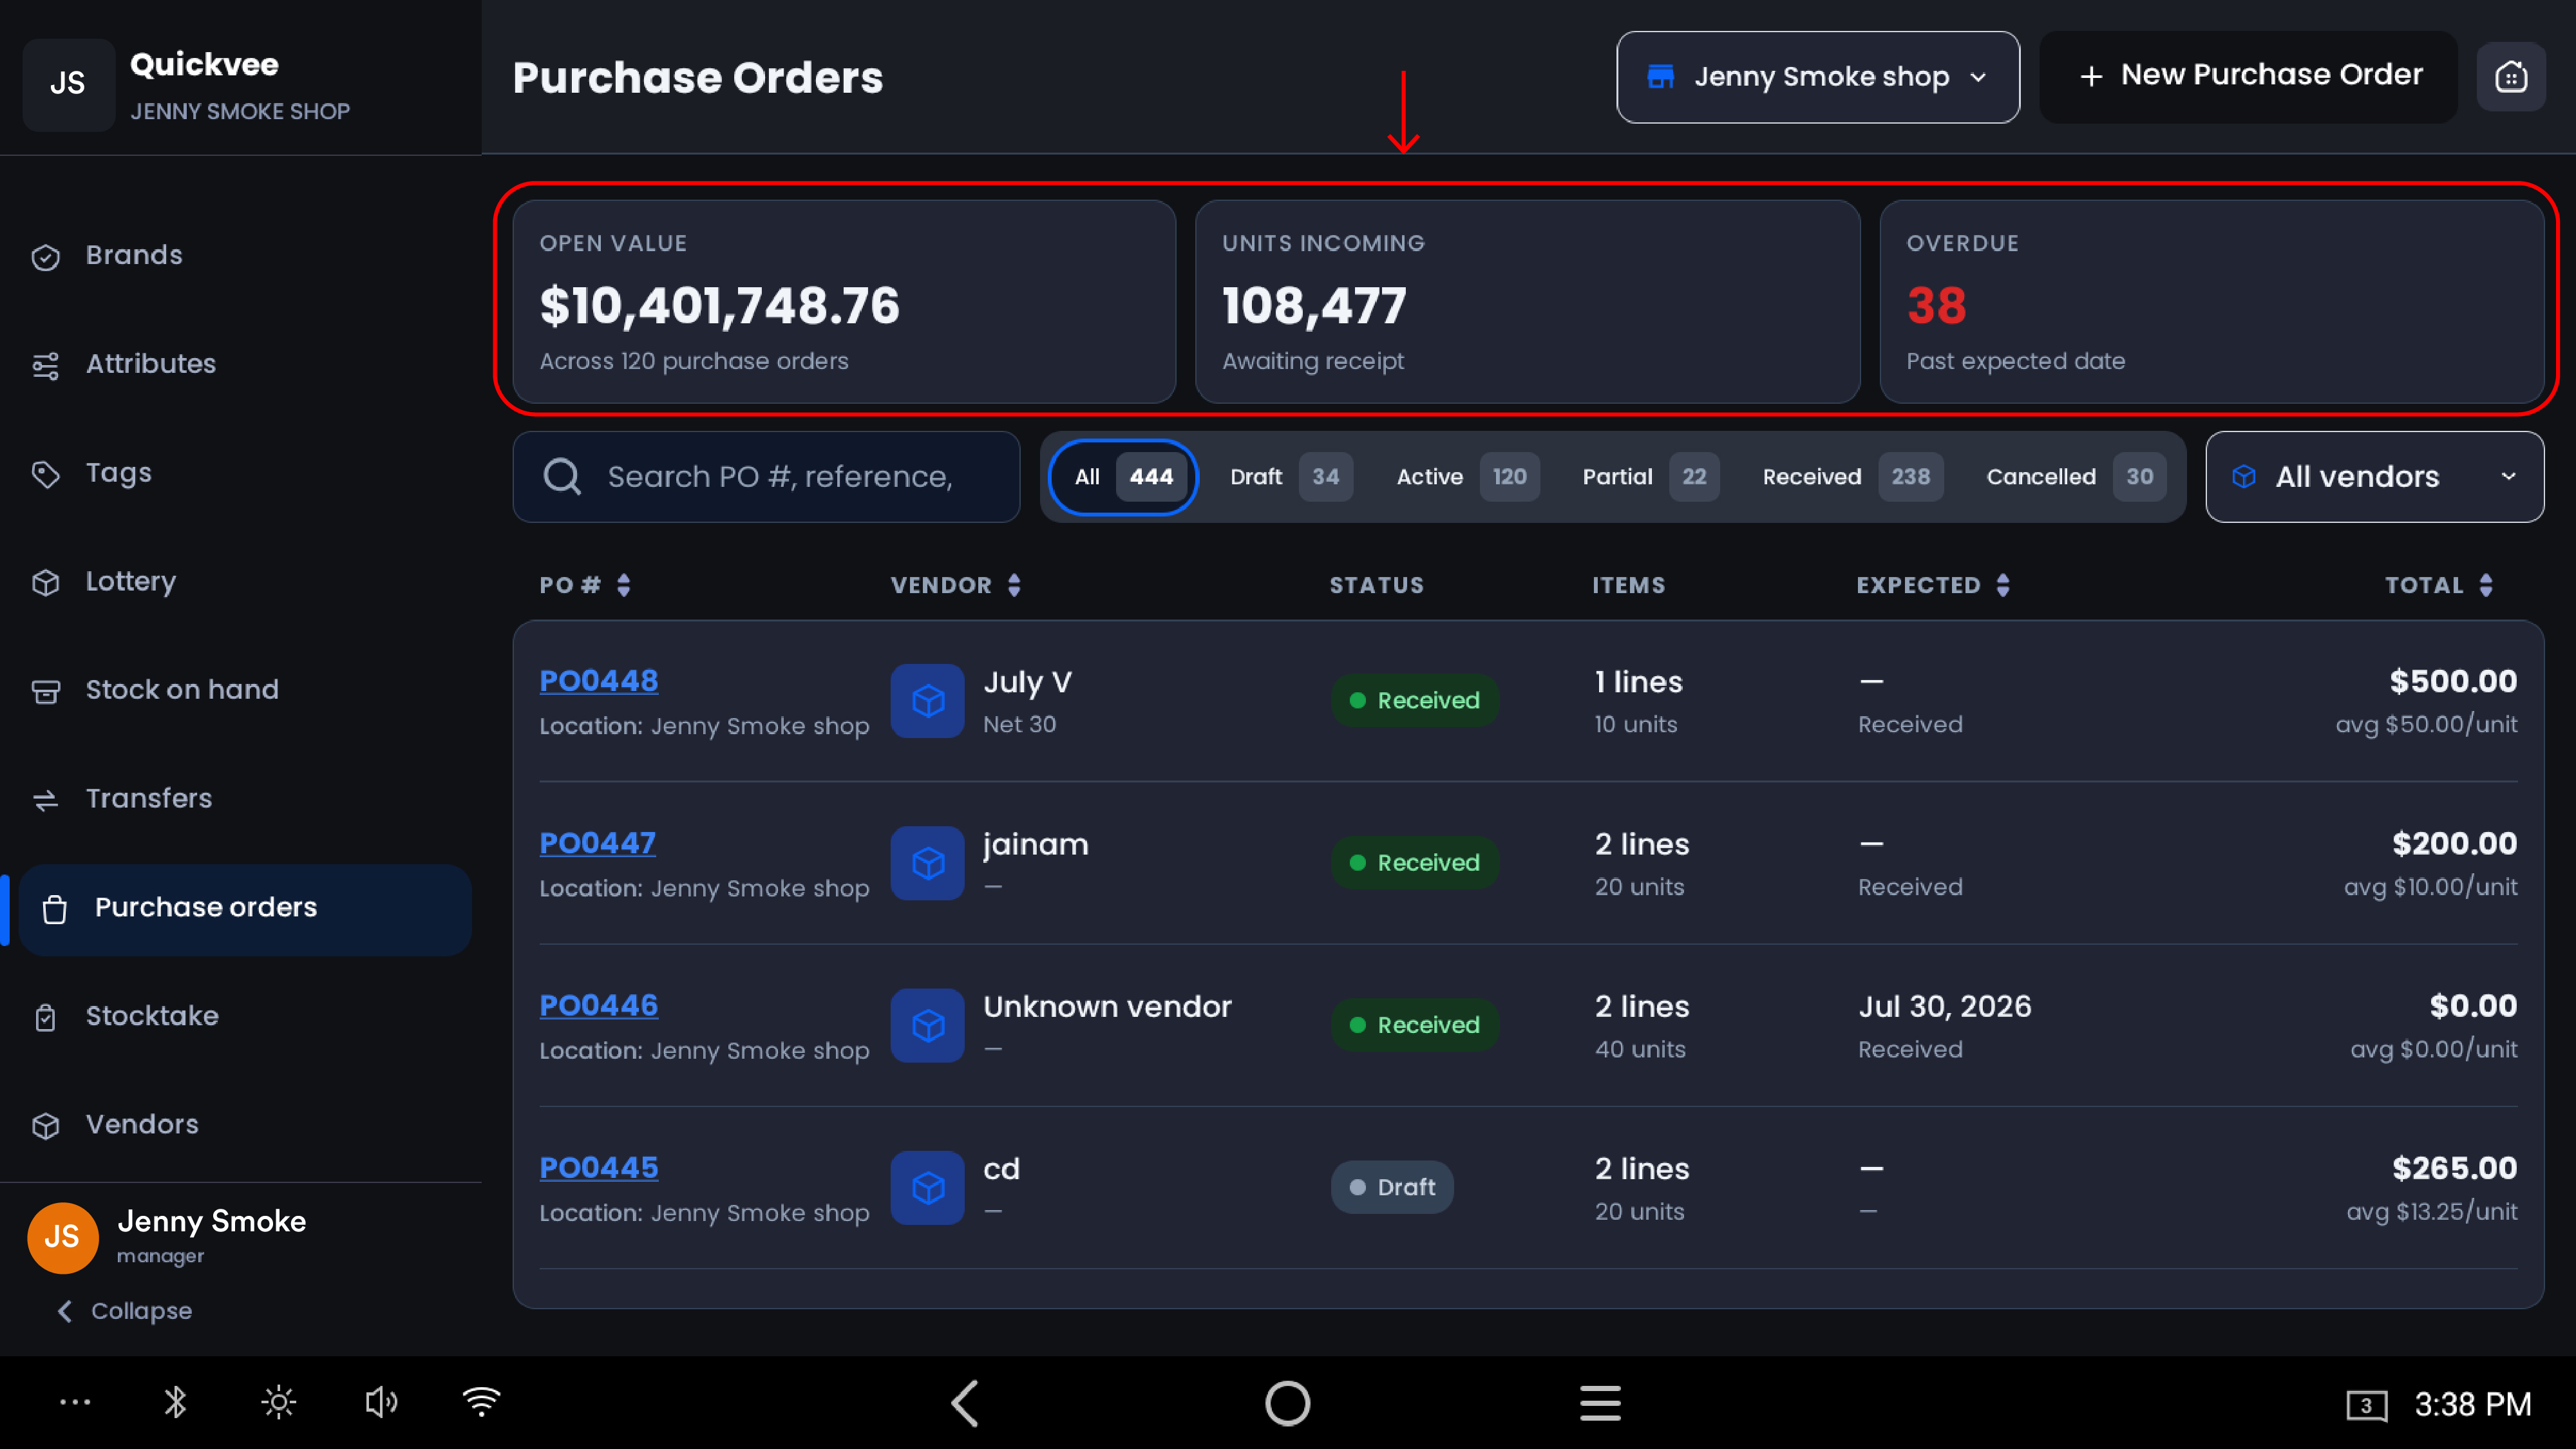
Three cards at the top give you your purchasing position at a glance.
|
Card |
What it tells you |
|---|---|
|
Open Value |
The total dollar value tied up in open purchase orders, and how many POs it spans. This is money committed but not yet on your shelves. |
|
Units Incoming |
Total units ordered and awaiting receipt across all open POs. |
|
Overdue |
POs past their expected date, shown in red. This is your follow-up list — anything here means a vendor call. |
Finding a purchase order
|
Control |
What it does |
|---|---|
|
Search |
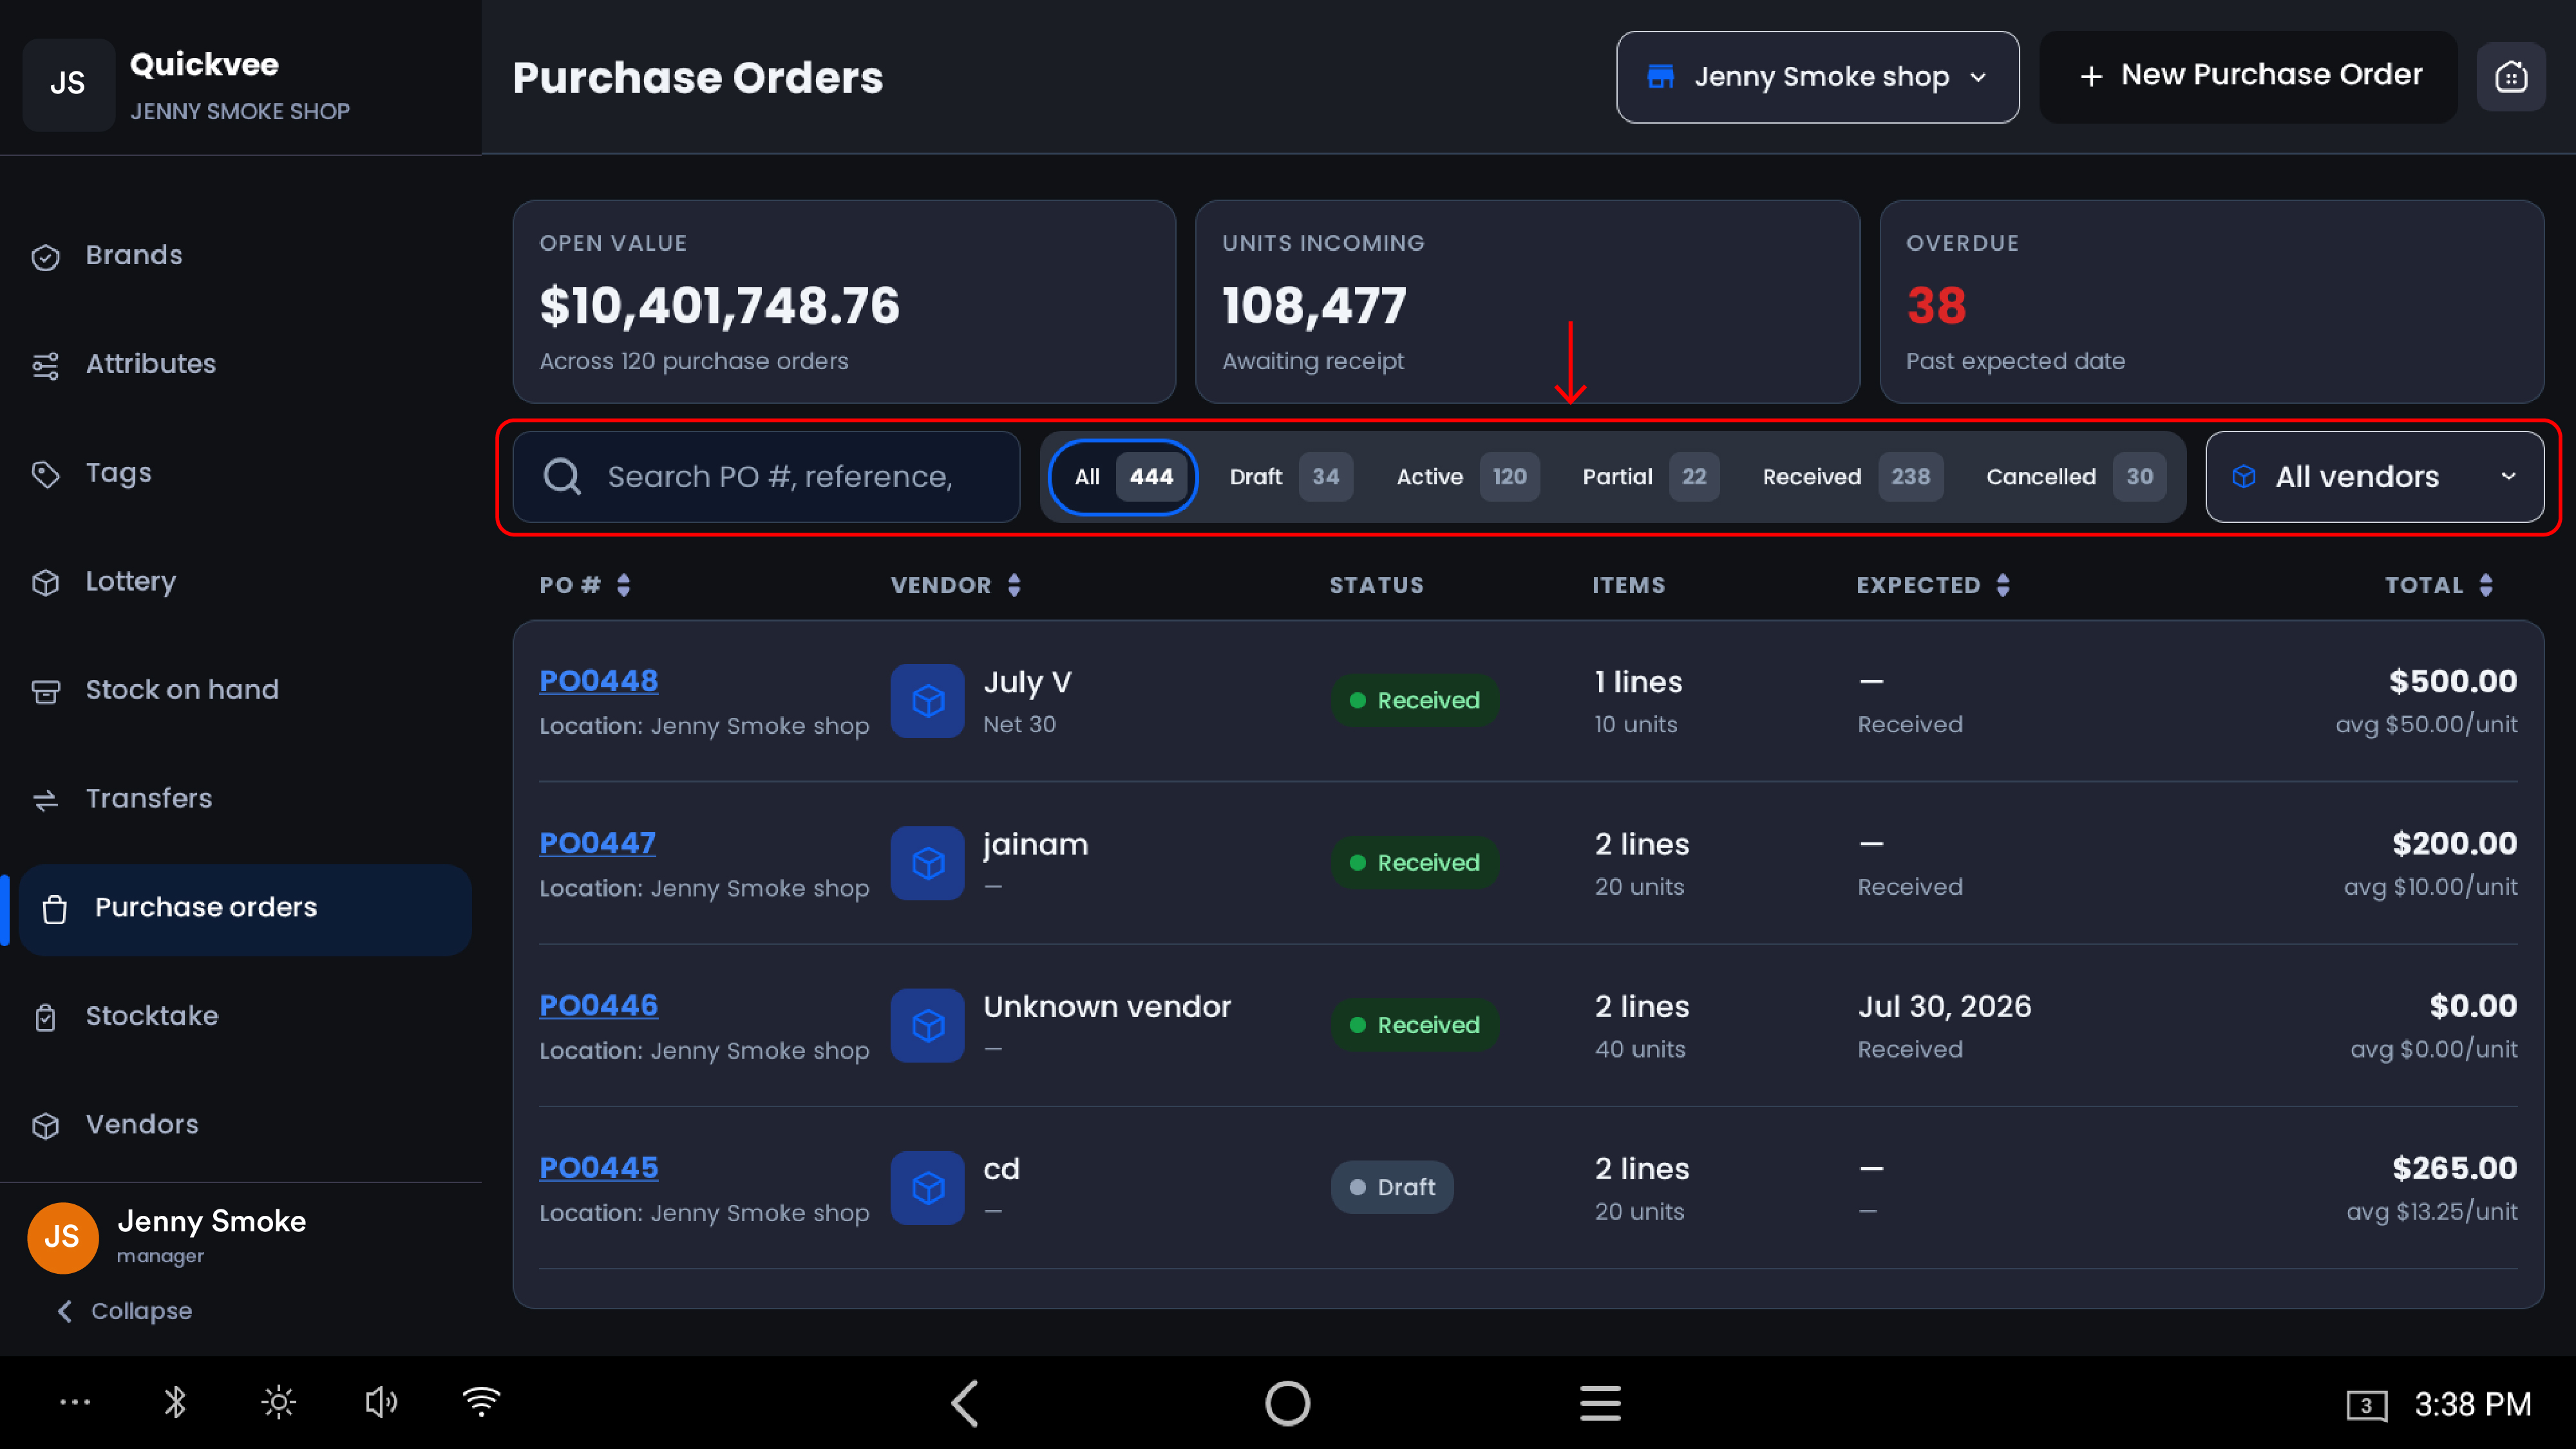
Find POs by PO number, reference, or vendor name. |
|
Status pills |
Filter by lifecycle stage, each with a live count: All, Draft, Active, Partial, Received, Cancelled. |
|
Vendor filter |
Narrow the list to one supplier. |
|
Location filter |
The stores dropdown in the header filters POs by location — tick the stores you want and tap Add. |
|
Sortable columns |
Sort by PO #, vendor, expected date, or total. |
Each row shows the PO number and its location, the vendor, a color-coded status badge, the line and unit counts (partial POs show progress such as 4,675 / 4,700 units), the expected date, and the total with an average cost per unit.
The PO lifecycle
|
Status |
Meaning |
|---|---|
|
Draft |
Saved but not committed. Editable freely; hasn't affected anything yet. |
|
Active |
Created and awaiting stock from the vendor. |
|
Partial |
Some units received, some still outstanding. |
|
Received |
All units received; stock has been added to inventory. |
|
Cancelled |
Voided — kept in the list for the record. |
Creating a purchase order
-
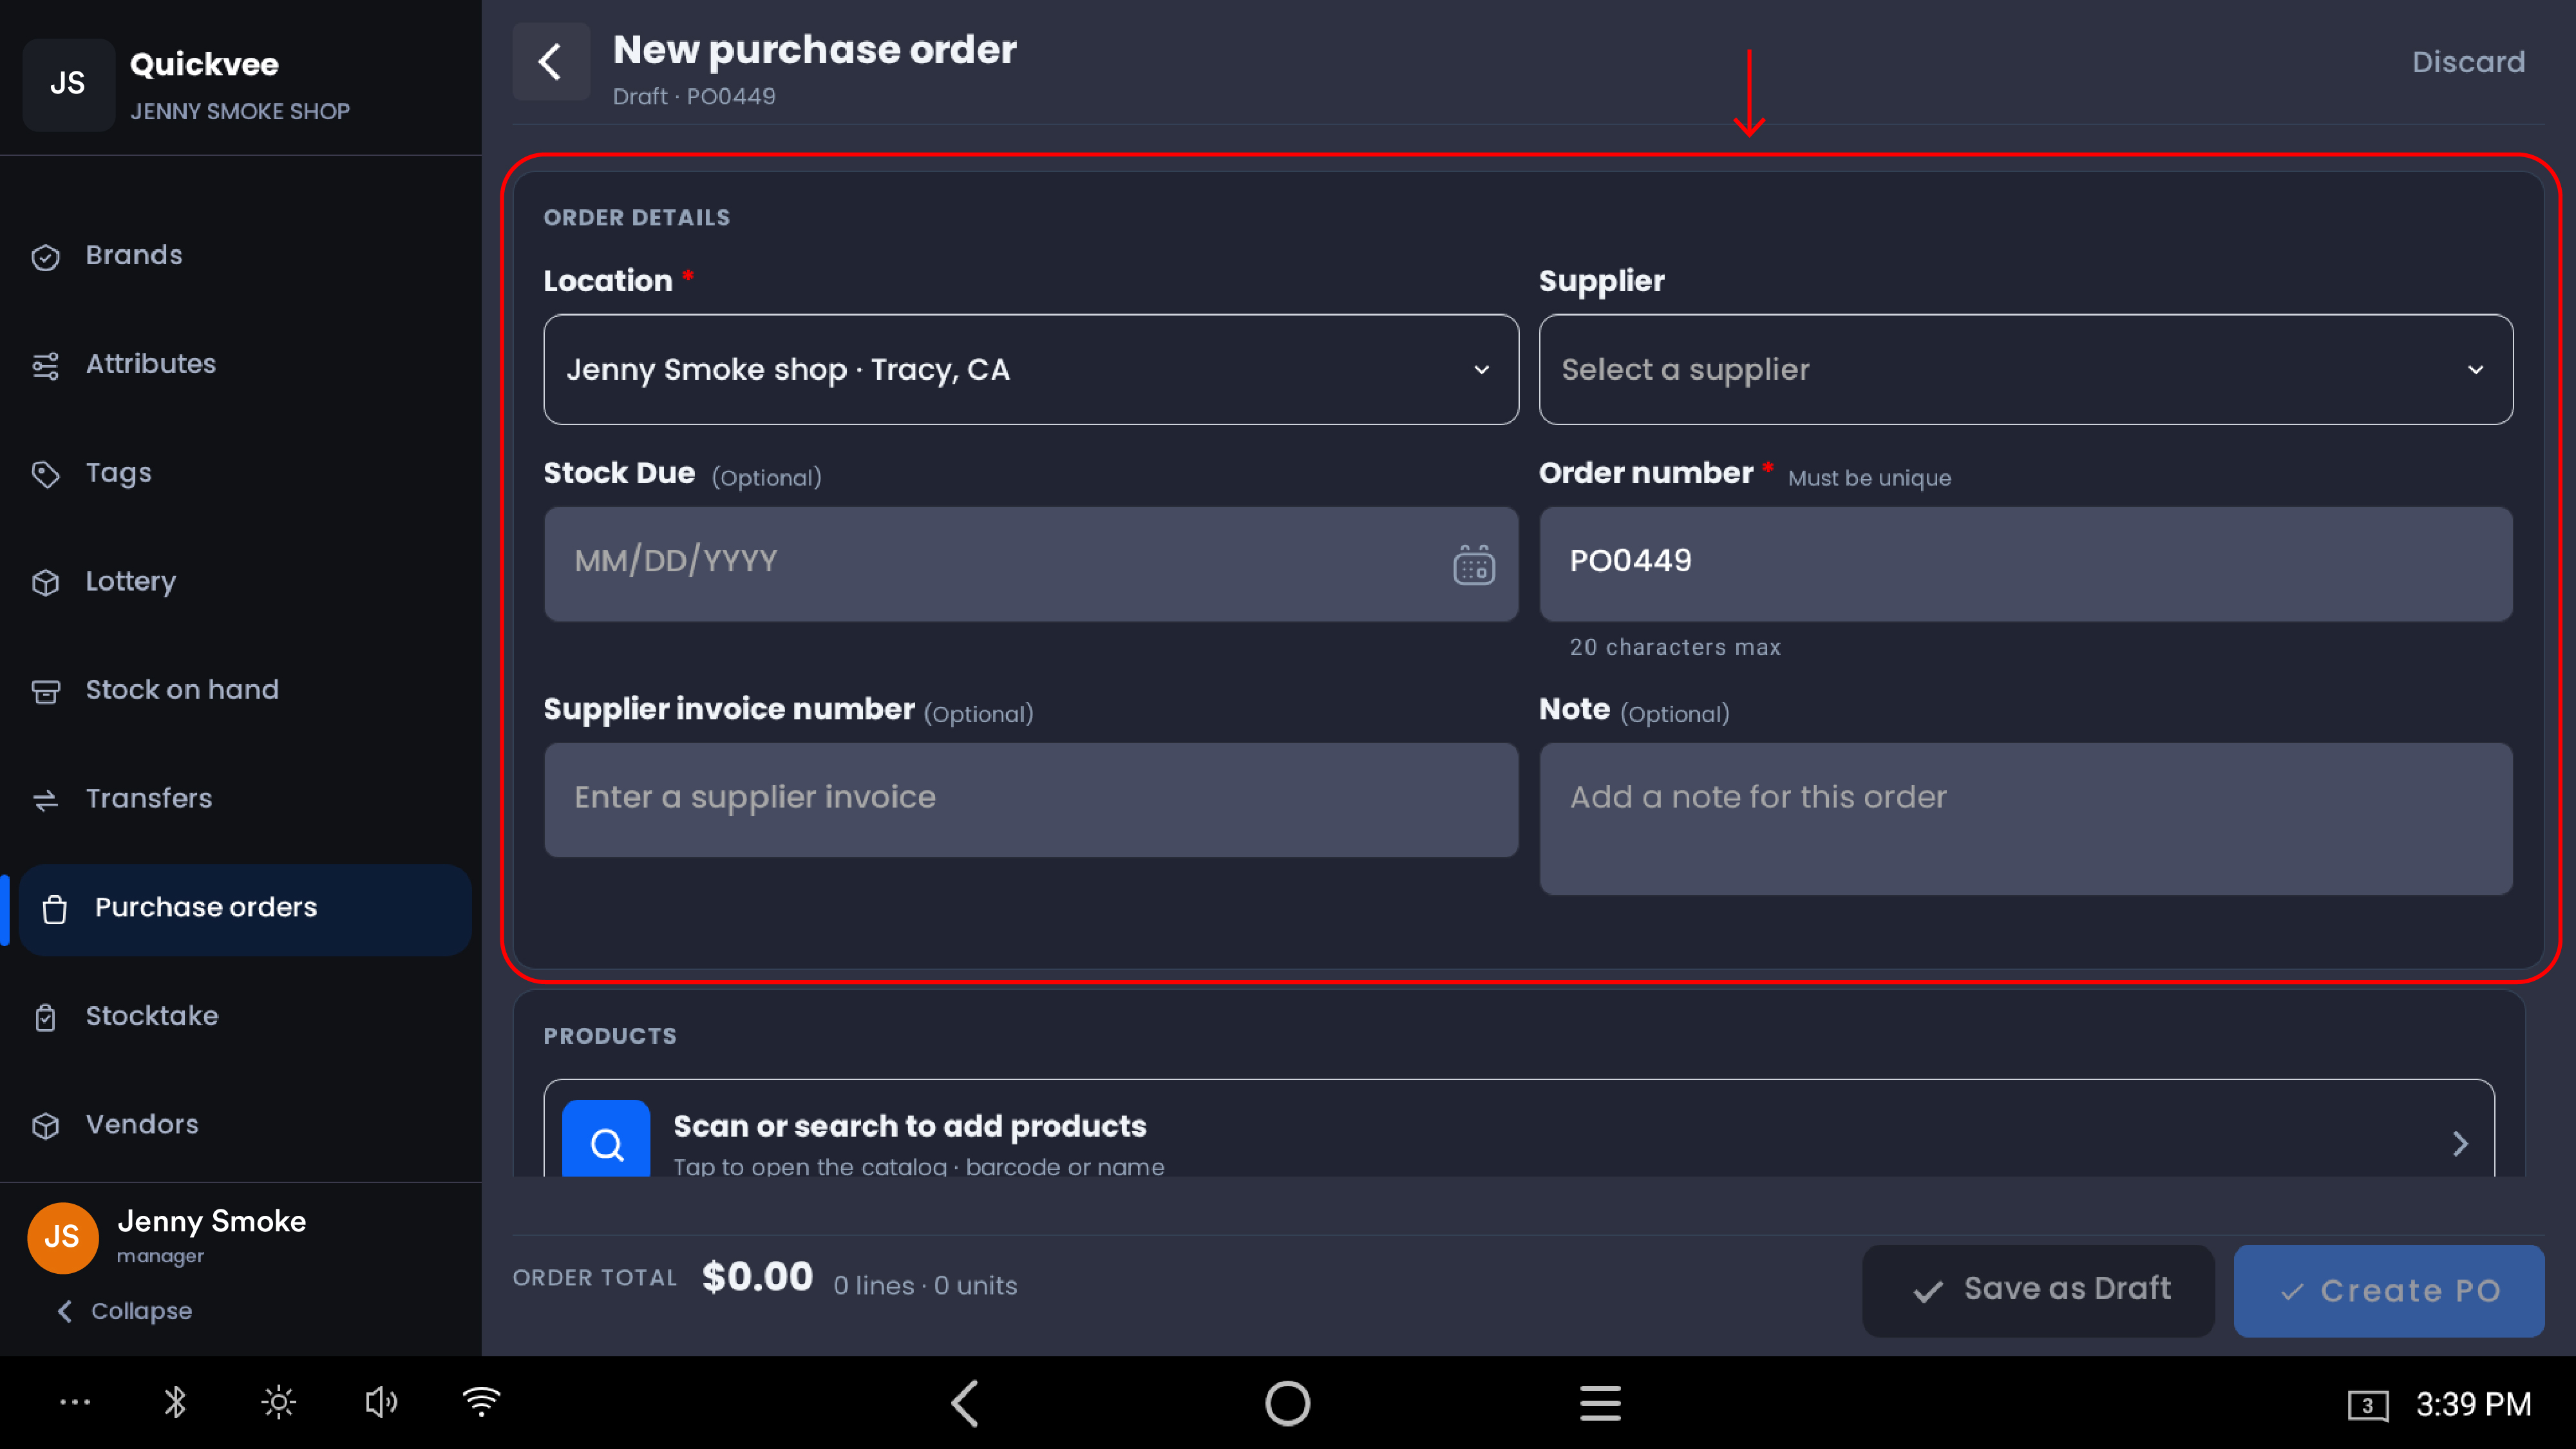
Tap + New Purchase Order. A draft opens with an auto-assigned order number.
-
Fill in the order details.
|
Field |
Required |
Notes |
|---|---|---|
|
Location |
Yes |
The store receiving this stock. |
|
Supplier |
No |
Pick the vendor from your vendor list. |
|
Stock Due |
No |
The date you expect delivery — this drives the Overdue tracking on the dashboard. |
|
Order number |
Yes |
Auto-generated (for example PO0058) but editable; must be unique, 20 characters max. |
|
Supplier invoice number |
No |
The vendor's invoice reference, for reconciliation. |
|
Note |
No |
Internal note visible on the PO detail. |
-
Add products (next section).
-
Tap Create PO to make it Active — or Save as Draft to finish later. Discard abandons it entirely.
💡 Tip. Always set the Stock Due date. It costs two taps and it's what makes the red Overdue counter work for you — without it, a late vendor never surfaces.
Adding products to a PO
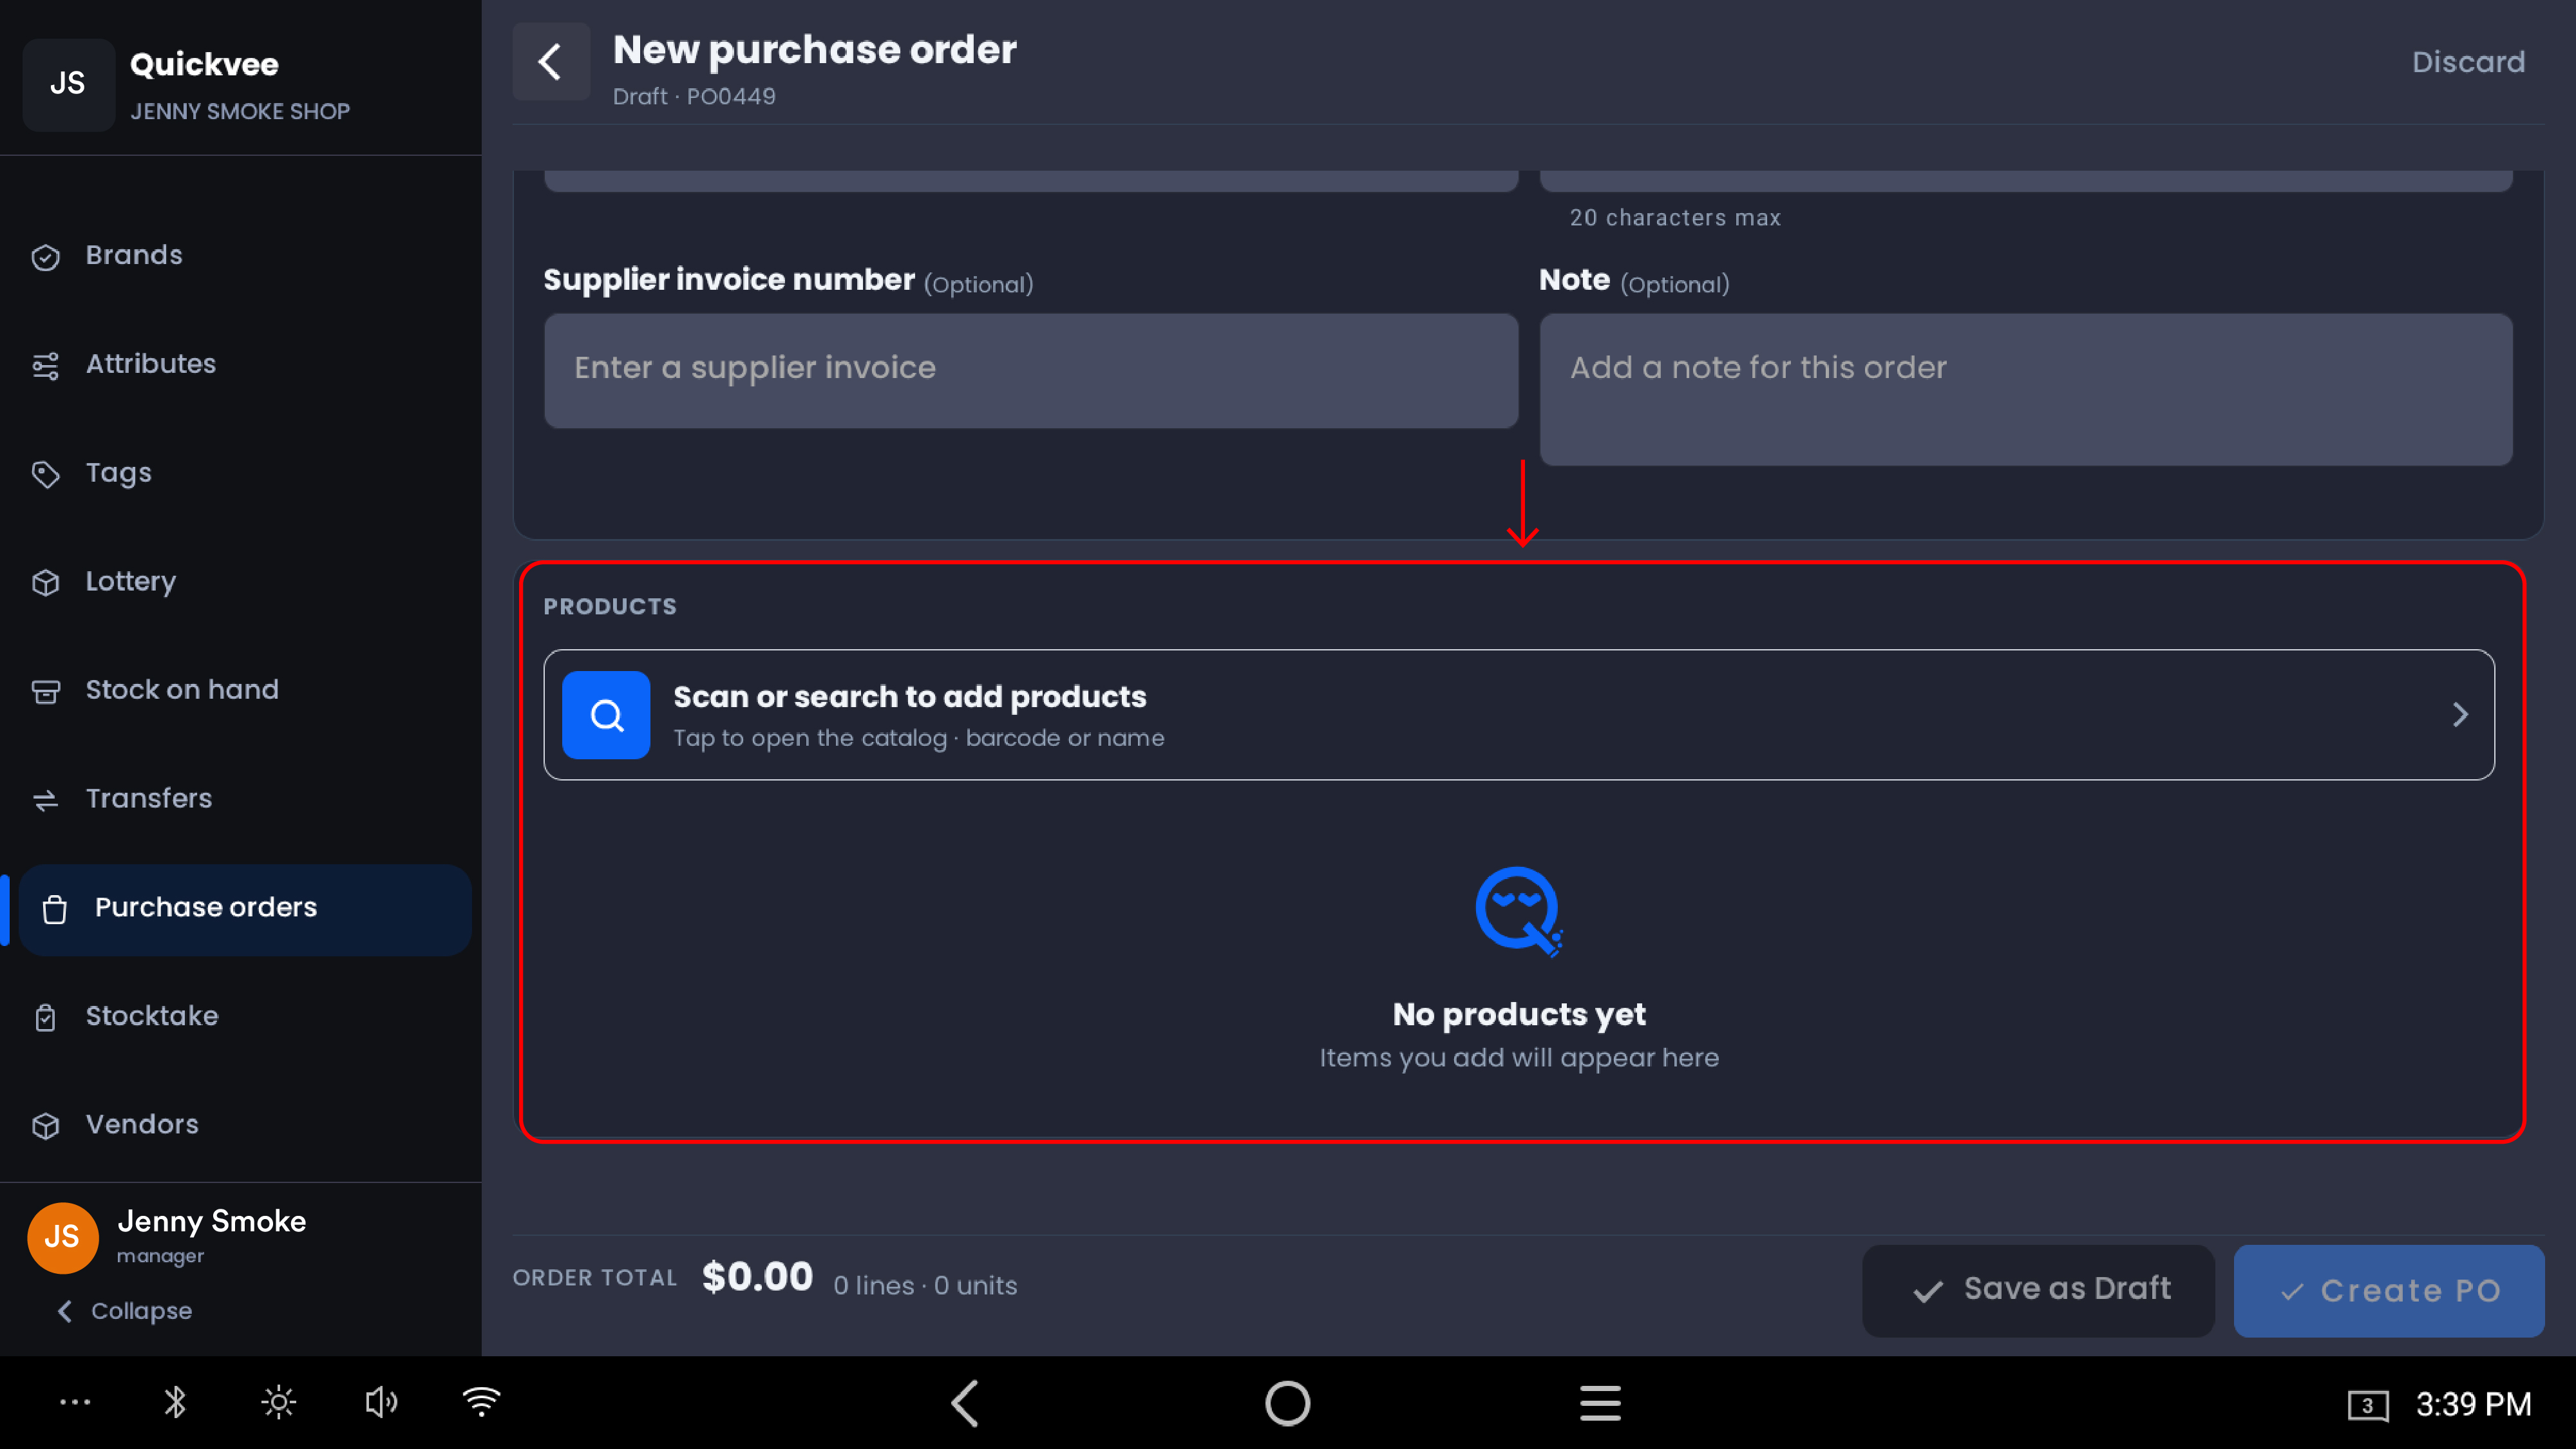
Tap Scan or search to add products to open the catalog picker.
-
Narrow the list using the vendor and category dropdowns — both searchable.
-
Or type in the search bar: product name, variant, UPC, or code — or simply scan a barcode.
-
Tick the products you want. Variant products expand with a chevron so you can select individual variants — each shows its code and current stock quantity.
-
Tap Add to PO.
Back on the order, each line shows:
|
Column |
What it does |
|---|---|
|
Product |
Name, barcode, and current stock. |
|
Current Inventory |
What's on hand right now — your reorder context. |
|
Quantity |
How many you're ordering. Editable per line. |
|
Cost price (USD) |
Your unit cost from the vendor. Editable per line. |
|
Total cost |
Quantity × cost, calculated automatically. |
|
Remove (trash) |
Takes the line off the order. |
The footer keeps a running order total with line and unit counts as you build.
✅ Best practice. The Current Inventory column is on this screen for a reason — check it before setting quantities. Ordering blind to what's already on the shelf is how backrooms fill up with slow movers.
The PO detail page
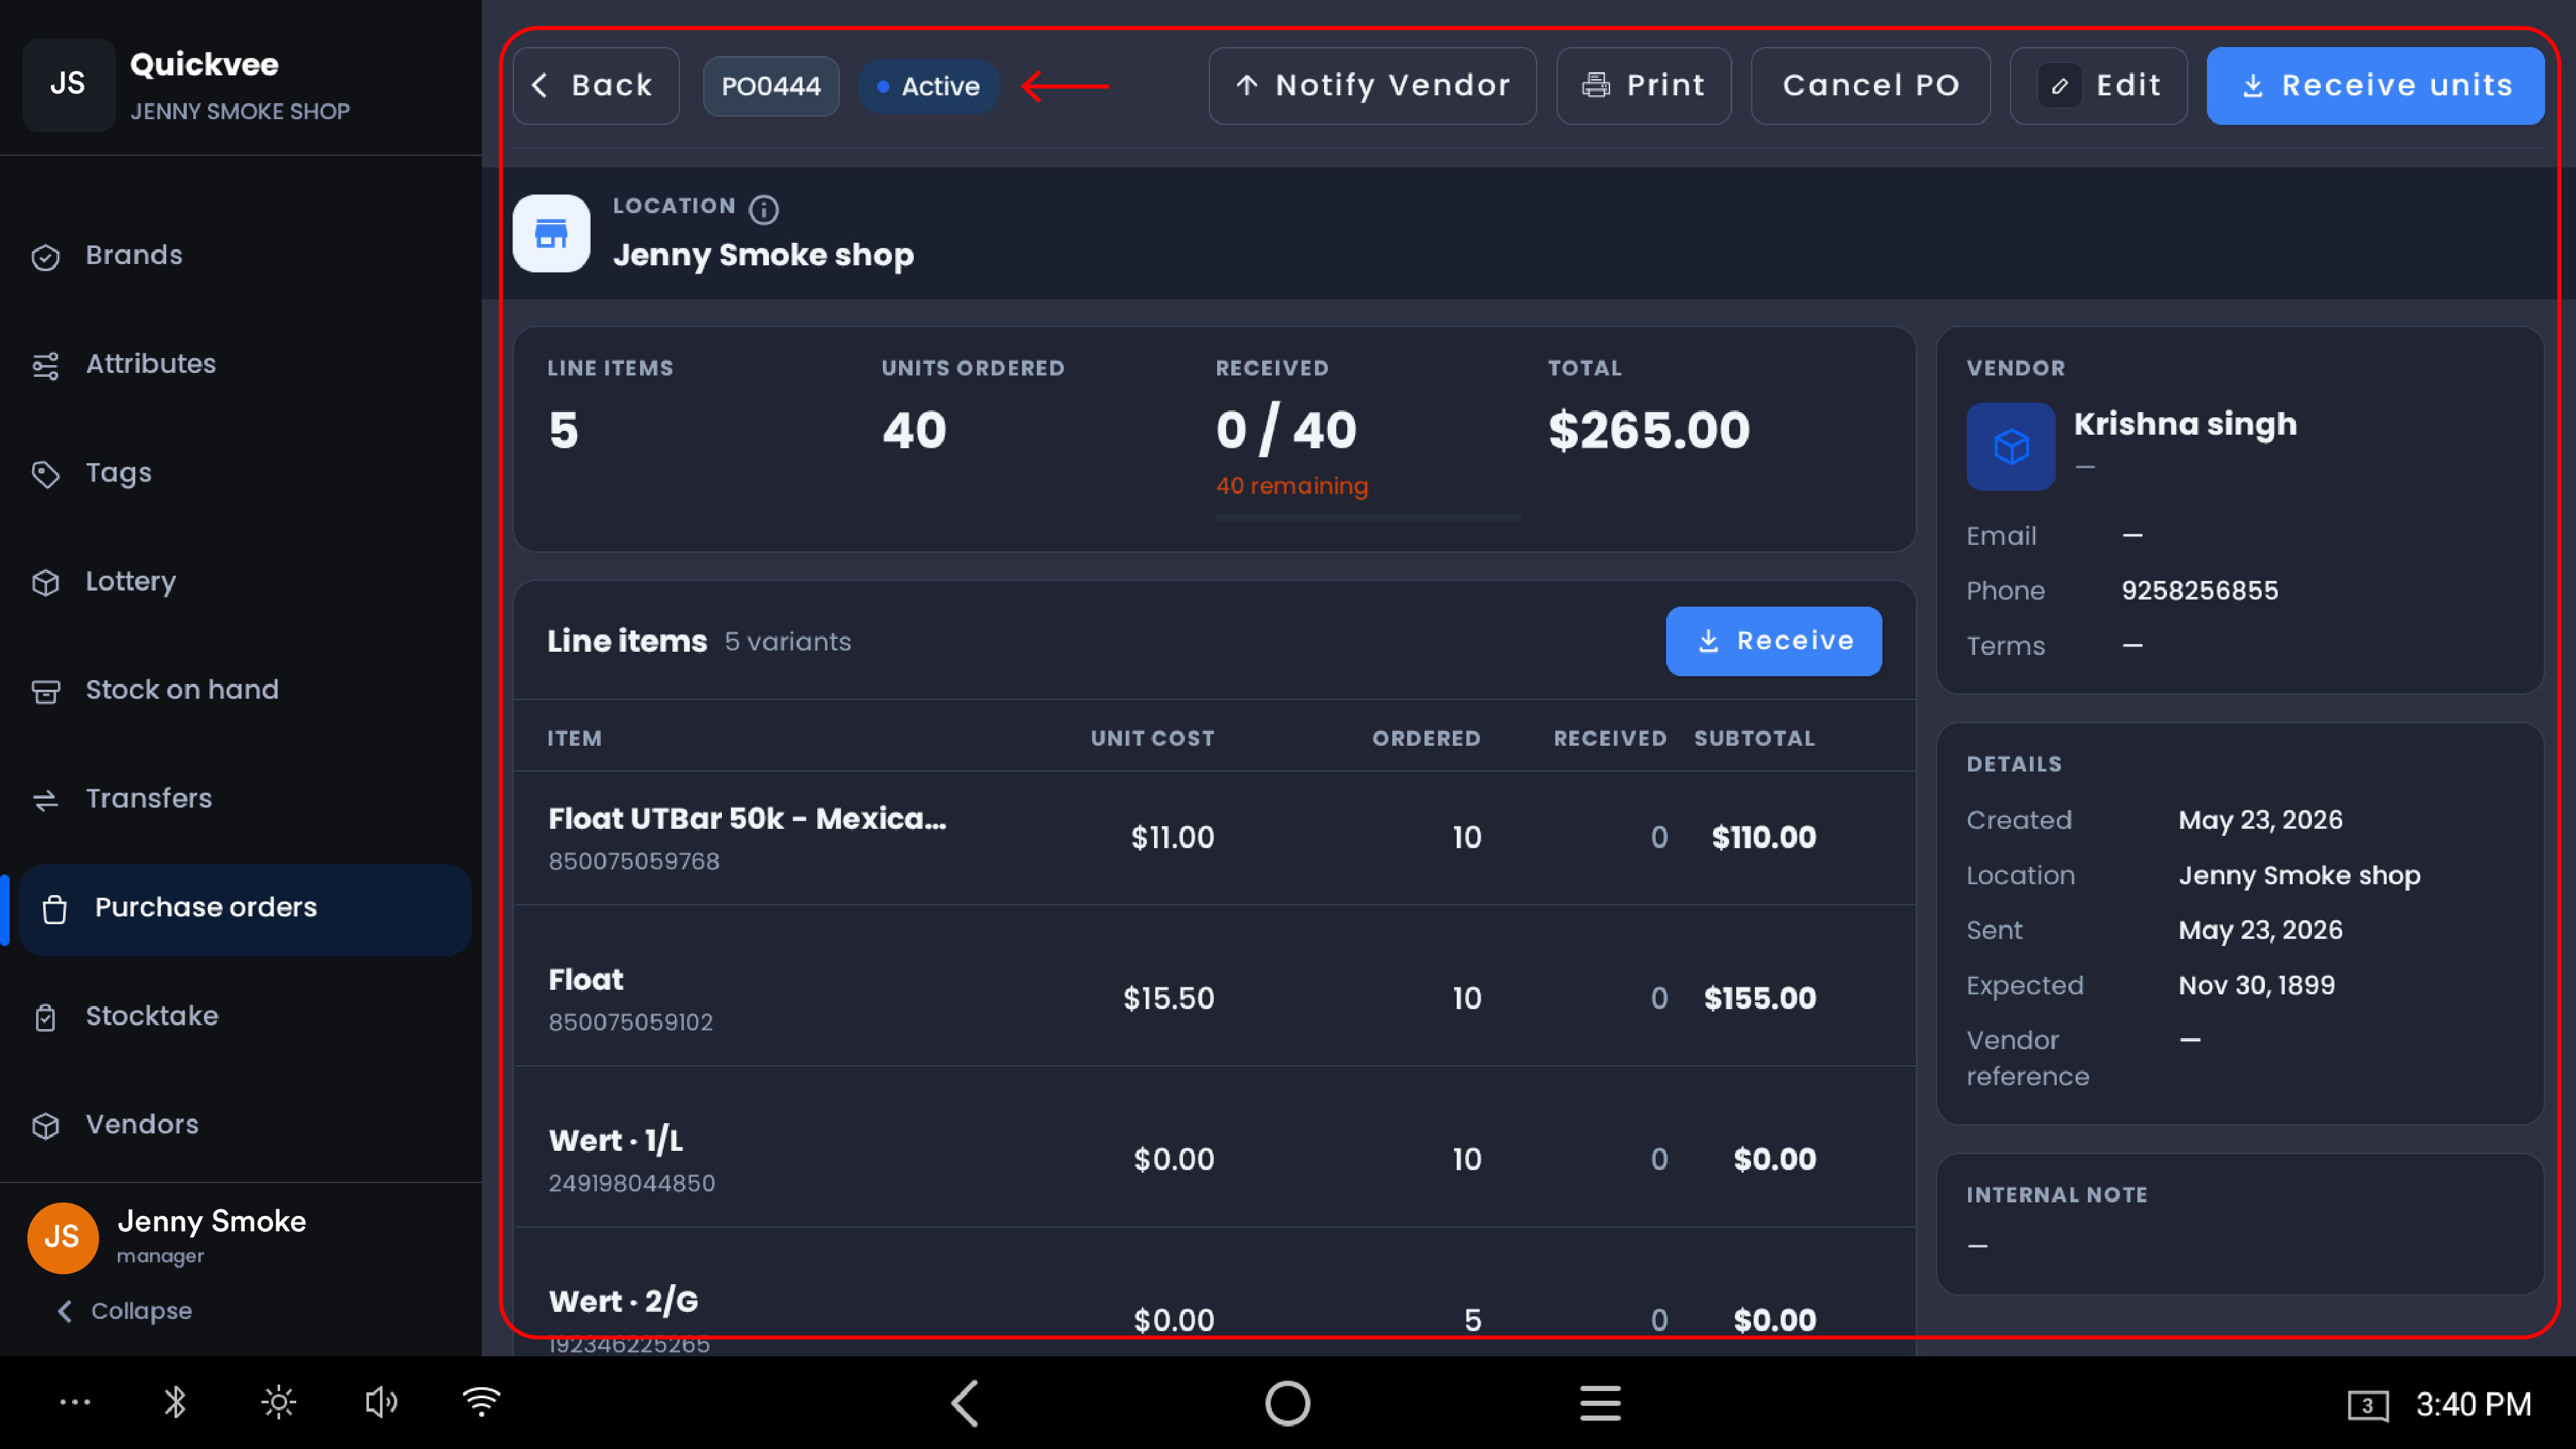
Open any PO to see its full picture.
-
Status header — PO number, status badge, and due status (for example Due today), with actions: Notify Vendor, Print, Cancel PO, Edit, and Receive units.
-
Progress cards — line items, units ordered, received progress (0/3 with remaining count), and total value.
-
Line items table — item, unit cost, ordered, received, and subtotal per line.
-
Vendor panel — the supplier's email, phone, and payment terms from your vendor record.
-
Details panel — created, location, sent, and expected dates, plus vendor reference.
-
Internal note — the note from creation.
Receiving stock
When the delivery arrives, tap Receive units.
-
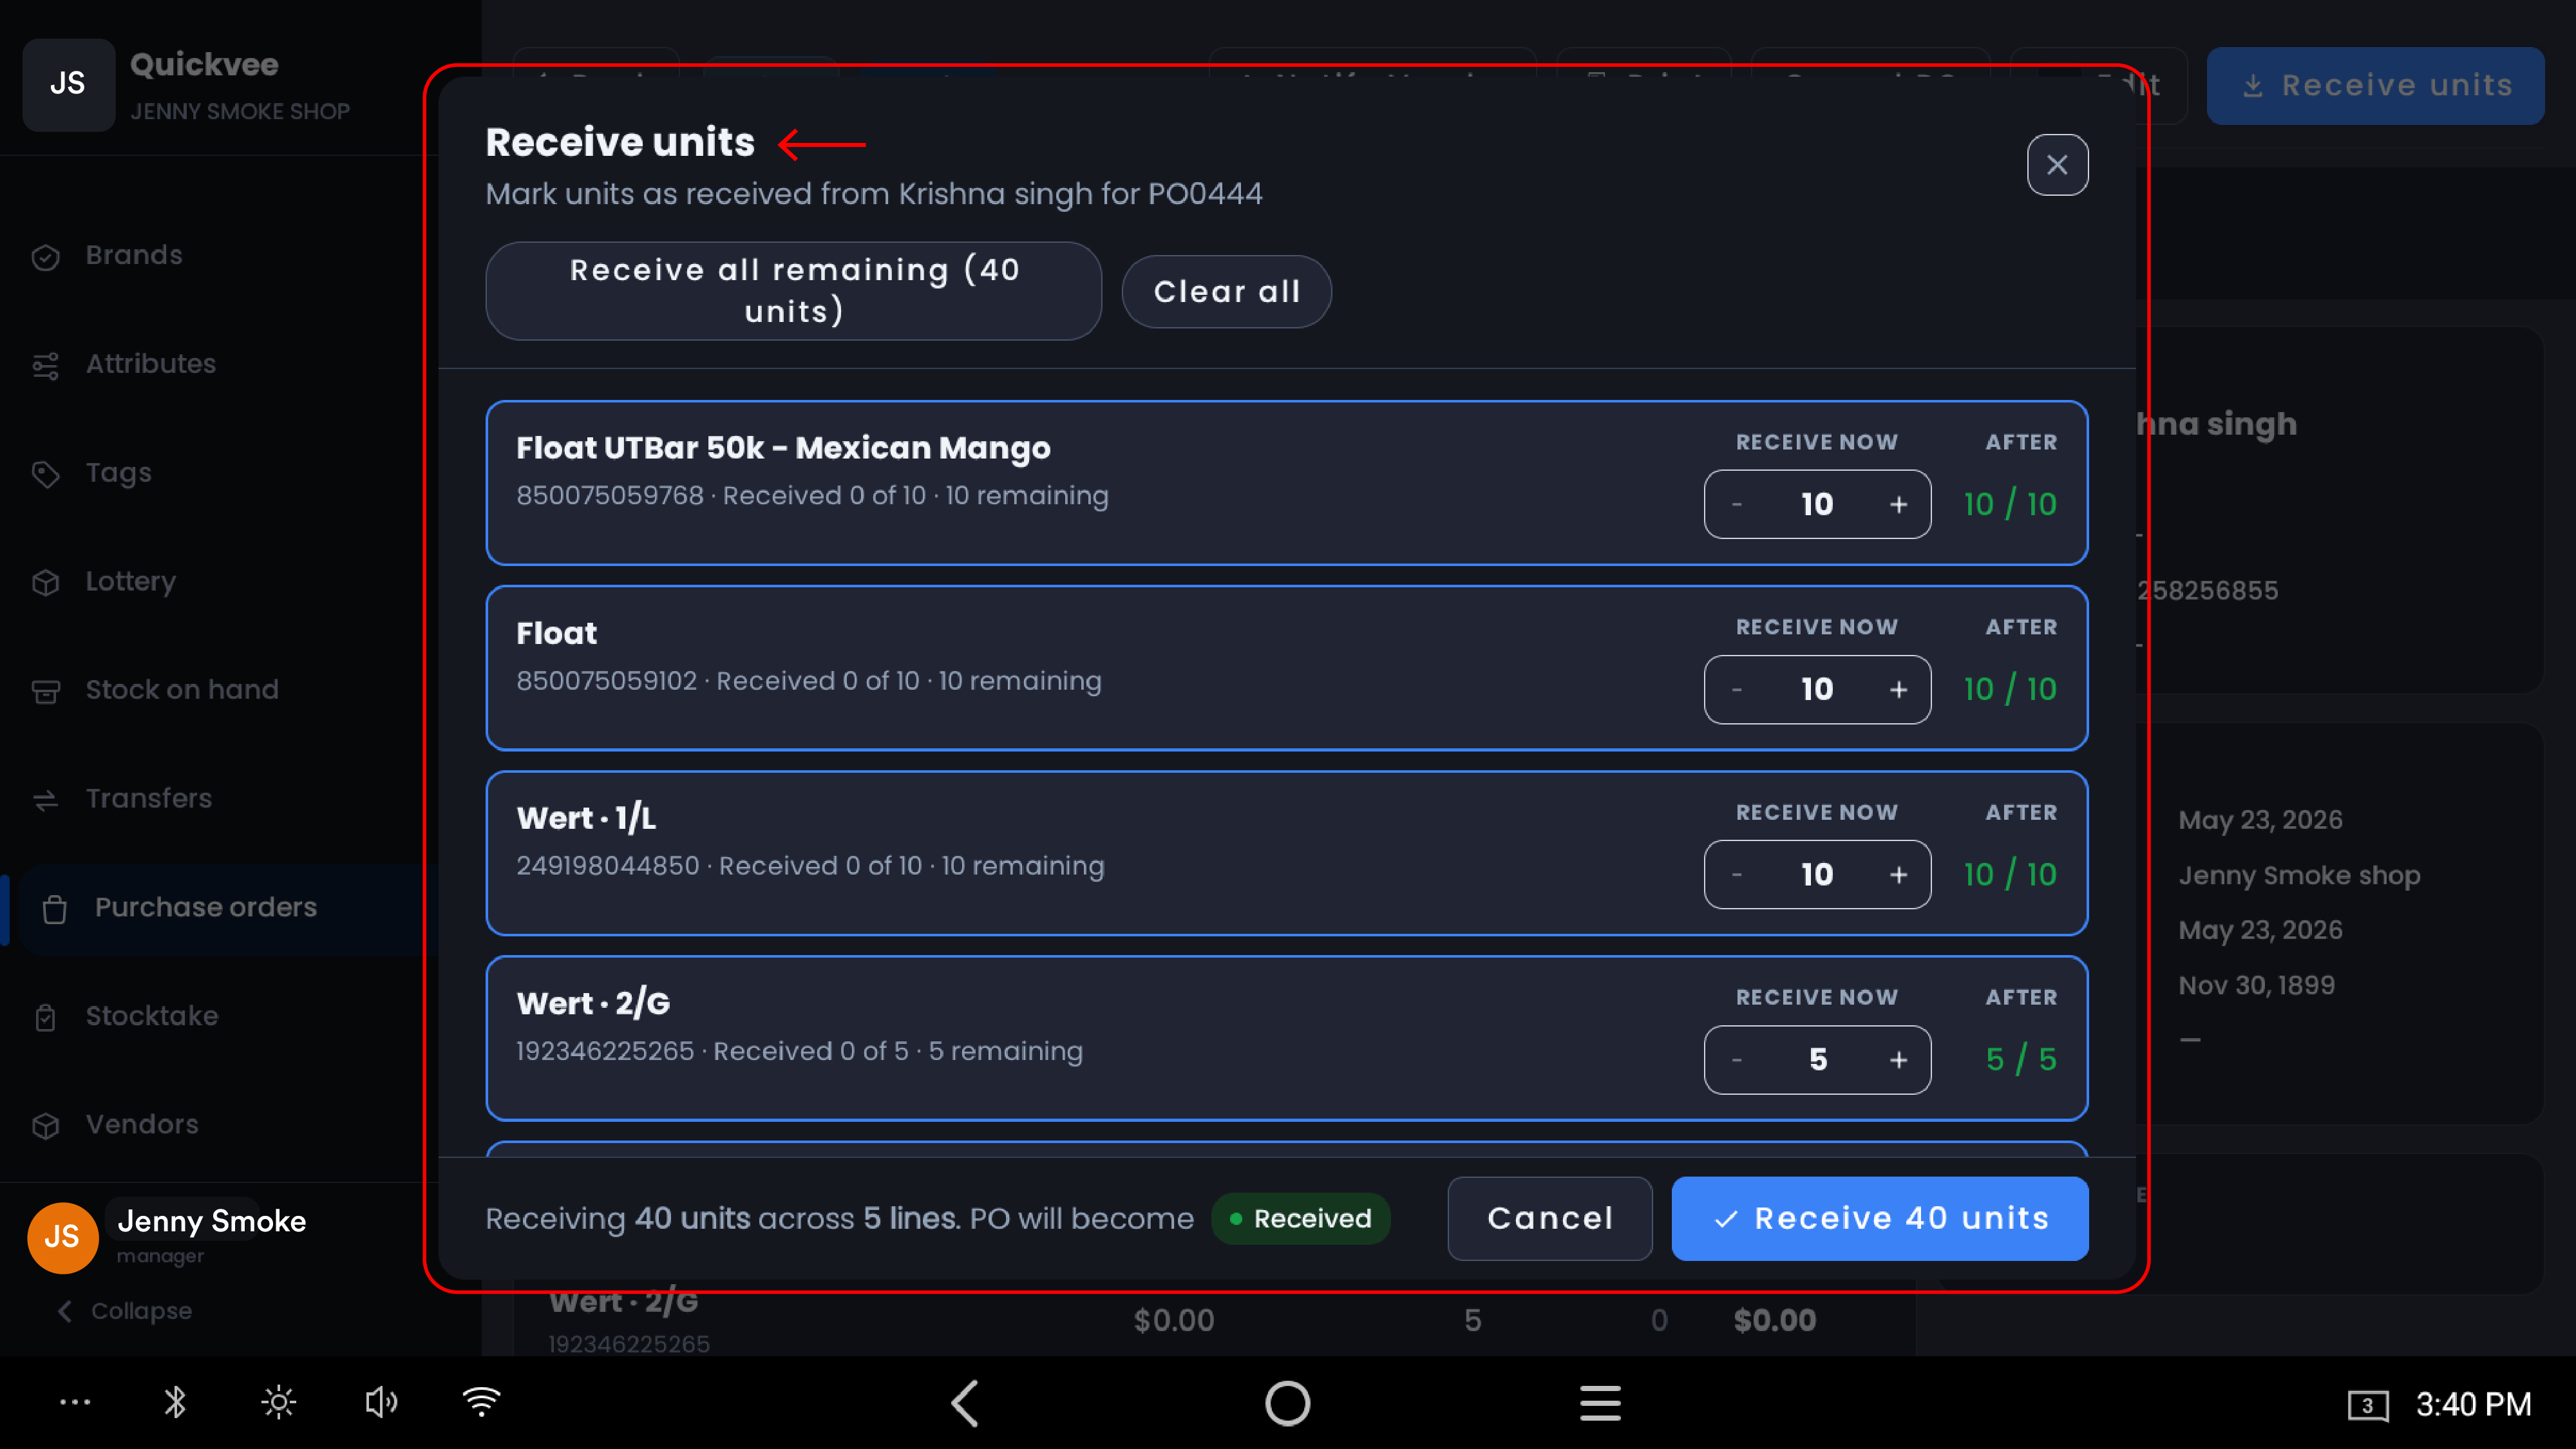
The receive dialog lists every outstanding line with its remaining count.
-
Set the Receive now quantity per line with the stepper — the After column shows what each line's received total will become, in green when the line completes.
-
For a complete delivery, tap Receive all remaining to fill every line in one tap. Clear all resets.
-
Optionally add a note — for example, boxes accepted versus damaged and flagged with the vendor.
-
The footer confirms exactly what's about to happen — how many units across how many lines, and what status the PO will become.
-
Tap Receive units to confirm. Received stock is added to your inventory immediately.
Partial deliveries are first-class: receive only what showed up, and the PO moves to Partial status with per-line progress tracked. Receive the balance in later sessions until the PO completes.
⚠️ Important. Use the receive note whenever a delivery isn't clean — shortages, damage, substitutions. The note lives in the PO's receive history permanently and settles vendor disputes months later.
Receive history
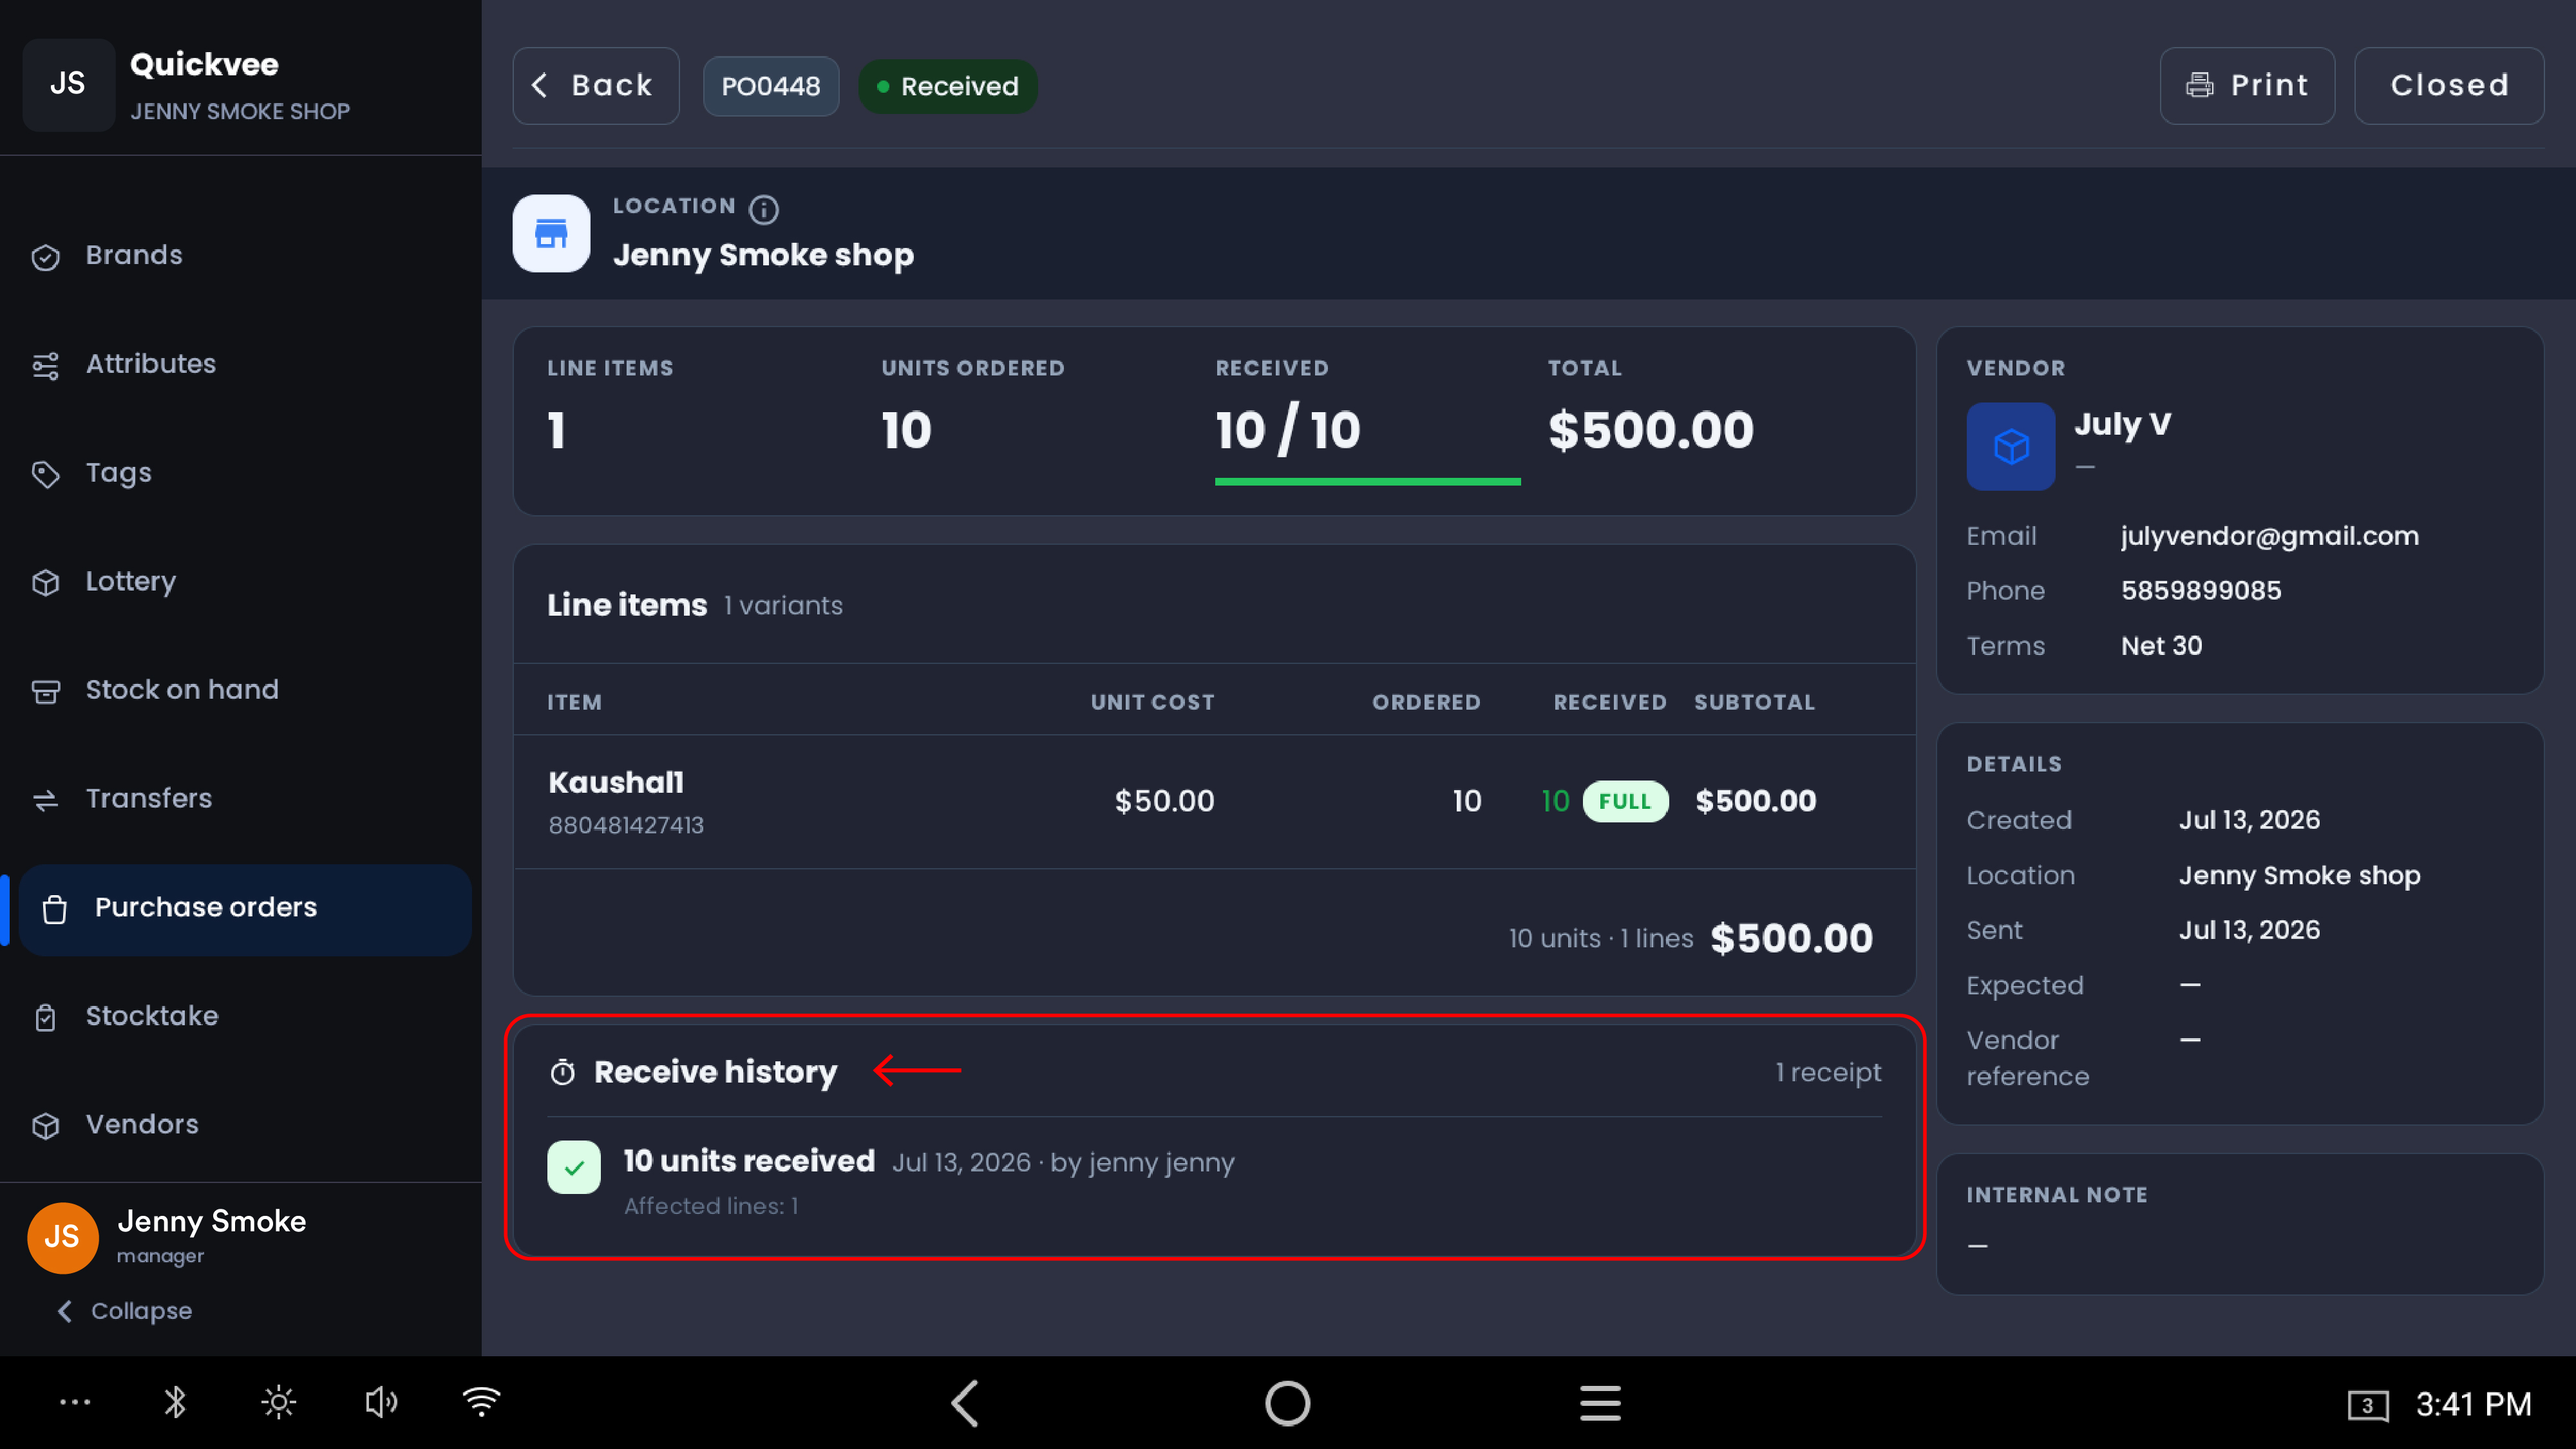
Fully and partially received POs show a Receive history section — every receiving session as a separate receipt with the unit count, date, who received it, and how many lines were affected. Fully received lines display a green Full chip. Once complete, the PO is marked Received and can be Closed from the header.
Cancelling a PO
Tap Cancel PO on the detail page to void an active order. Cancelled POs stay in the list under the Cancelled filter for the record — nothing disappears.
Printing
Tap Print on the detail page for a hard copy — useful as a receiving checklist at the back door or for suppliers who still want a paper order.
Every action is audit-logged
PO activity — create, edit, receive, void, delete — is recorded in the Audit Log with field-level before-and-after values, who did it, and when. See Audit log (inventory activity history) for how to review it.
Common questions
What's the difference between Save as Draft and Create PO?
A draft is a private work-in-progress you can finish anytime. Create PO commits the order to Active — it starts counting in Open Value and Units Incoming, and its expected date feeds the Overdue tracker.
The vendor delivered more than ordered — what do I do?
Edit the PO to correct the line quantity first, then receive. Keeping the ordered quantity accurate keeps your cost and vendor reporting honest.
Can I receive the same PO across multiple days?
Yes — that's what Partial status is for. Each receiving session becomes its own entry in the receive history with its own note.
Does receiving update my stock immediately?
Yes. The received units are added to the product's inventory at the PO's location the moment you confirm.
What does the average per unit on the list page mean?
The PO's total divided by its units — a quick sanity check that a big order's blended cost looks right before you open it.
Can I raise one PO for multiple stores?
A PO belongs to one location — the store that receives the stock. Raise a separate PO per location, and use the header's store filter to see them side by side.
Why do I see both "Purchase Order" and "Old Purchase Order" in the web backend?
The web backend keeps the legacy module available during the transition. This article covers the new POS experience; the new UI is the go-forward workflow.
Related
See Manage purchase orders in the web backend for the same workflow in the merchant dashboard, and Manage vendors on the POS to set up the suppliers you order from.