
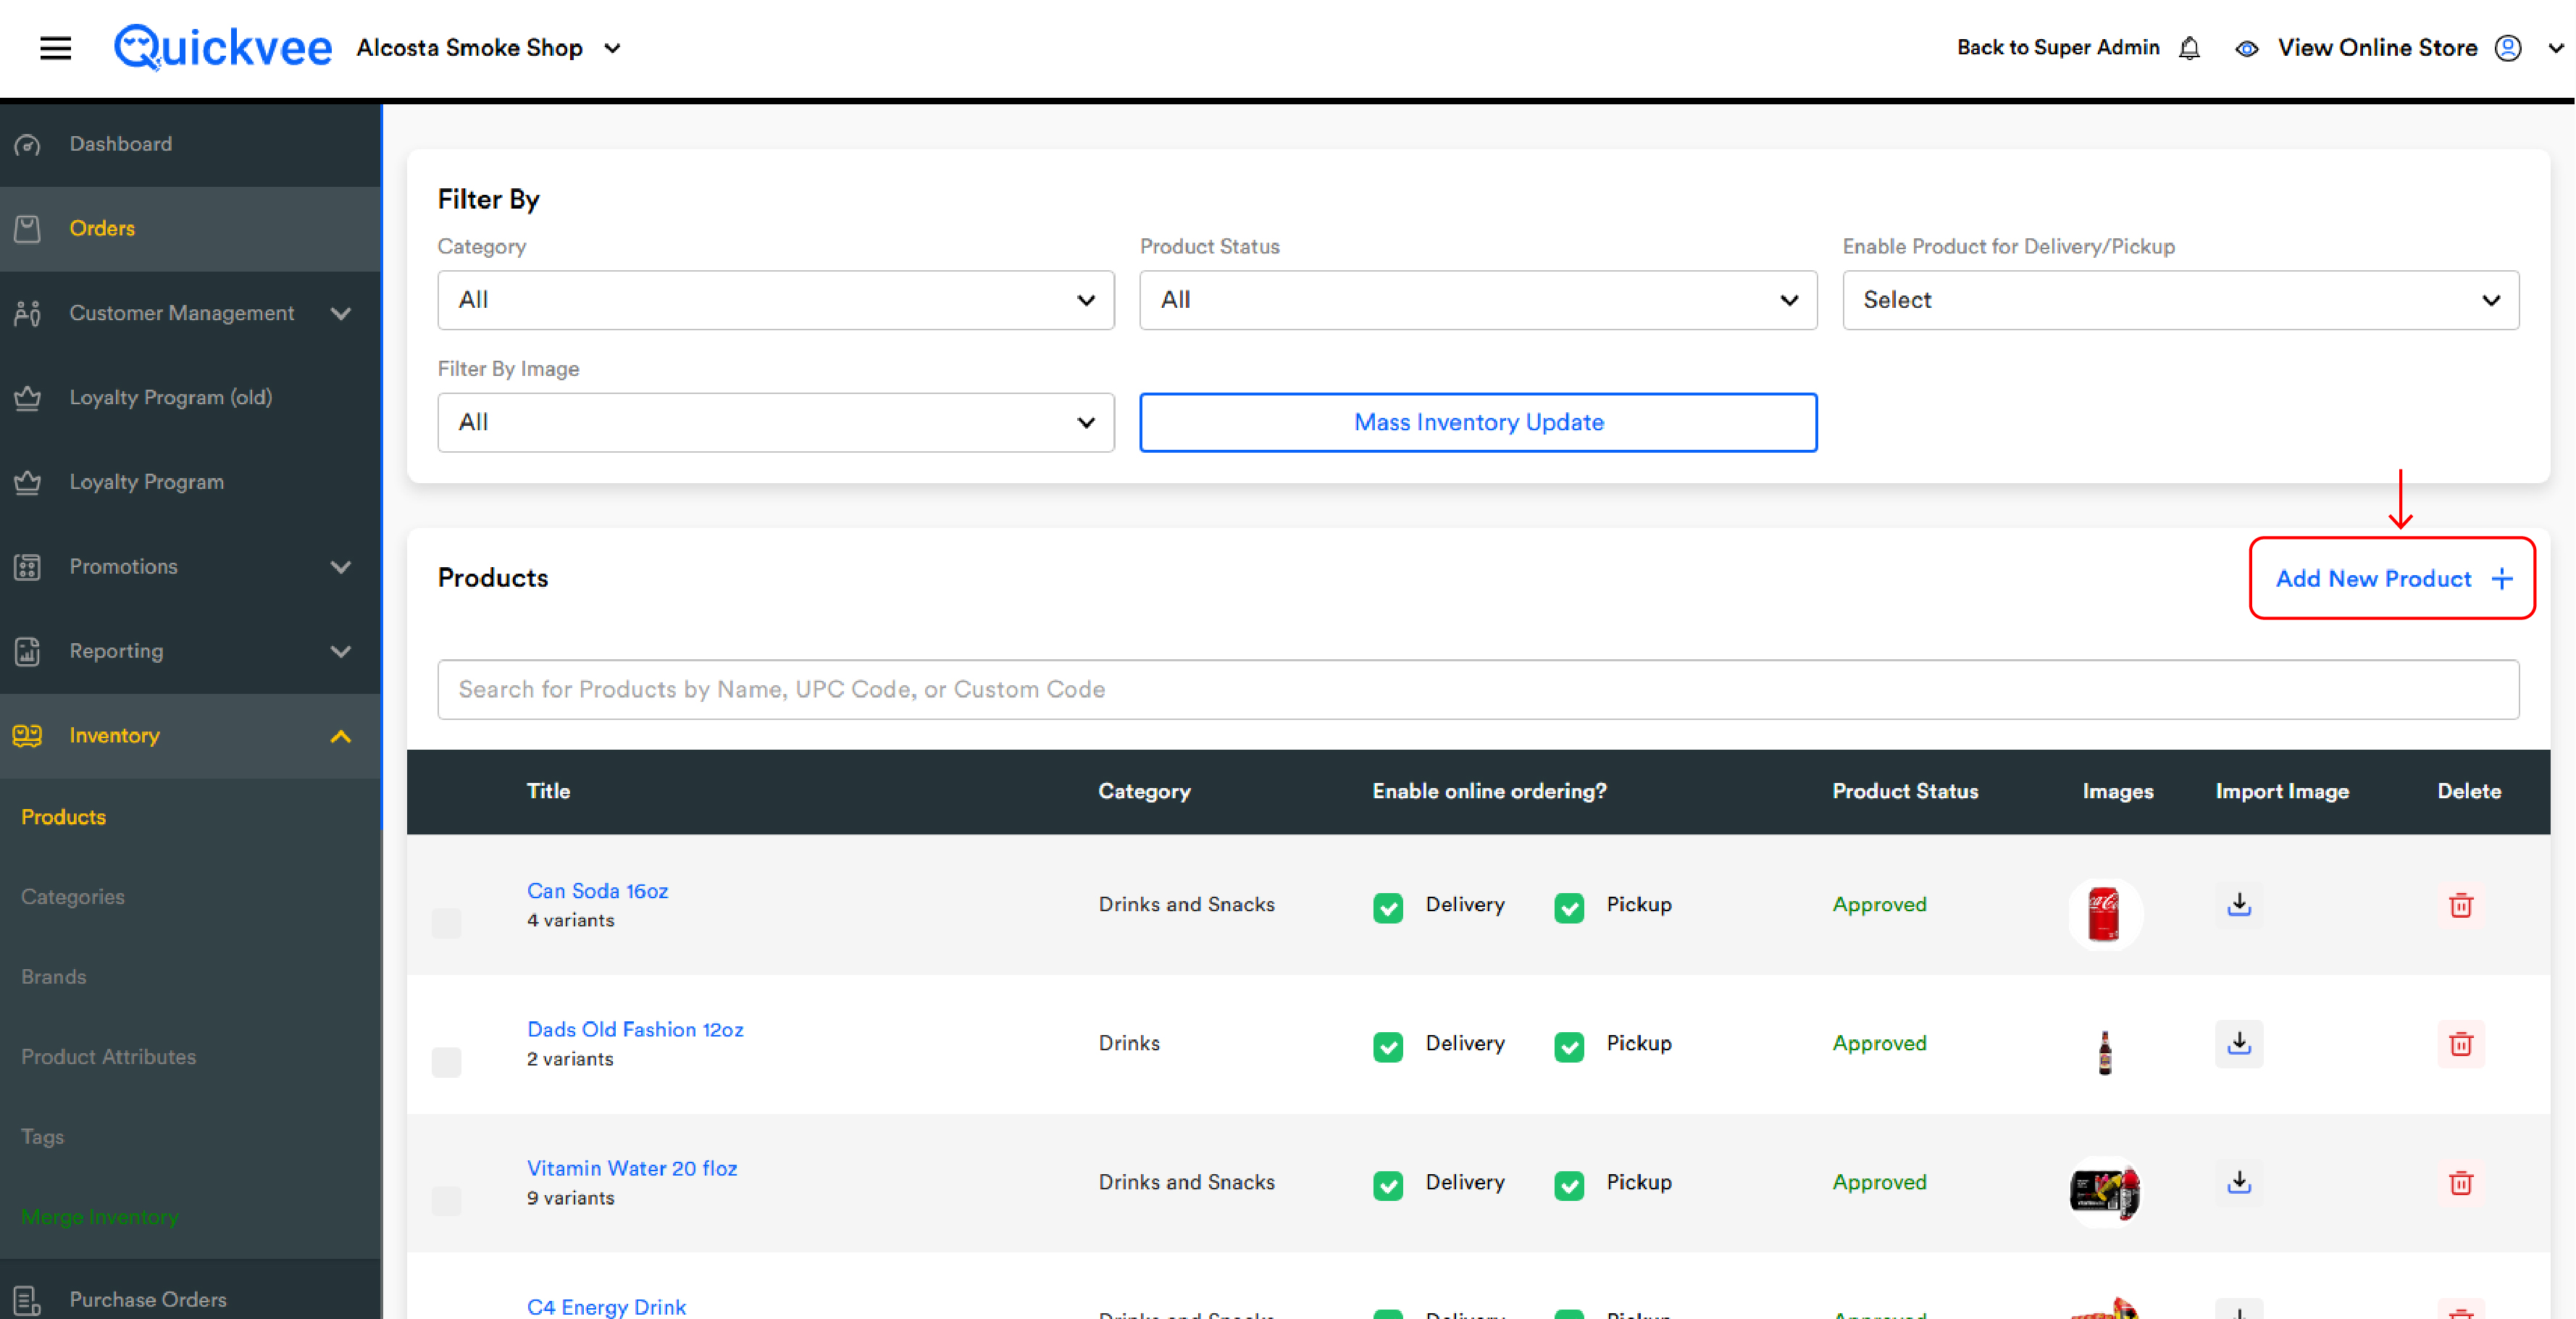
The Products page in your web backend is the master view of every product you sell — across the register, your online storefront, and any other channel. From this single page you can see your whole catalog at a glance, filter and search, mass-update flags across many products at once, and drill into any product to edit details, variants, pricing, stock, images, brand, tags, and online-channel visibility.
Access path: Sign in to your merchant backend → side menu → Inventory → Products.
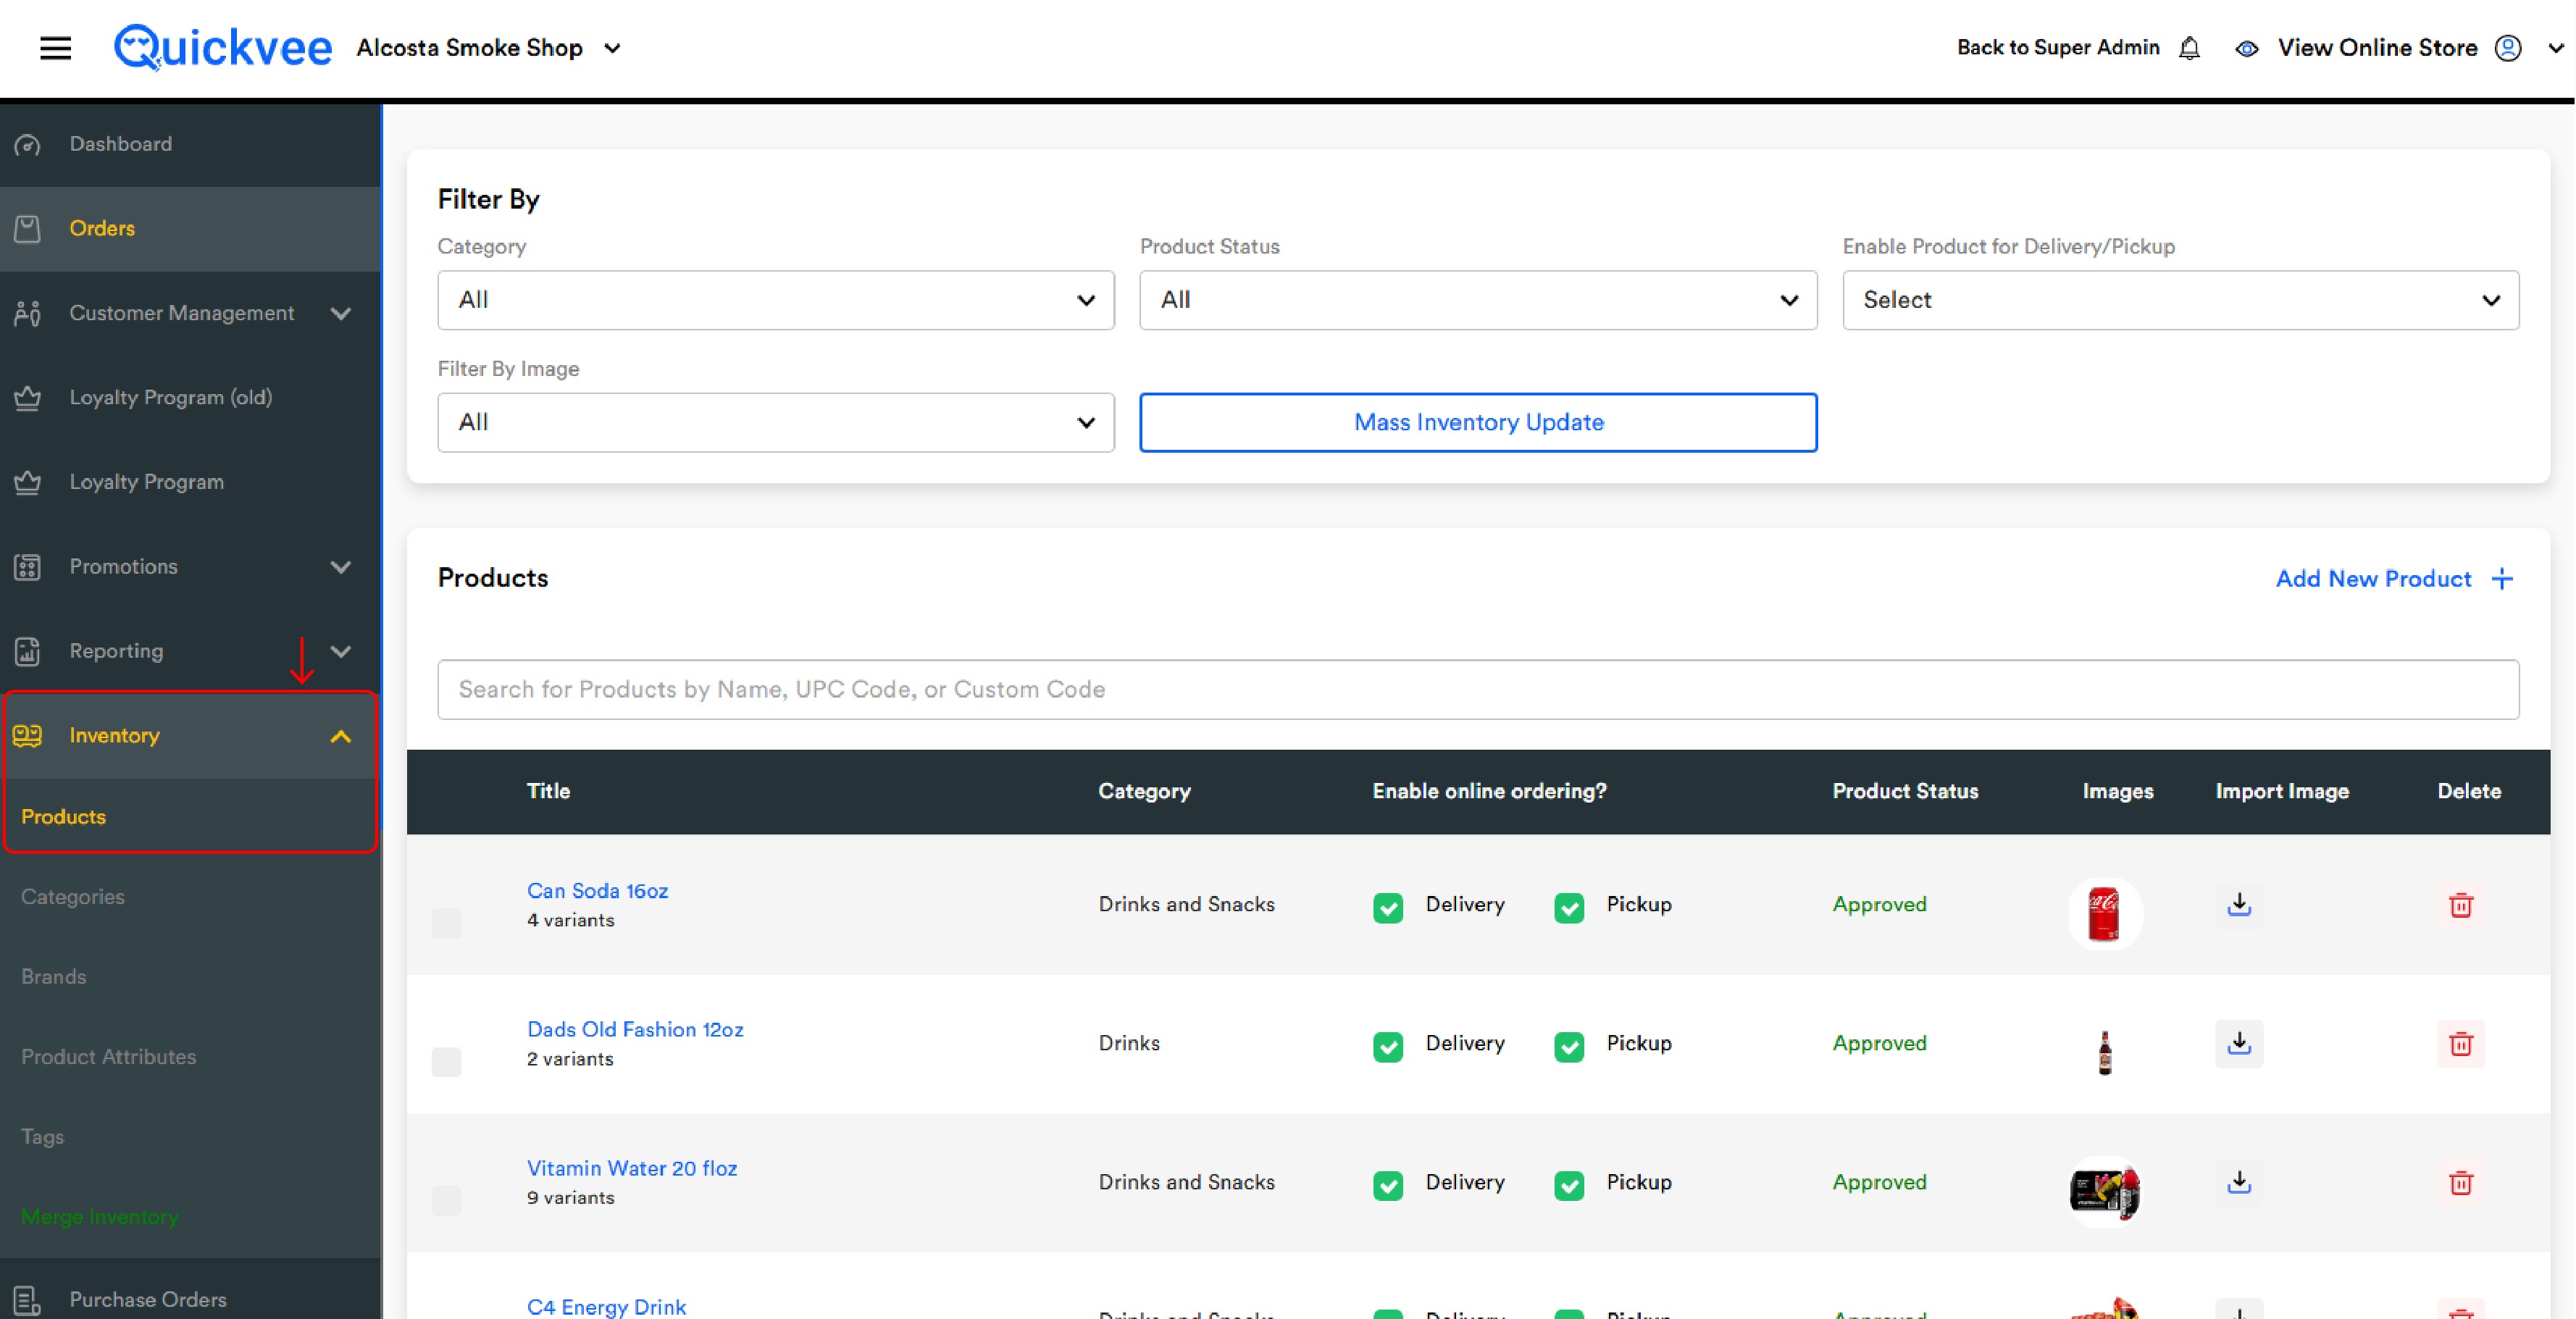
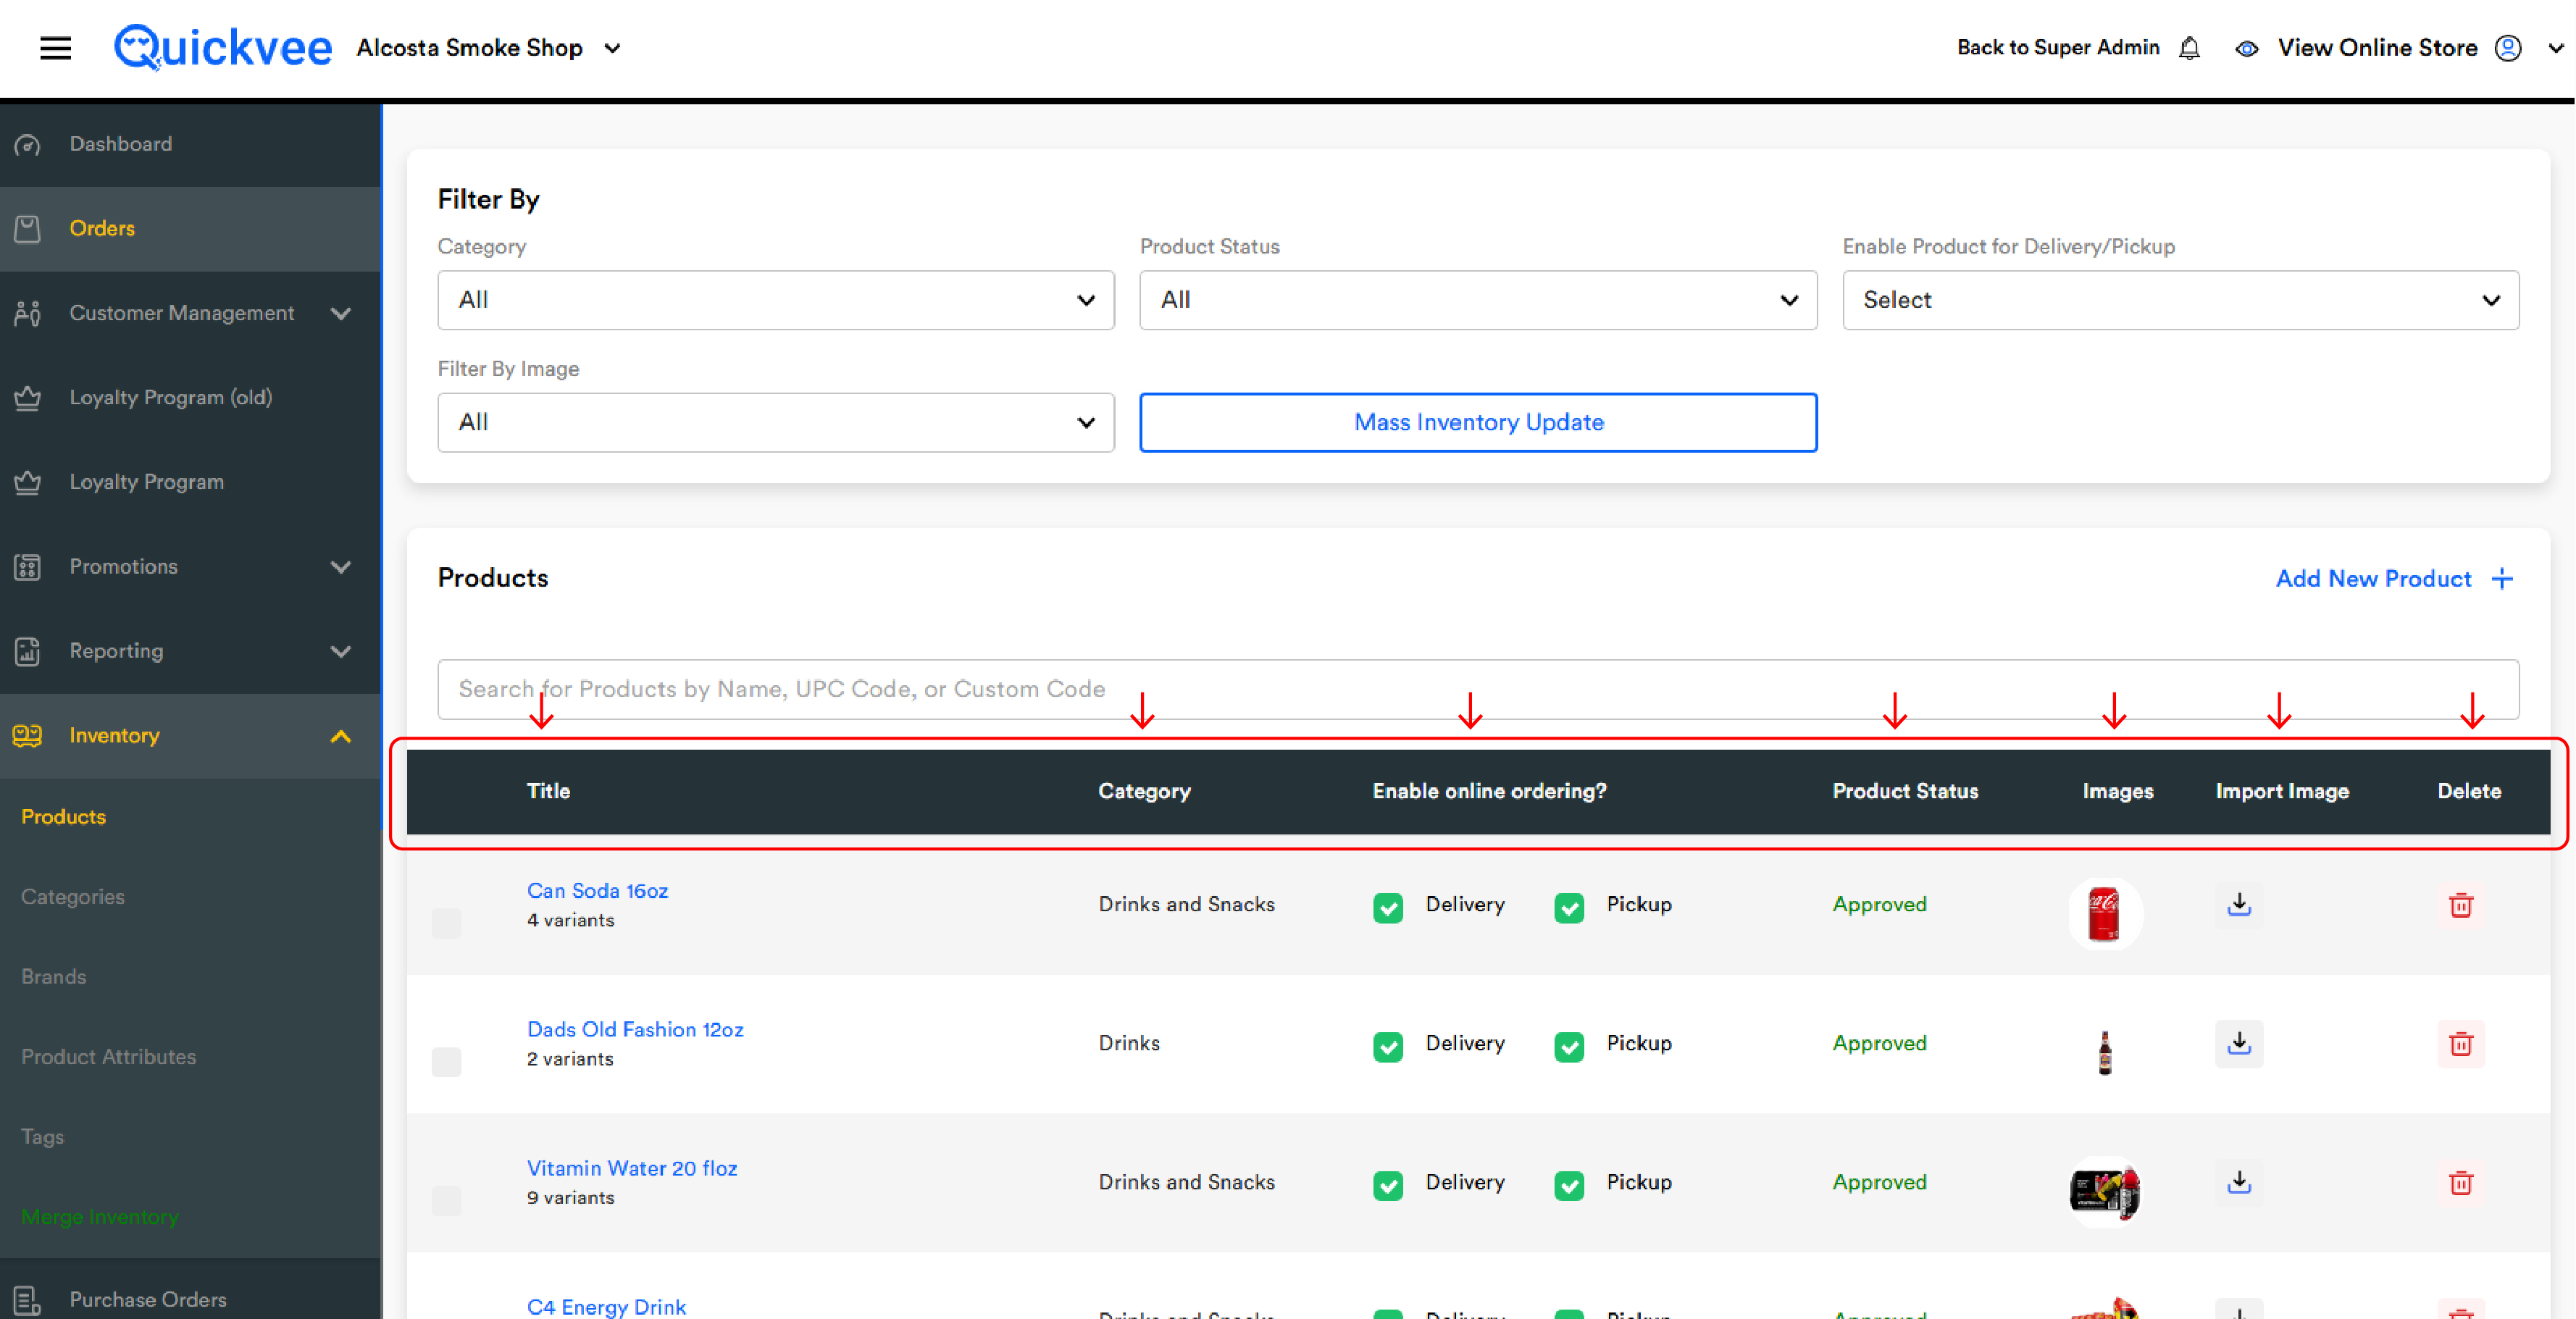
The Products list
Every product appears as a row. Each row carries the information you'd most often want to scan at a glance:
|
Column |
What it shows |
|---|---|
|
Checkbox (leftmost) |
Select one or more products to act on them with Mass Inventory Update. |
|
Title |
The product name (blue, clickable). Variant products show a N variants tag underneath. |
|
Category |
The category the product is assigned to (Rolling Trays, Disposables, Cleaning Products, etc.). |
|
Enable online ordering? |
Two channel toggles — Delivery and Pickup. Green checkmark = live; blank = hidden. |
|
Product Status |
Approval state for the online storefront: Pending, Approved, or Rejected. |
|
Images |
Thumbnail of the product's default image. A magnifier icon means no image is on file. |
|
Import Image |
One-click image fetch from a connected source. |
|
Delete (red trash icon) |
Removes the product from the catalog. |
A search bar above the table filters live as you type — by name, UPC, or custom code. Add New Product + sits at the top-right.
Filtering the list
The Filter By panel above the Products section gives you four ways to narrow what's shown. Filters combine — pick category + status + channel rule together and the list returns only products matching every selection.
Category
Pick any category in your store from the dropdown — Disposables, Pouches, Freebase, Salt Nic, and so on. All clears the filter.
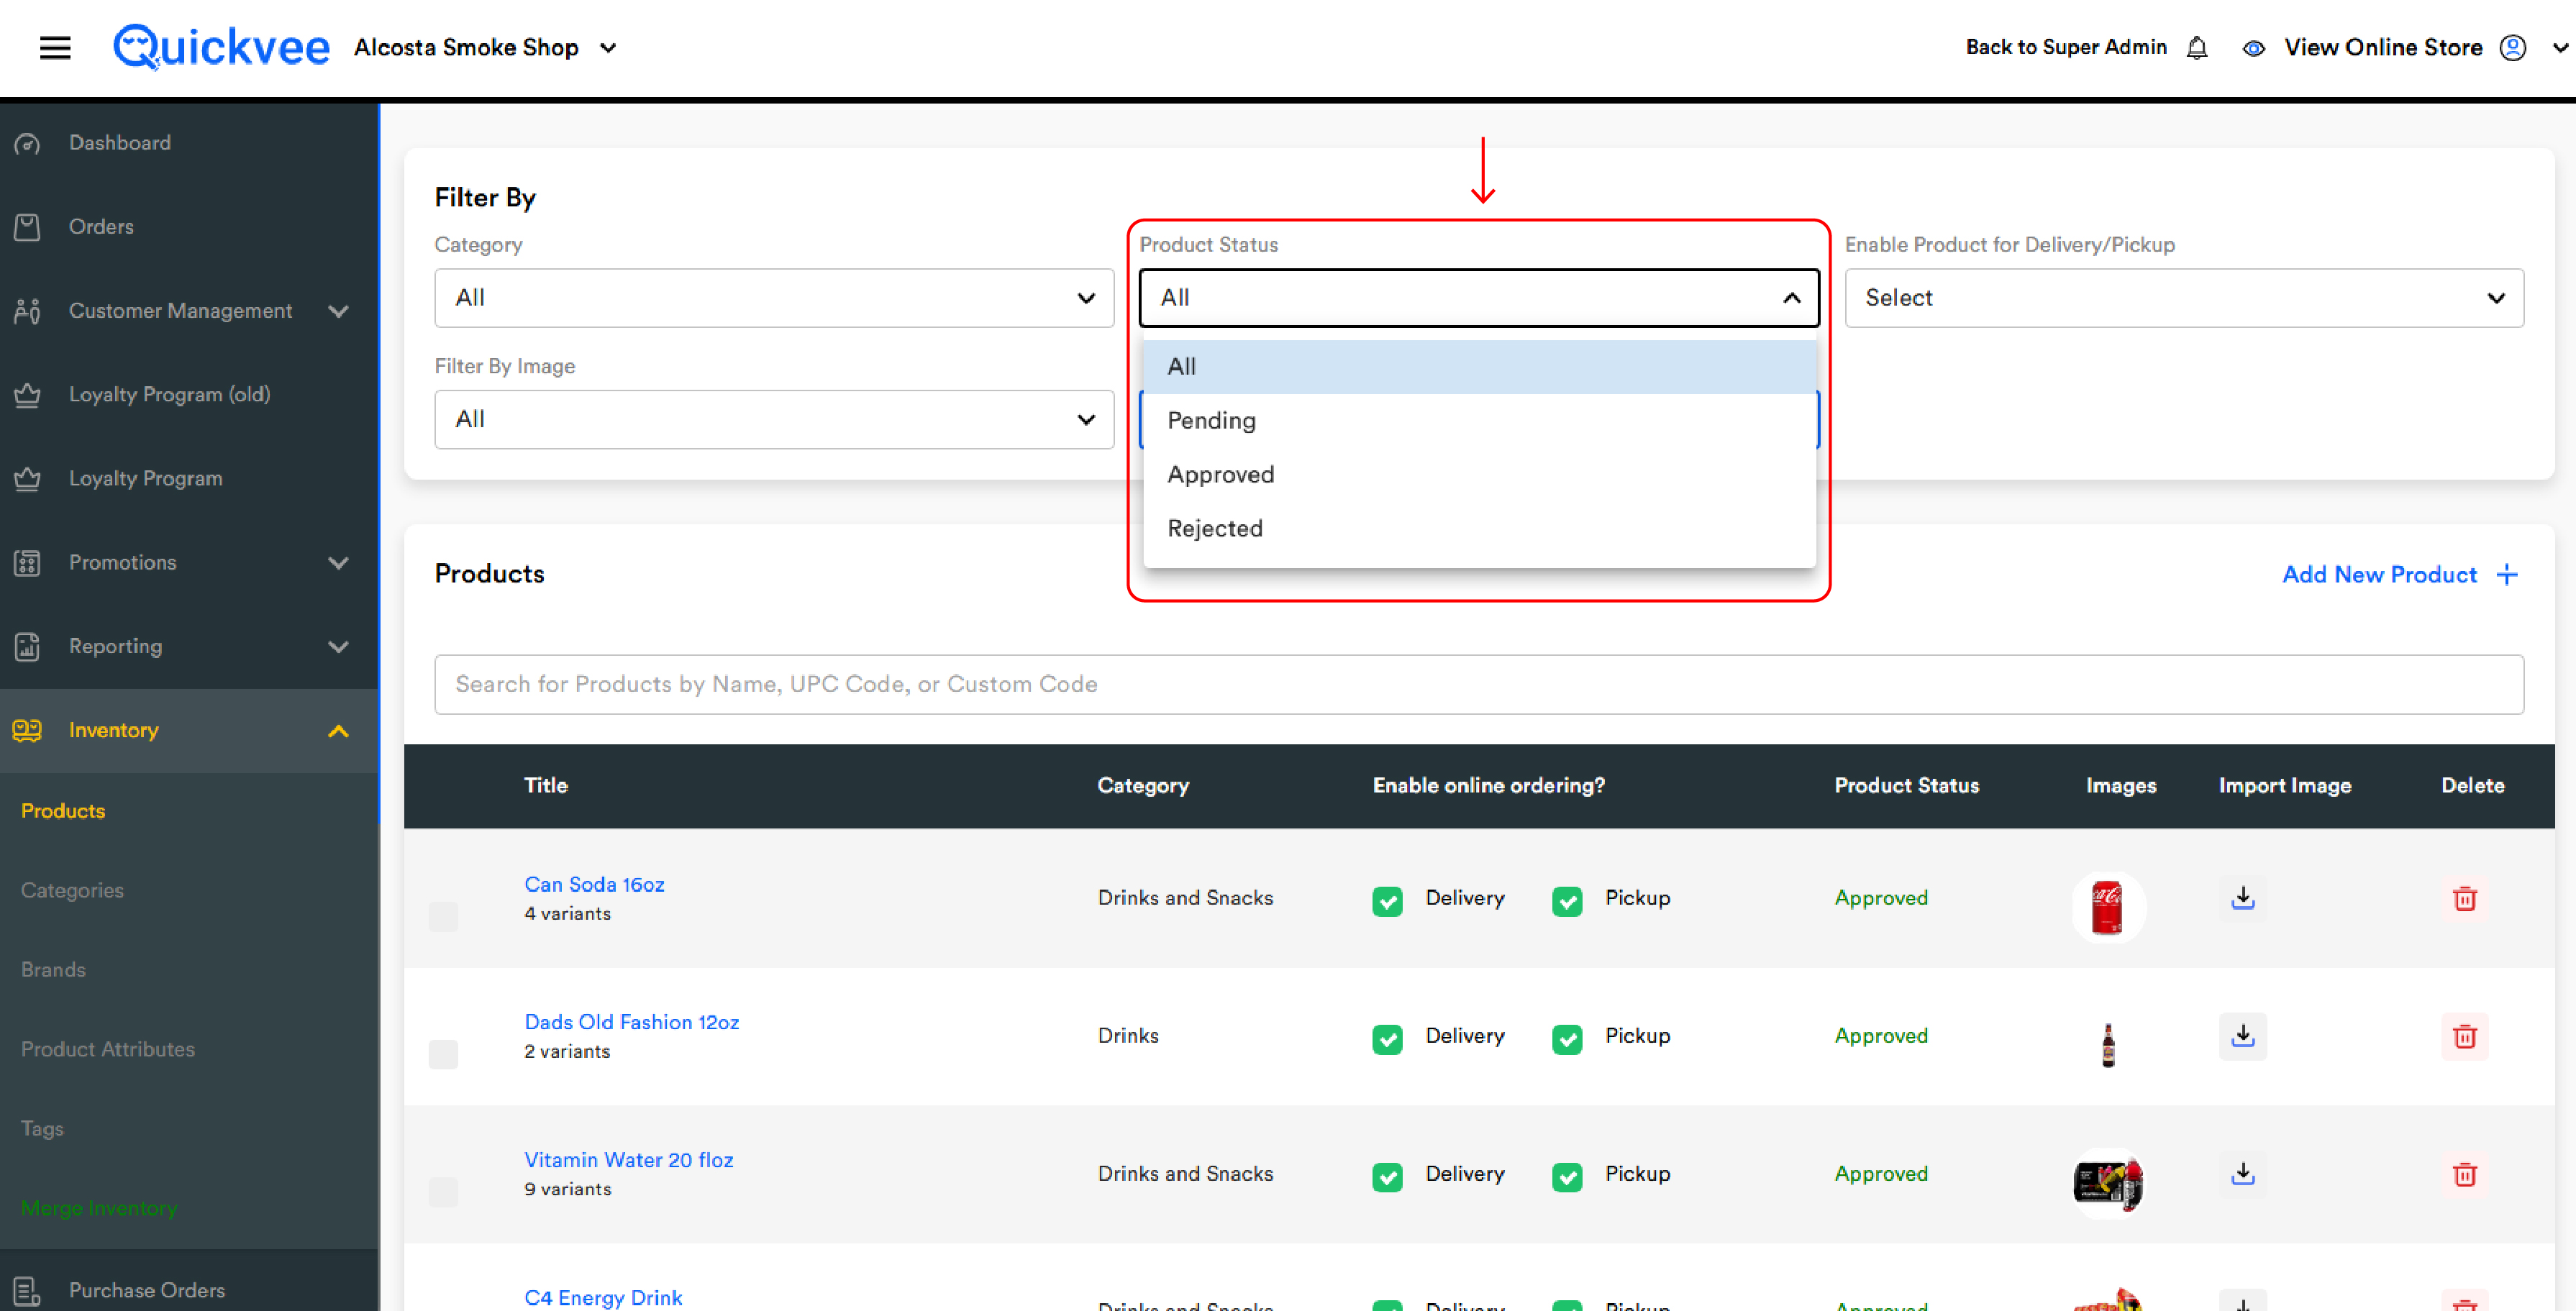
Product Status
|
Option |
Shows |
|---|---|
|
All |
Every product regardless of approval status. |
|
Pending |
Products awaiting approval for the online storefront. |
|
Approved |
Products live on the storefront. |
|
Rejected |
Products that failed approval and are hidden from the storefront. |
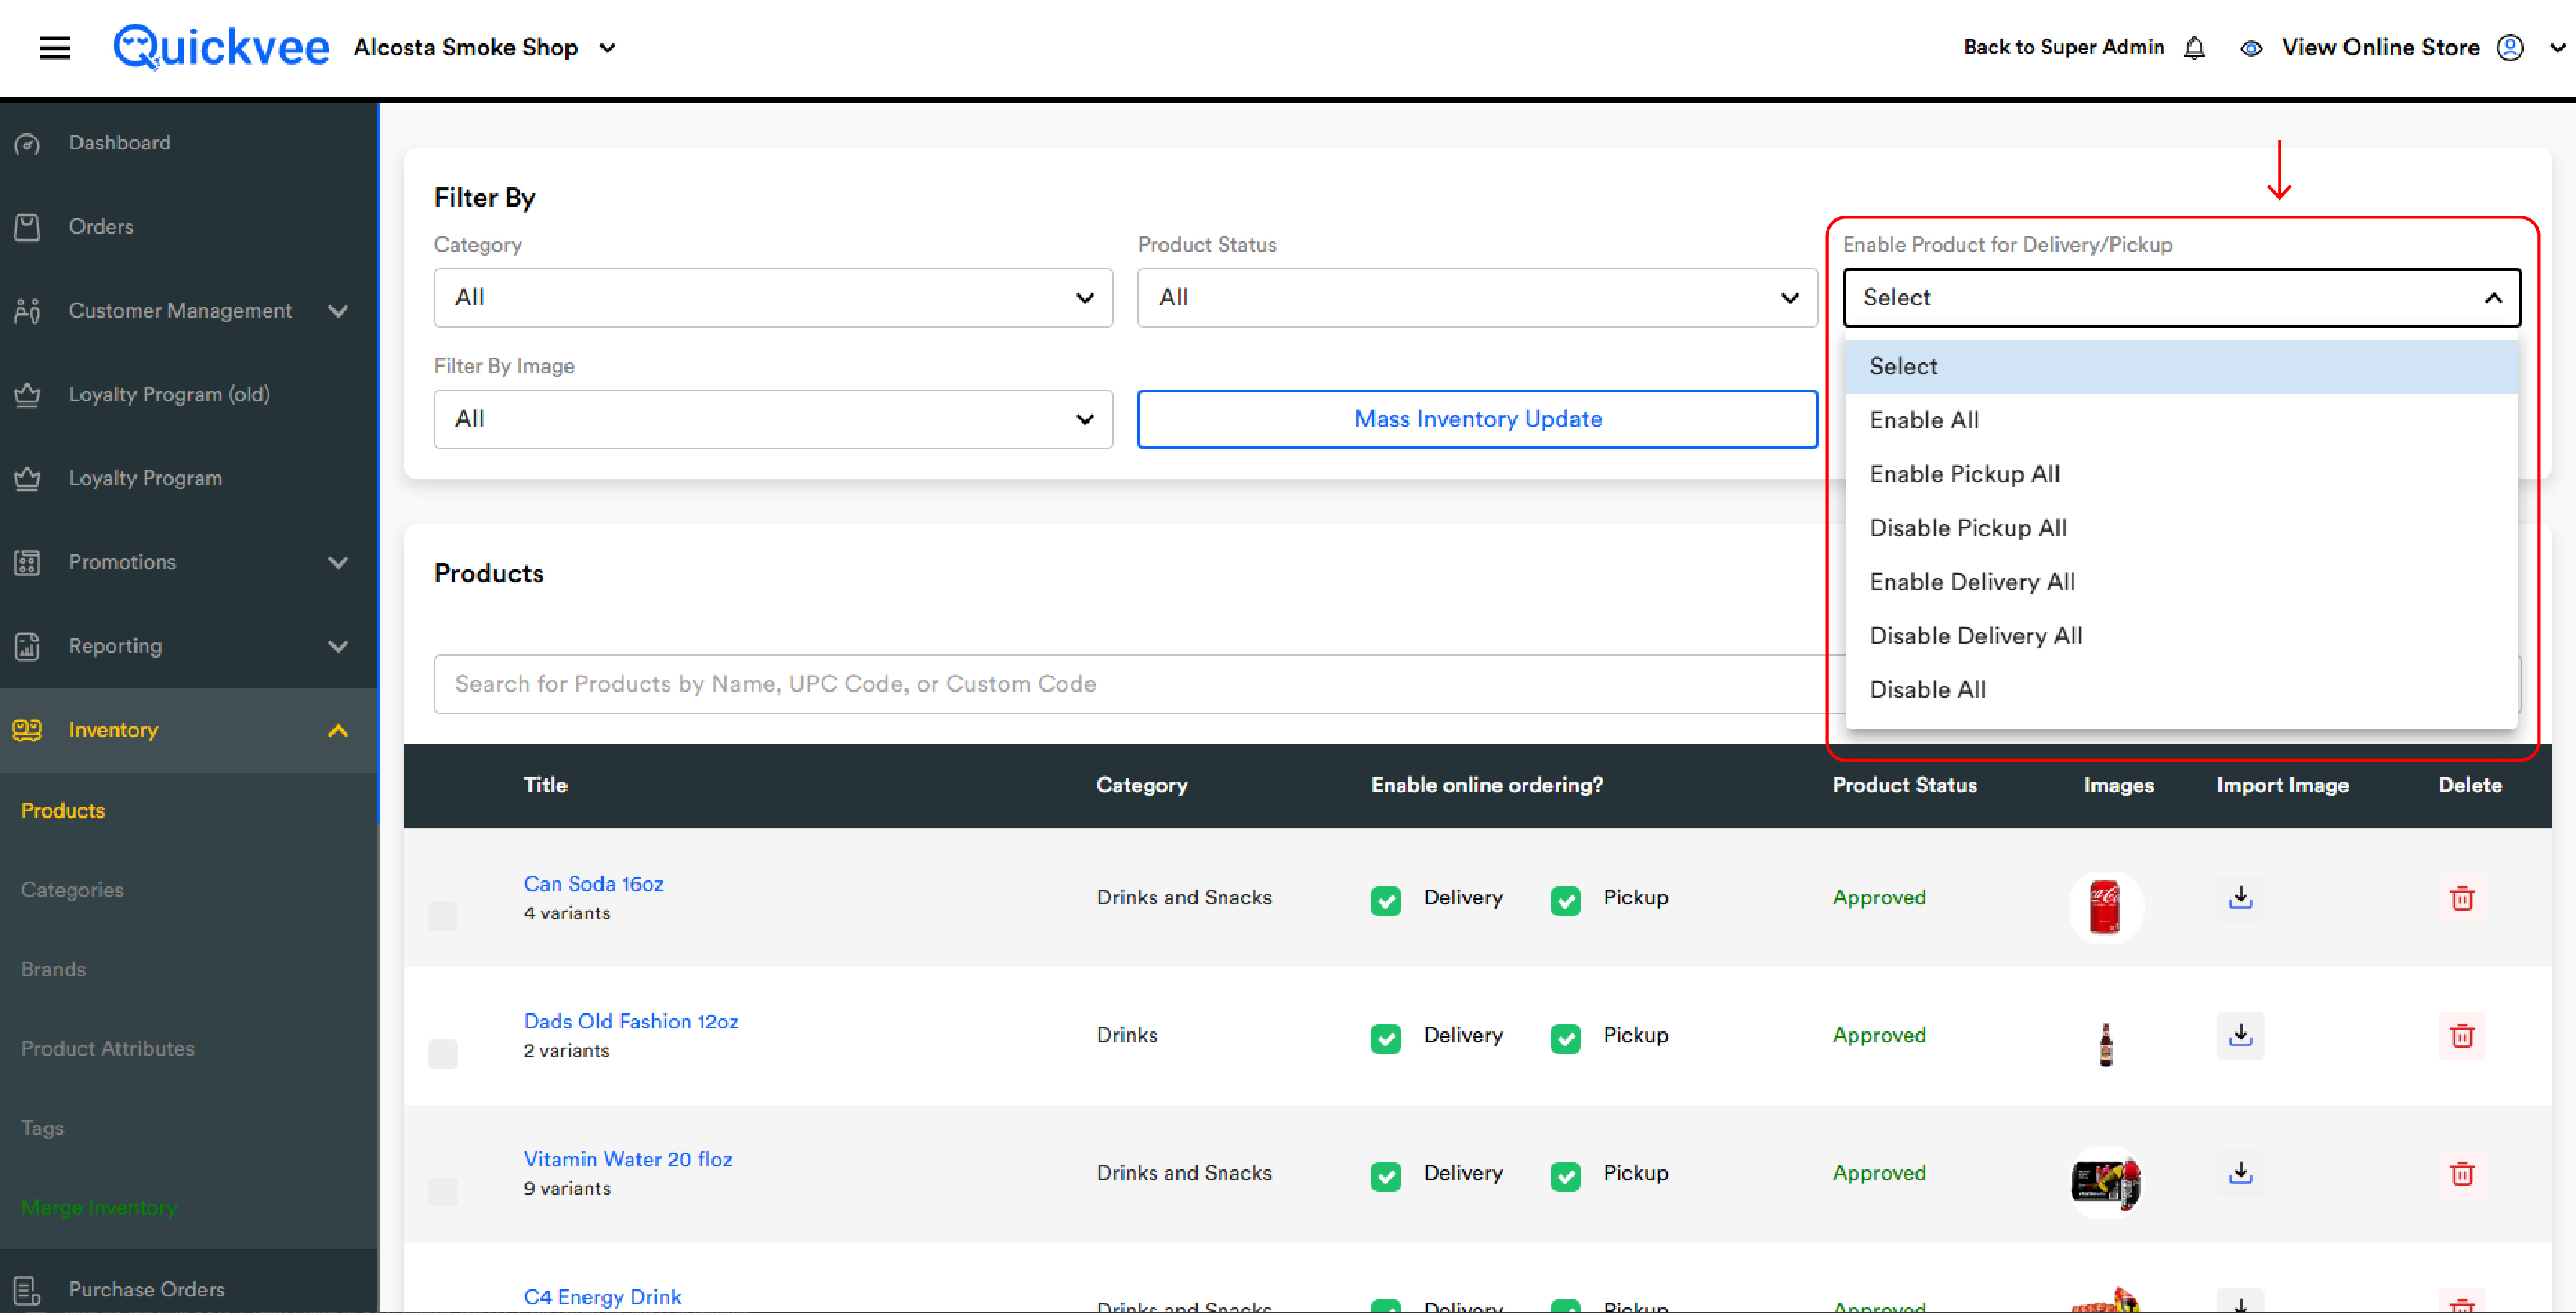
Enable Product for Delivery/Pickup
|
Option |
Shows |
|---|---|
|
Enable All |
Both Delivery and Pickup enabled. |
|
Enable Pickup All |
Pickup on (regardless of Delivery). |
|
Disable Pickup All |
Pickup off. |
|
Enable Delivery All |
Delivery on (regardless of Pickup). |
|
Disable Delivery All |
Delivery off. |
|
Disable All |
Both off — not orderable online. |
Filter By Image
All shows everything; Without Image shows only products missing a default image — useful during an image-upload pass.
Tip: Stack filters to focus your work. Category = Disposables + Filter By Image = Without Image gives you only the disposables that still need product photography.
Mass Inventory Update
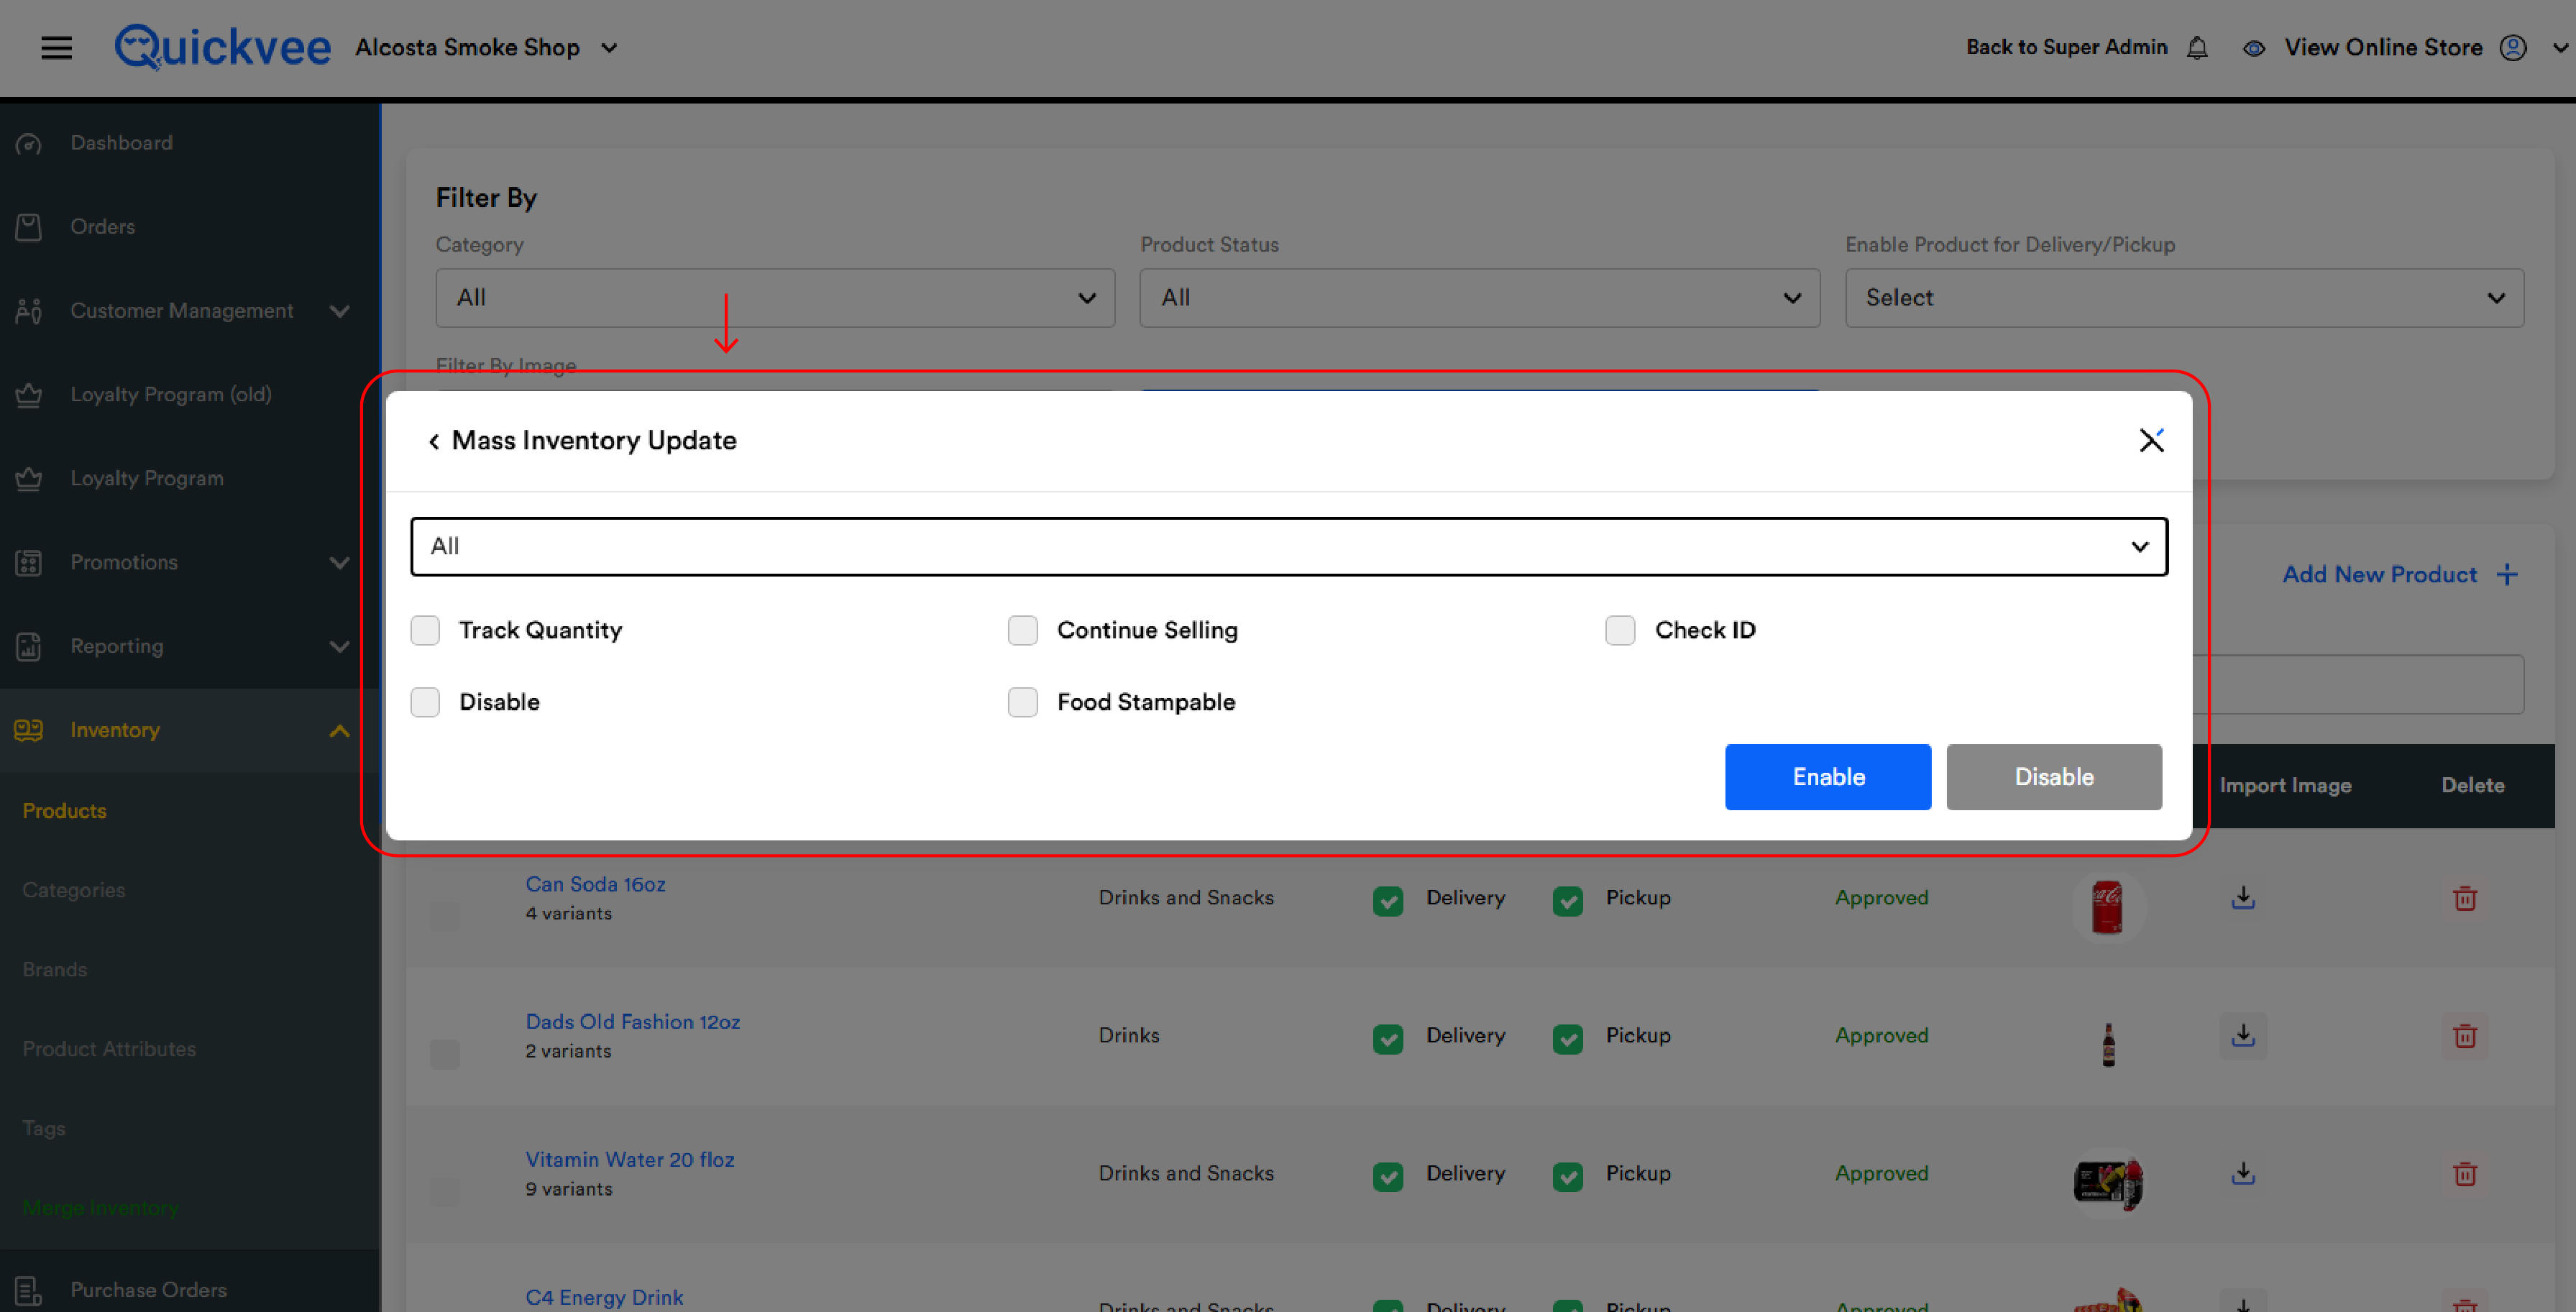
The Mass Inventory Update button (next to Filter By Image) flips flags on every product in your current filtered view at once — perfect for shop-wide changes like enabling Check ID across an entire age-restricted category.
|
Control |
What it does |
|---|---|
|
Scope dropdown (top) |
All for every product, or pick a specific category. |
|
Track Quantity |
Stock levels decrement on every sale. |
|
Continue Selling |
Customers can still order when stock drops to zero. |
|
Check ID |
Forces ID verification at checkout (tobacco, vape, kratom). |
|
Disable |
Product no longer appears at register or storefront. |
|
Food Stampable |
Marks products as EBT-eligible. |
|
Enable / Disable buttons |
Turn the ticked flags on or off for every product in scope. |
Important: The action applies to every product matching your current filter selection, not just the products visible on the page. Double-check the Filter By panel before tapping Enable or Disable. There is no undo.
Common use case: Filter to Category = Vapes, open Mass Inventory Update, tick Check ID, click Enable — every vape in your catalog now requires ID verification at checkout.
Adding a new product
Tap Add New Product + above the table. The form is grouped into sections:
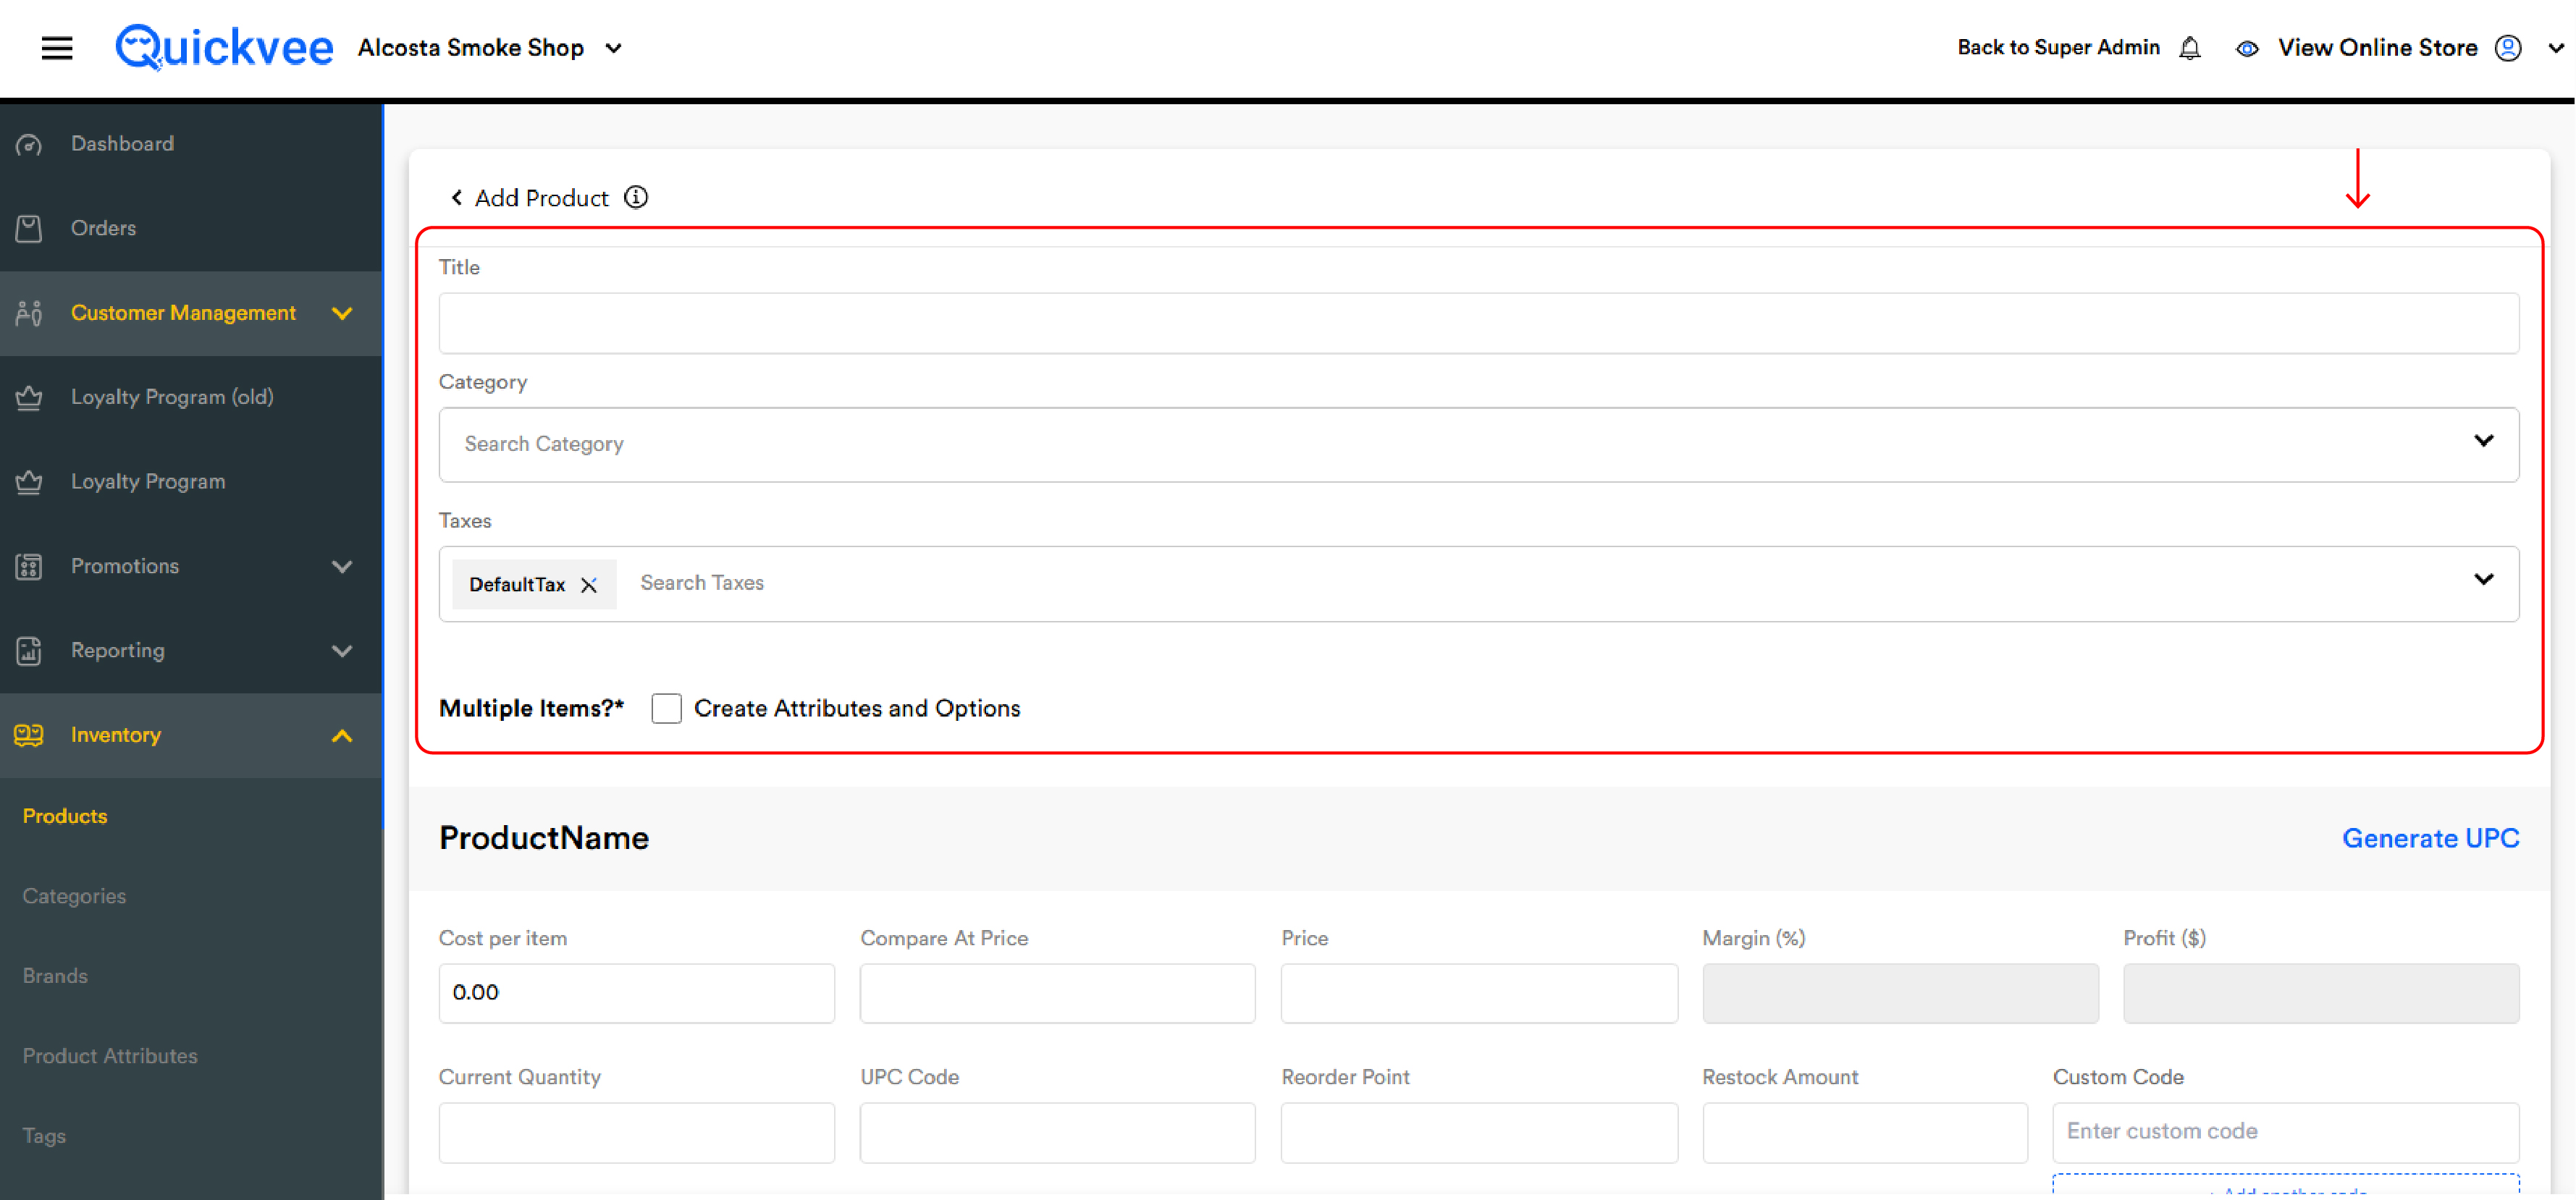
1. Identification
|
Field |
Description |
|---|---|
|
Title |
Product name — required. |
|
Category |
Search and pick. The product inherits taxes, channel defaults, EBT, and age-restriction flags from the category. |
|
Taxes |
Defaults to DefaultTax. Search and add additional taxes (state surcharge, county tax, etc.). Tap × to remove. |
|
Multiple Items? |
Tick if the product comes in variants (multiple flavors, sizes, strengths). |
2. Product details
|
Field |
Description |
|---|---|
|
Cost per item |
What you pay. Drives margin and profit calculations. |
|
Compare At Price |
The "was" price shown struck-through on sale. |
|
Price |
The retail price customers pay. |
|
Margin (%) / Profit ($) |
Auto-calculated from Cost and Price — read-only. |
|
Current Quantity |
Stock on hand right now. |
|
UPC Code |
The product's barcode. Type one manually, or tap Generate UPC at the top-right. |
|
Reorder Point / Restock Amount |
Stock level at which to flag for restock, and how many to reorder. |
|
Custom Code |
Internal code other than UPC. Tap + Add another code to stack multiple. |
3. Flags
-20260609-121146.jpg?cb=4c15f8c9282bfd7e245bd78a5ba356a5)
|
Flag |
Effect |
|---|---|
|
Track Quantity |
Stock decrements on every sale. Defaults on. |
|
Continue Selling when Out of stock |
Lets customers order even at zero stock. |
|
Check ID |
Forces ID verification at checkout. |
|
Disable |
Removes the product from register and storefront without deleting. |
|
Food Stampable |
EBT-eligible. |
4. Content & relationships
|
Field |
Description |
|---|---|
|
Description |
Rich-text editor. An AI button drafts a description from the title and category. |
|
Related Products |
Search and link products for the storefront Related Products carousel. |
|
Frequently Bought Together |
Search and link products for the upsell module. |
|
Tags |
Pick from your tag library for promo grouping and frontend filters. |
|
Brand |
Select one brand from your brand library. |
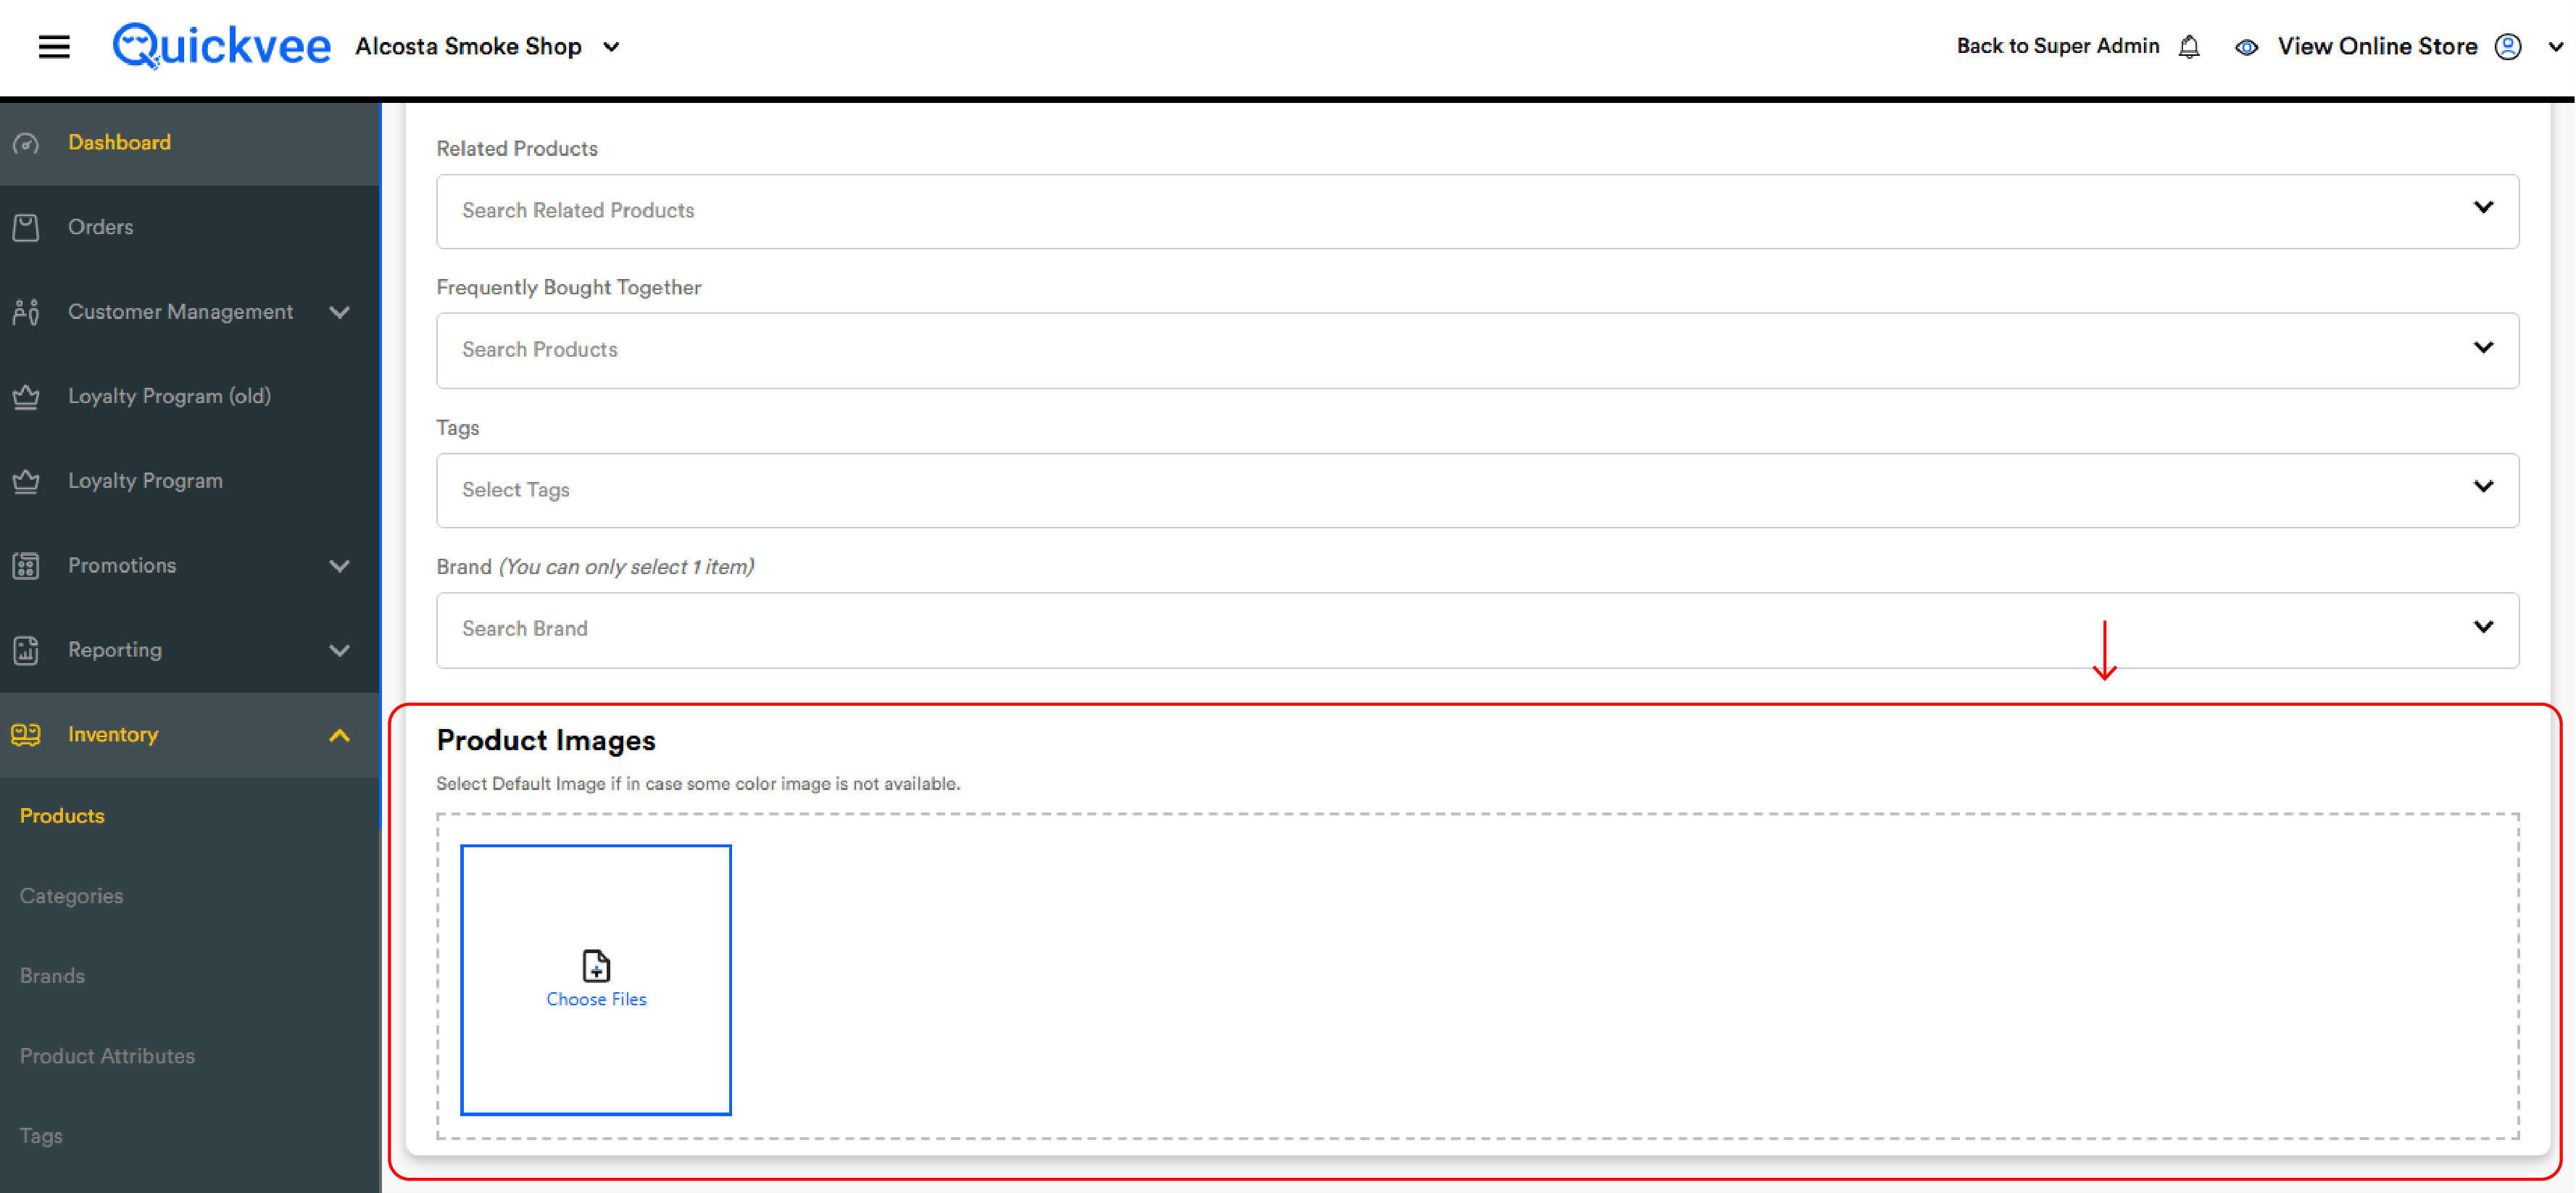
5. Product Images
Tap Choose Files to upload one or more images. The first image is the default image shown in lists and on the cart line item.
Editing a product
Tap any product title to open Edit Product. Form is identical to Add Product with data pre-filled, plus action buttons just under the flags row:
|
Button |
What it does |
|---|---|
|
Vendors |
Link this product to one or more vendors and assign vendor-specific cost prices. |
|
Sales History |
Unit-level sales history with date range, units sold, revenue, and channel breakdown. Excludes unpaid orders. |
|
Instant PO |
Quick stock top-up against the assigned vendor without going through the full PO workflow. |
|
Stocktake |
Adjust current stock with a reason note — counts, shrink, write-offs, corrections. |
|
Print Label |
Generate a barcode label. Pick paper size and send to your label printer. |
Duplicate Product
A Duplicate Product button at the top-right creates an identical copy (with a new UPC) so you can build near-identical products in seconds.
Tip: Use Duplicate Product for one-off near-clones. For products that genuinely differ by an attribute like flavor or size, set them up as variants instead — keeps the storefront cleaner and stock counts per variant.
Variants on the Edit screen
When Multiple Items? is ticked, the Edit Product screen exposes a Variant Attributes block above a Variants section.
Variant Attributes
Pick an attribute (Color, Flavor, Size, Nicotine Strength, etc.). Existing values appear as tags below the dropdown — Silver, Watermelon Ice, King, 100s. Type a new value in Enter Variant Name and press Enter to add it.
Two banners always appear above this block — After making any change, please update the page and You cannot remove existing variants. Variant deletion is blocked once a variant is live, to preserve sales history and stock integrity.
Variants section
Below the attribute block, every variant is listed in order — 1. ProductName - Silver, 2. ProductName - Black. Each variant has its own block of pricing, stock, UPC, custom codes, flags, and action buttons — exactly like the parent product, but independently editable. Use Generate UPC at the top-right to create UPCs for any variants that don't have one yet.
Product Status — what changes it
|
Status |
Meaning |
|---|---|
|
Pending |
Newly added or recently edited — awaiting compliance review. Still works at the register but hidden from the storefront. |
|
Approved |
Cleared and live on the storefront. |
|
Rejected |
Failed approval — hidden from the storefront and flagged for action. Common reasons: restricted category, missing required image, missing required description. |
Rejected and pending products continue to work at the POS register — channel restrictions apply to online ordering only unless you also tick Disable.
Important notes
Channel scope: Delivery and Pickup toggles apply to the online storefront only. They have no effect on the POS register — face-to-face sales are unaffected. To fully suspend a product everywhere, use the Disable flag instead.
Don't delete a product with order history you'll need to look up later — use Disable instead. Disabled products vanish from sale but order history, sales reports, and audit trail stay intact.
UPC uniqueness: Every UPC must be unique across the entire catalog. The system blocks duplicates across products, variants, and lottery items.
Custom Code as UPC fallback: If a product's Custom Code is set and a UPC isn't, the system can use the Custom Code as the UPC prefix on import/export operations.
Editing pricing on a variant product: Variants are priced independently — changing the price on one variant doesn't change the others. Edit each variant block or use a price import to update them all together.