
Stock on Hand on the POS gives you a live view of every SKU's inventory position, what is physically on hand, what is committed to orders, and what is genuinely available to sell, plus the tools to act on it without leaving the screen. From one place you can adjust quantities with a documented reason, start a transfer to another store, add products to a purchase order, flag items to watch, and print labels.
📝 Note. Stock on Hand shows your current store's position. Where a product exists at more than one location, a combined all-locations quantity is also shown.
Where to find it
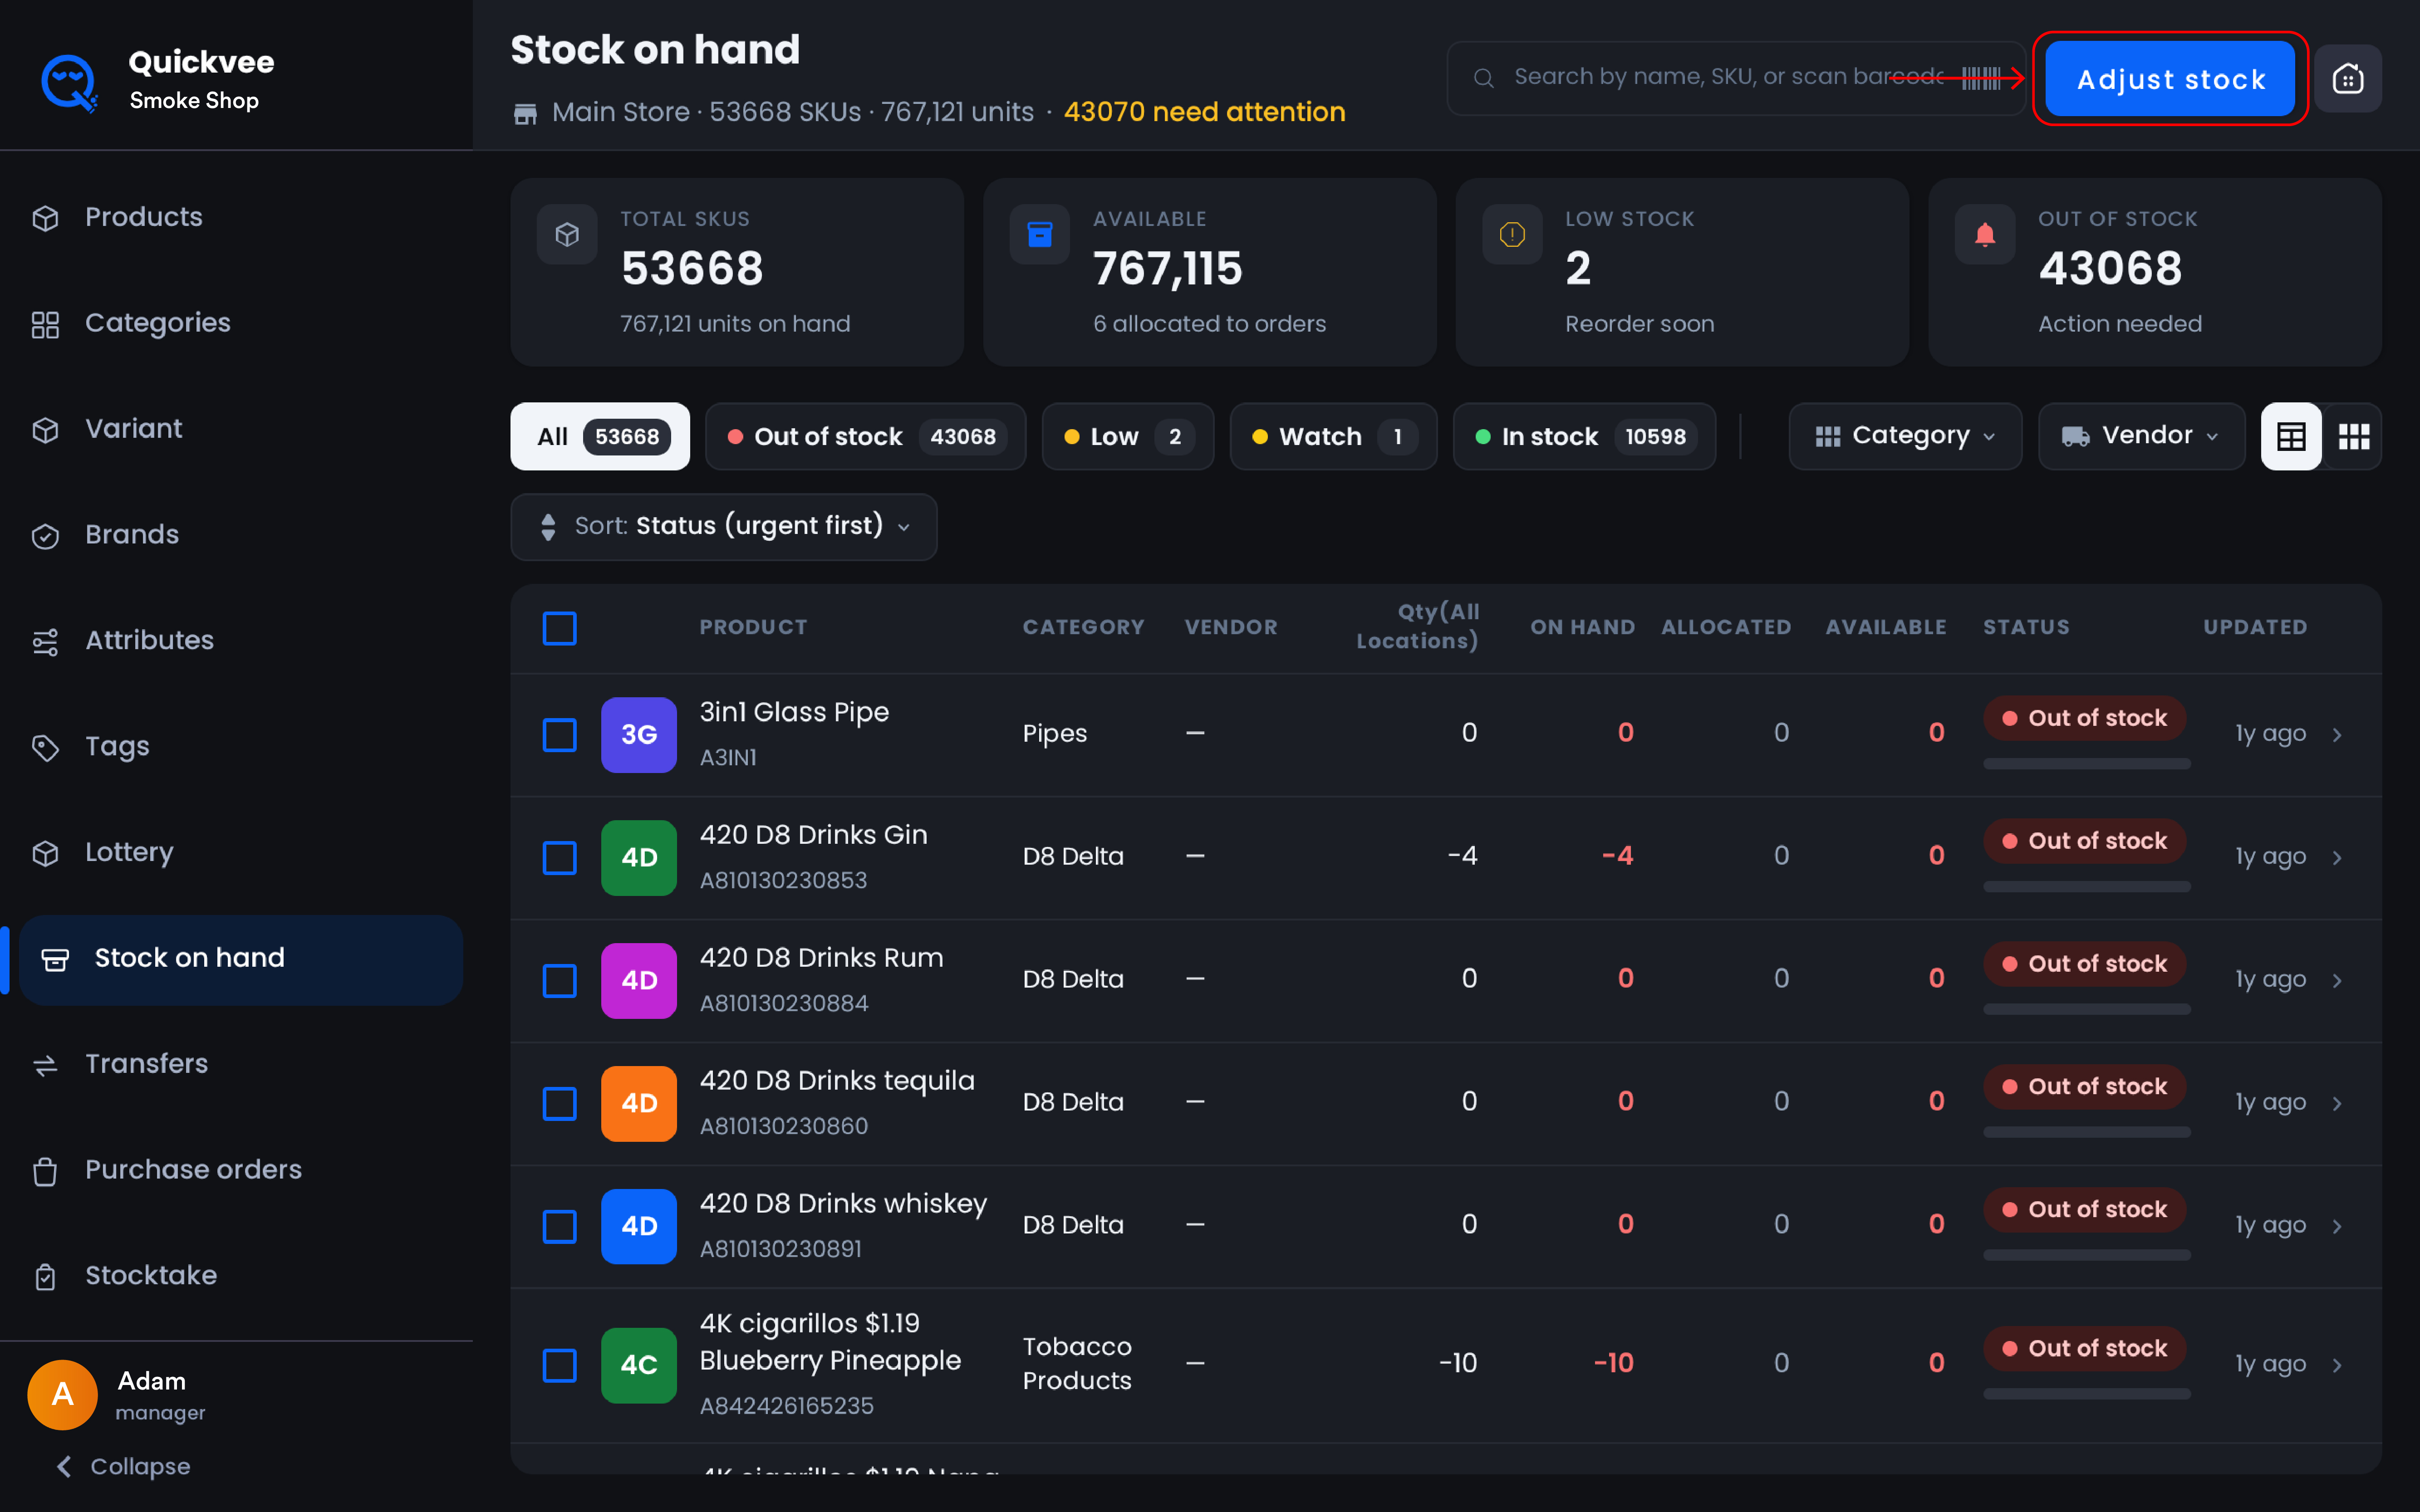
Tap Stock on hand in the left navigation of the POS. The header shows your store name, total SKUs, total units, and a count of items needing attention, with a Search by name, SKU, or scan field and an Adjust stock button.
The dashboard
Four summary tiles sit at the top:
|
Tile |
What it shows |
|---|---|
|
Total SKUs |
SKU count, with total units on hand beneath |
|
Available |
Units available to sell, with units allocated to orders noted beneath |
|
Low stock |
Items at or below their reorder threshold, Reorder soon |
|
Out of stock |
Items at zero, Action needed |
Below the tiles, status chips filter the list with live counts: All, Out of stock, Low, Watch, In stock. Category and Vendor dropdowns narrow further, a Sort control defaults to Status (urgent first), and a toggle at the right switches between table view and card view.
Reading the numbers
Three quantities appear throughout the module, and the difference between them matters:
|
Quantity |
Meaning |
|---|---|
|
On hand |
Units physically in the store |
|
Allocated |
Units committed to existing orders |
|
Available |
Units that can still be sold, On hand minus Allocated |
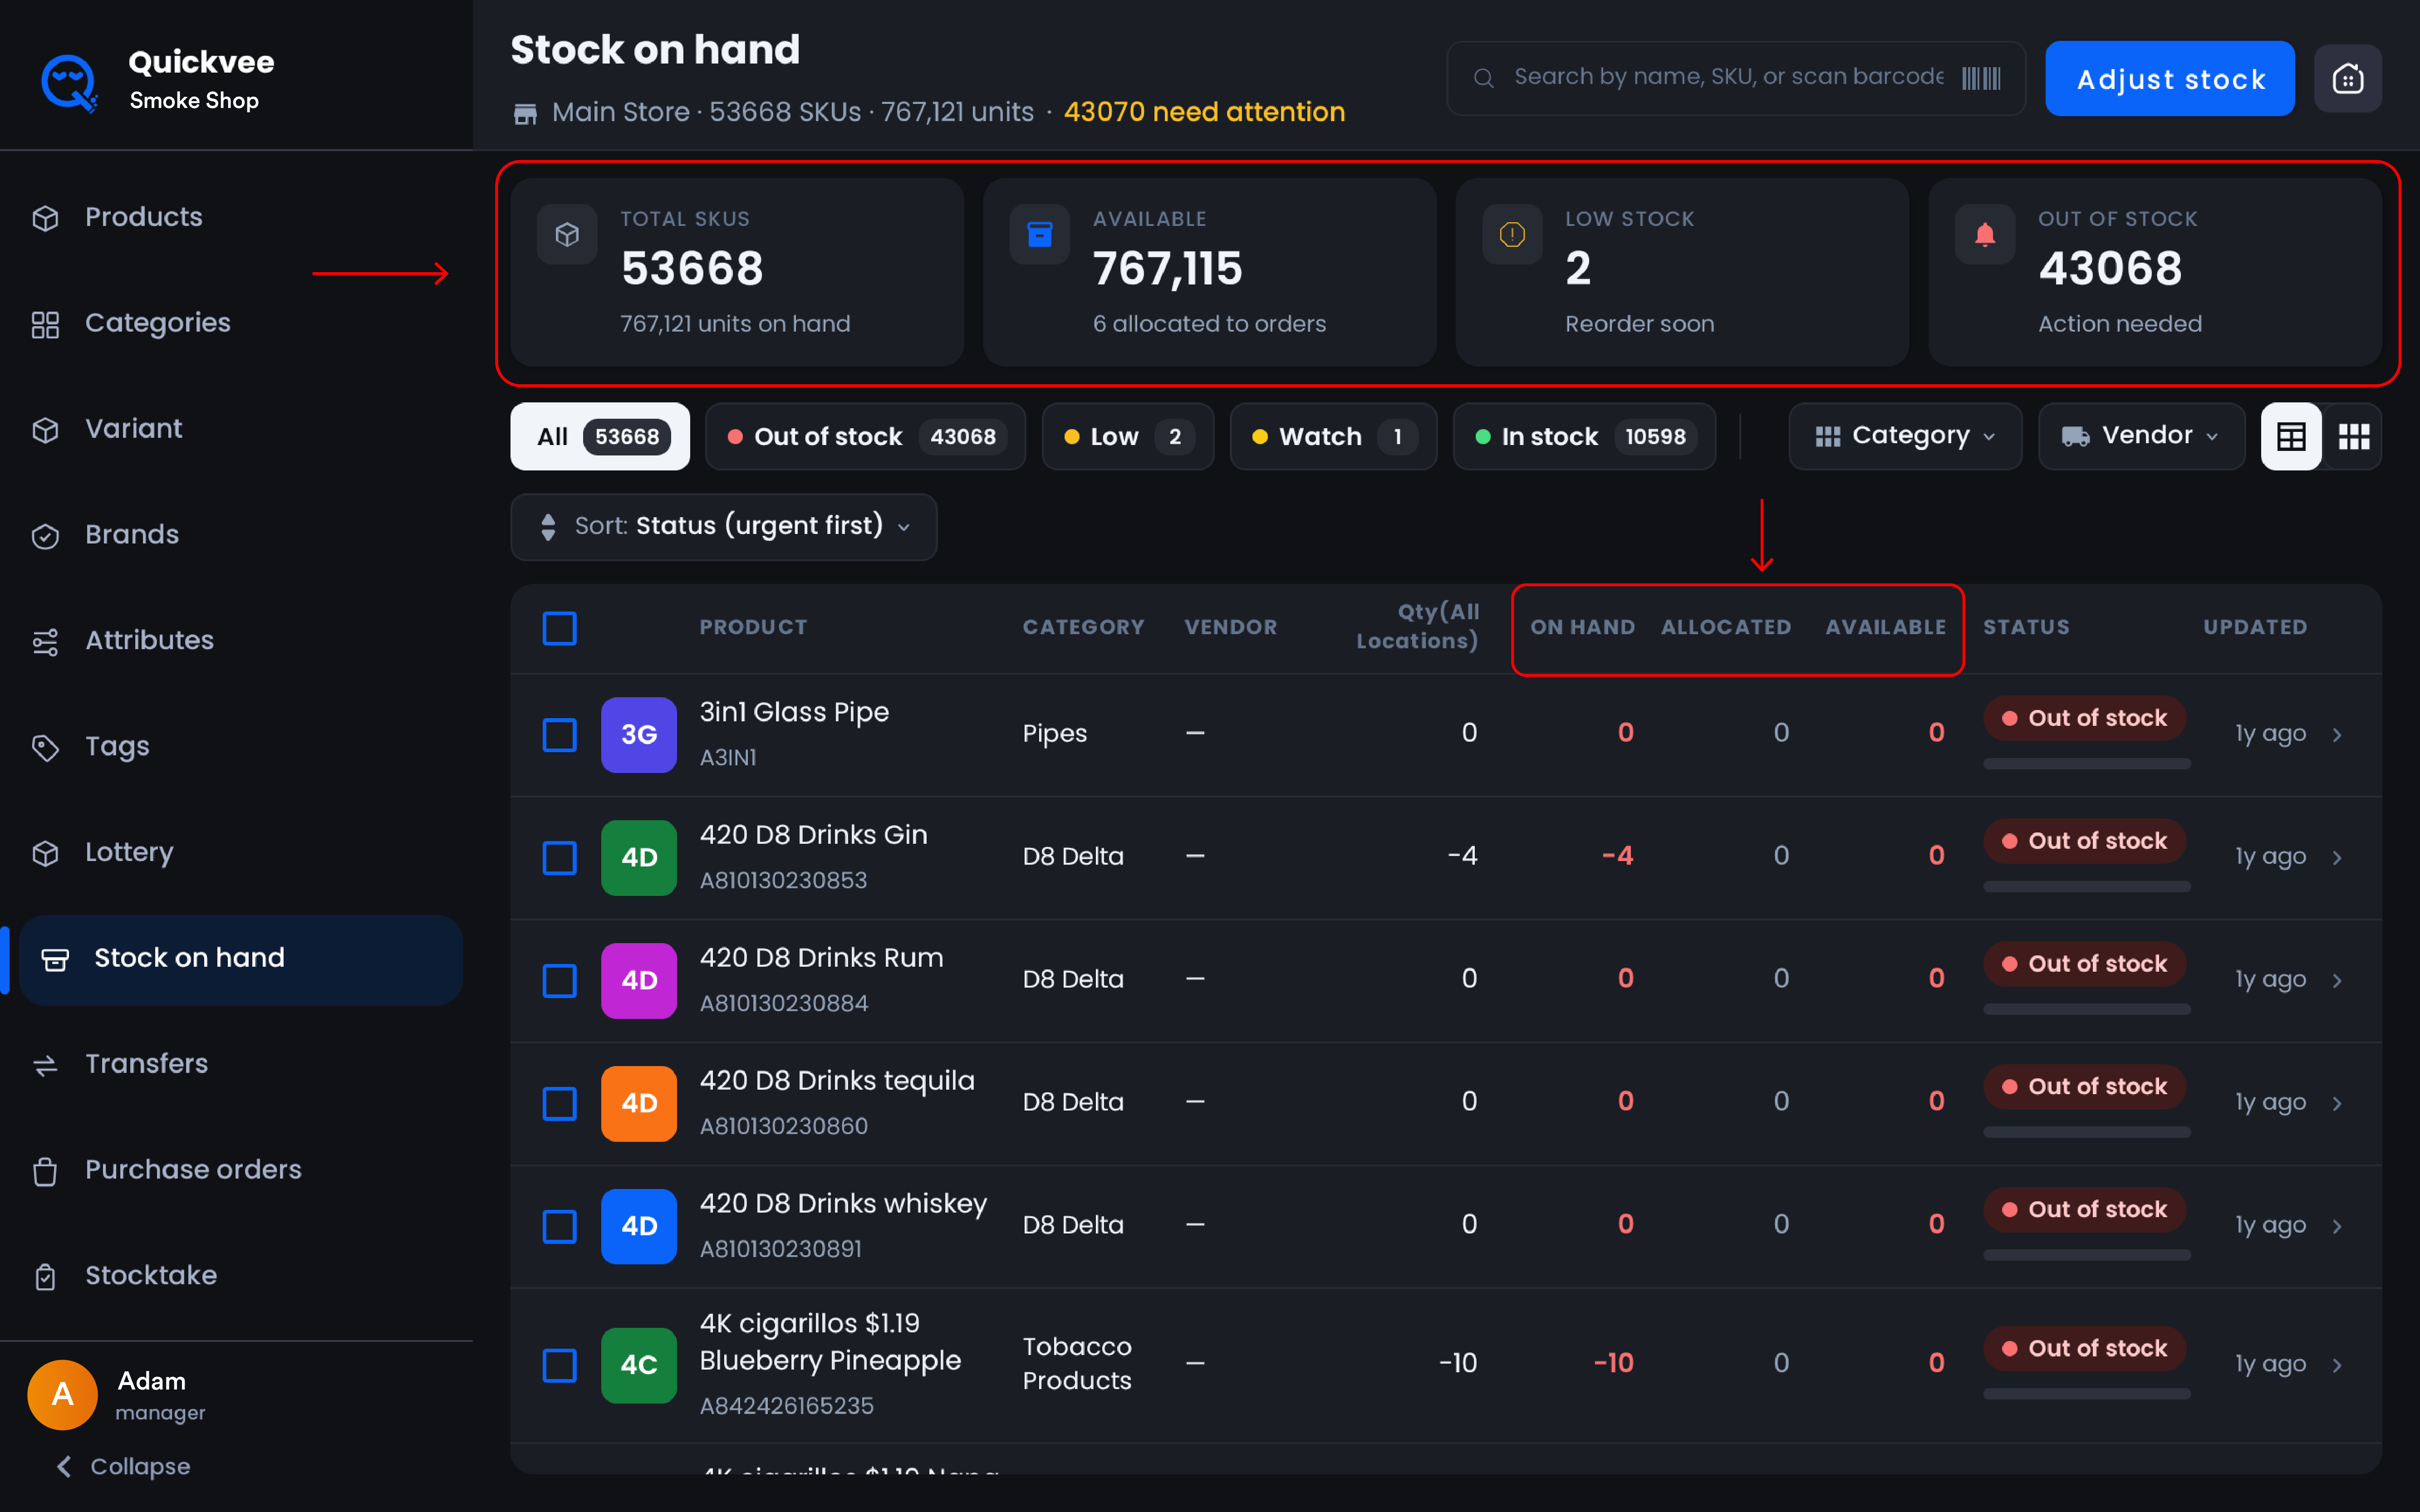
⚠️ Important. Available is the number to trust when deciding whether you can sell something. A product can show units on hand and still be unavailable if all of them are allocated to orders.
Table view shows Product (with UPC and variant chip), Category, Vendor, Qty (all locations), On hand, Allocated, Available, Status, and when it was last updated. Card view shows each product as a tile with its status chip, units on hand, and Available/Allocated beneath.
Adjusting stock
Stock adjustments correct a quantity when what's on the shelf doesn't match what the system says.
Adjusting a few products
-
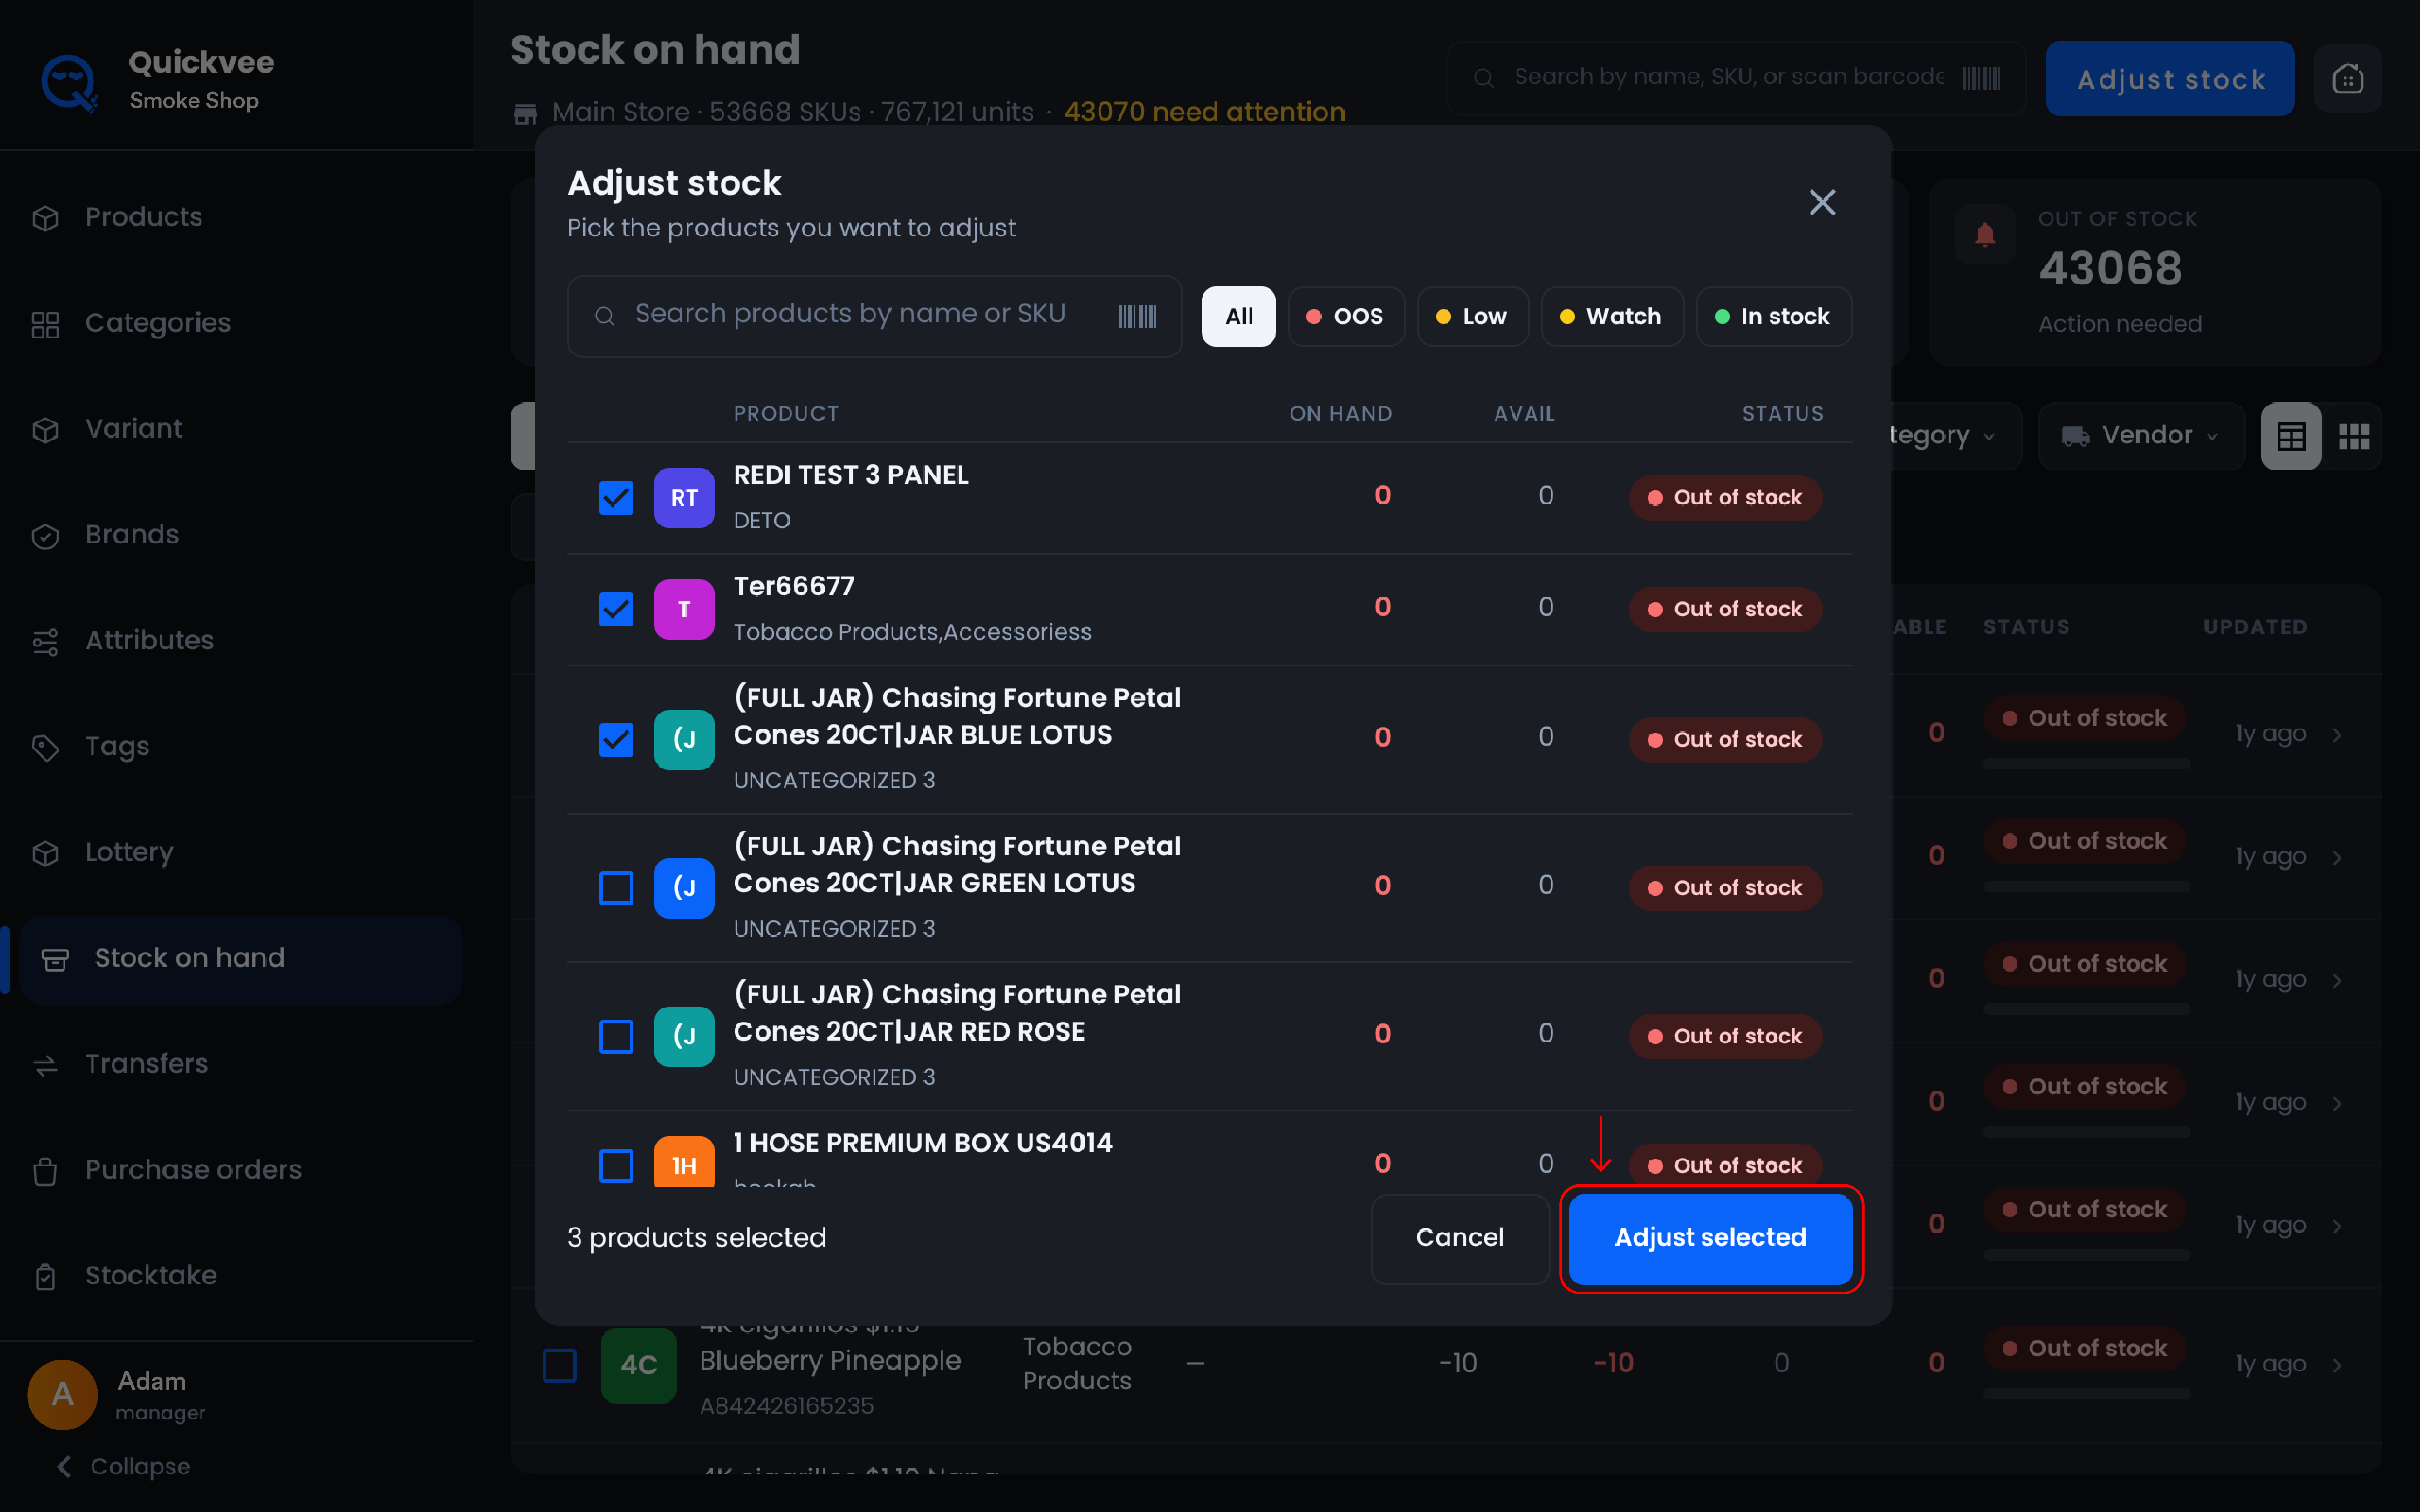
Tap Adjust stock, then pick the products in the picker, search by name or SKU, or scan a barcode. Filter chips (All, OOS, Low, Watch, In stock) and a sort control help you find them.
-
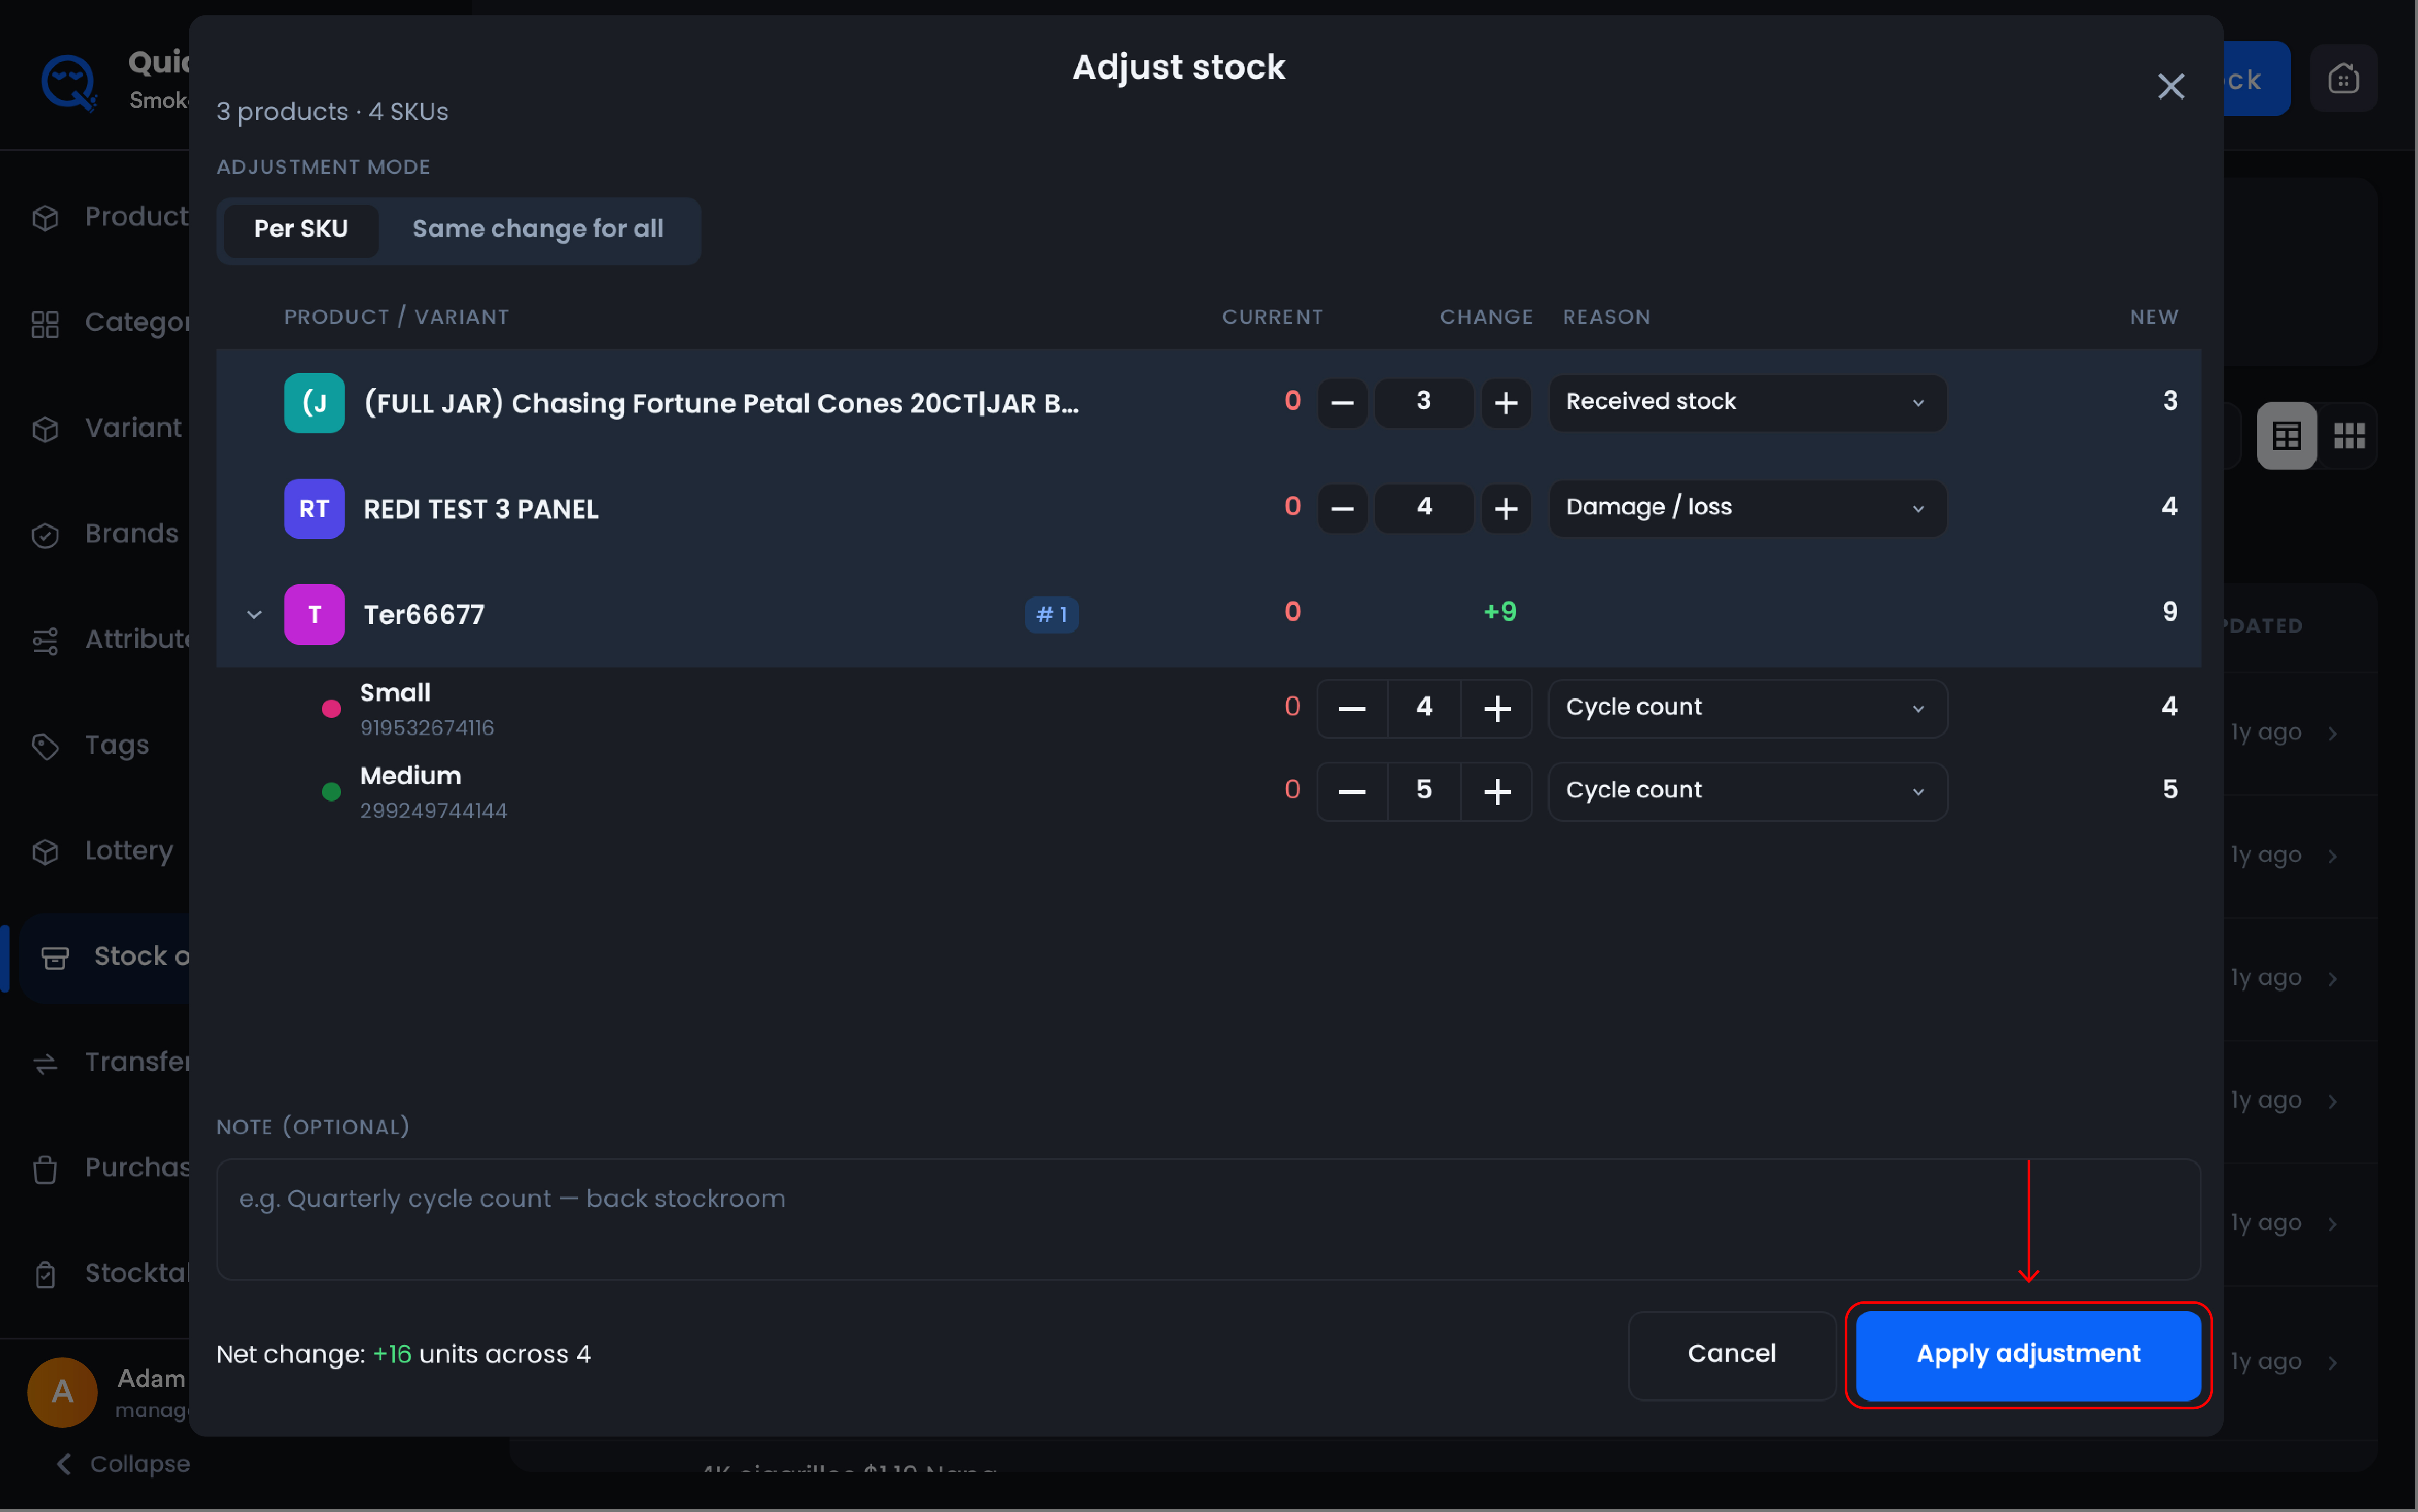
Tap Adjust selected. The Adjust stock screen shows N products · N SKUs.
-
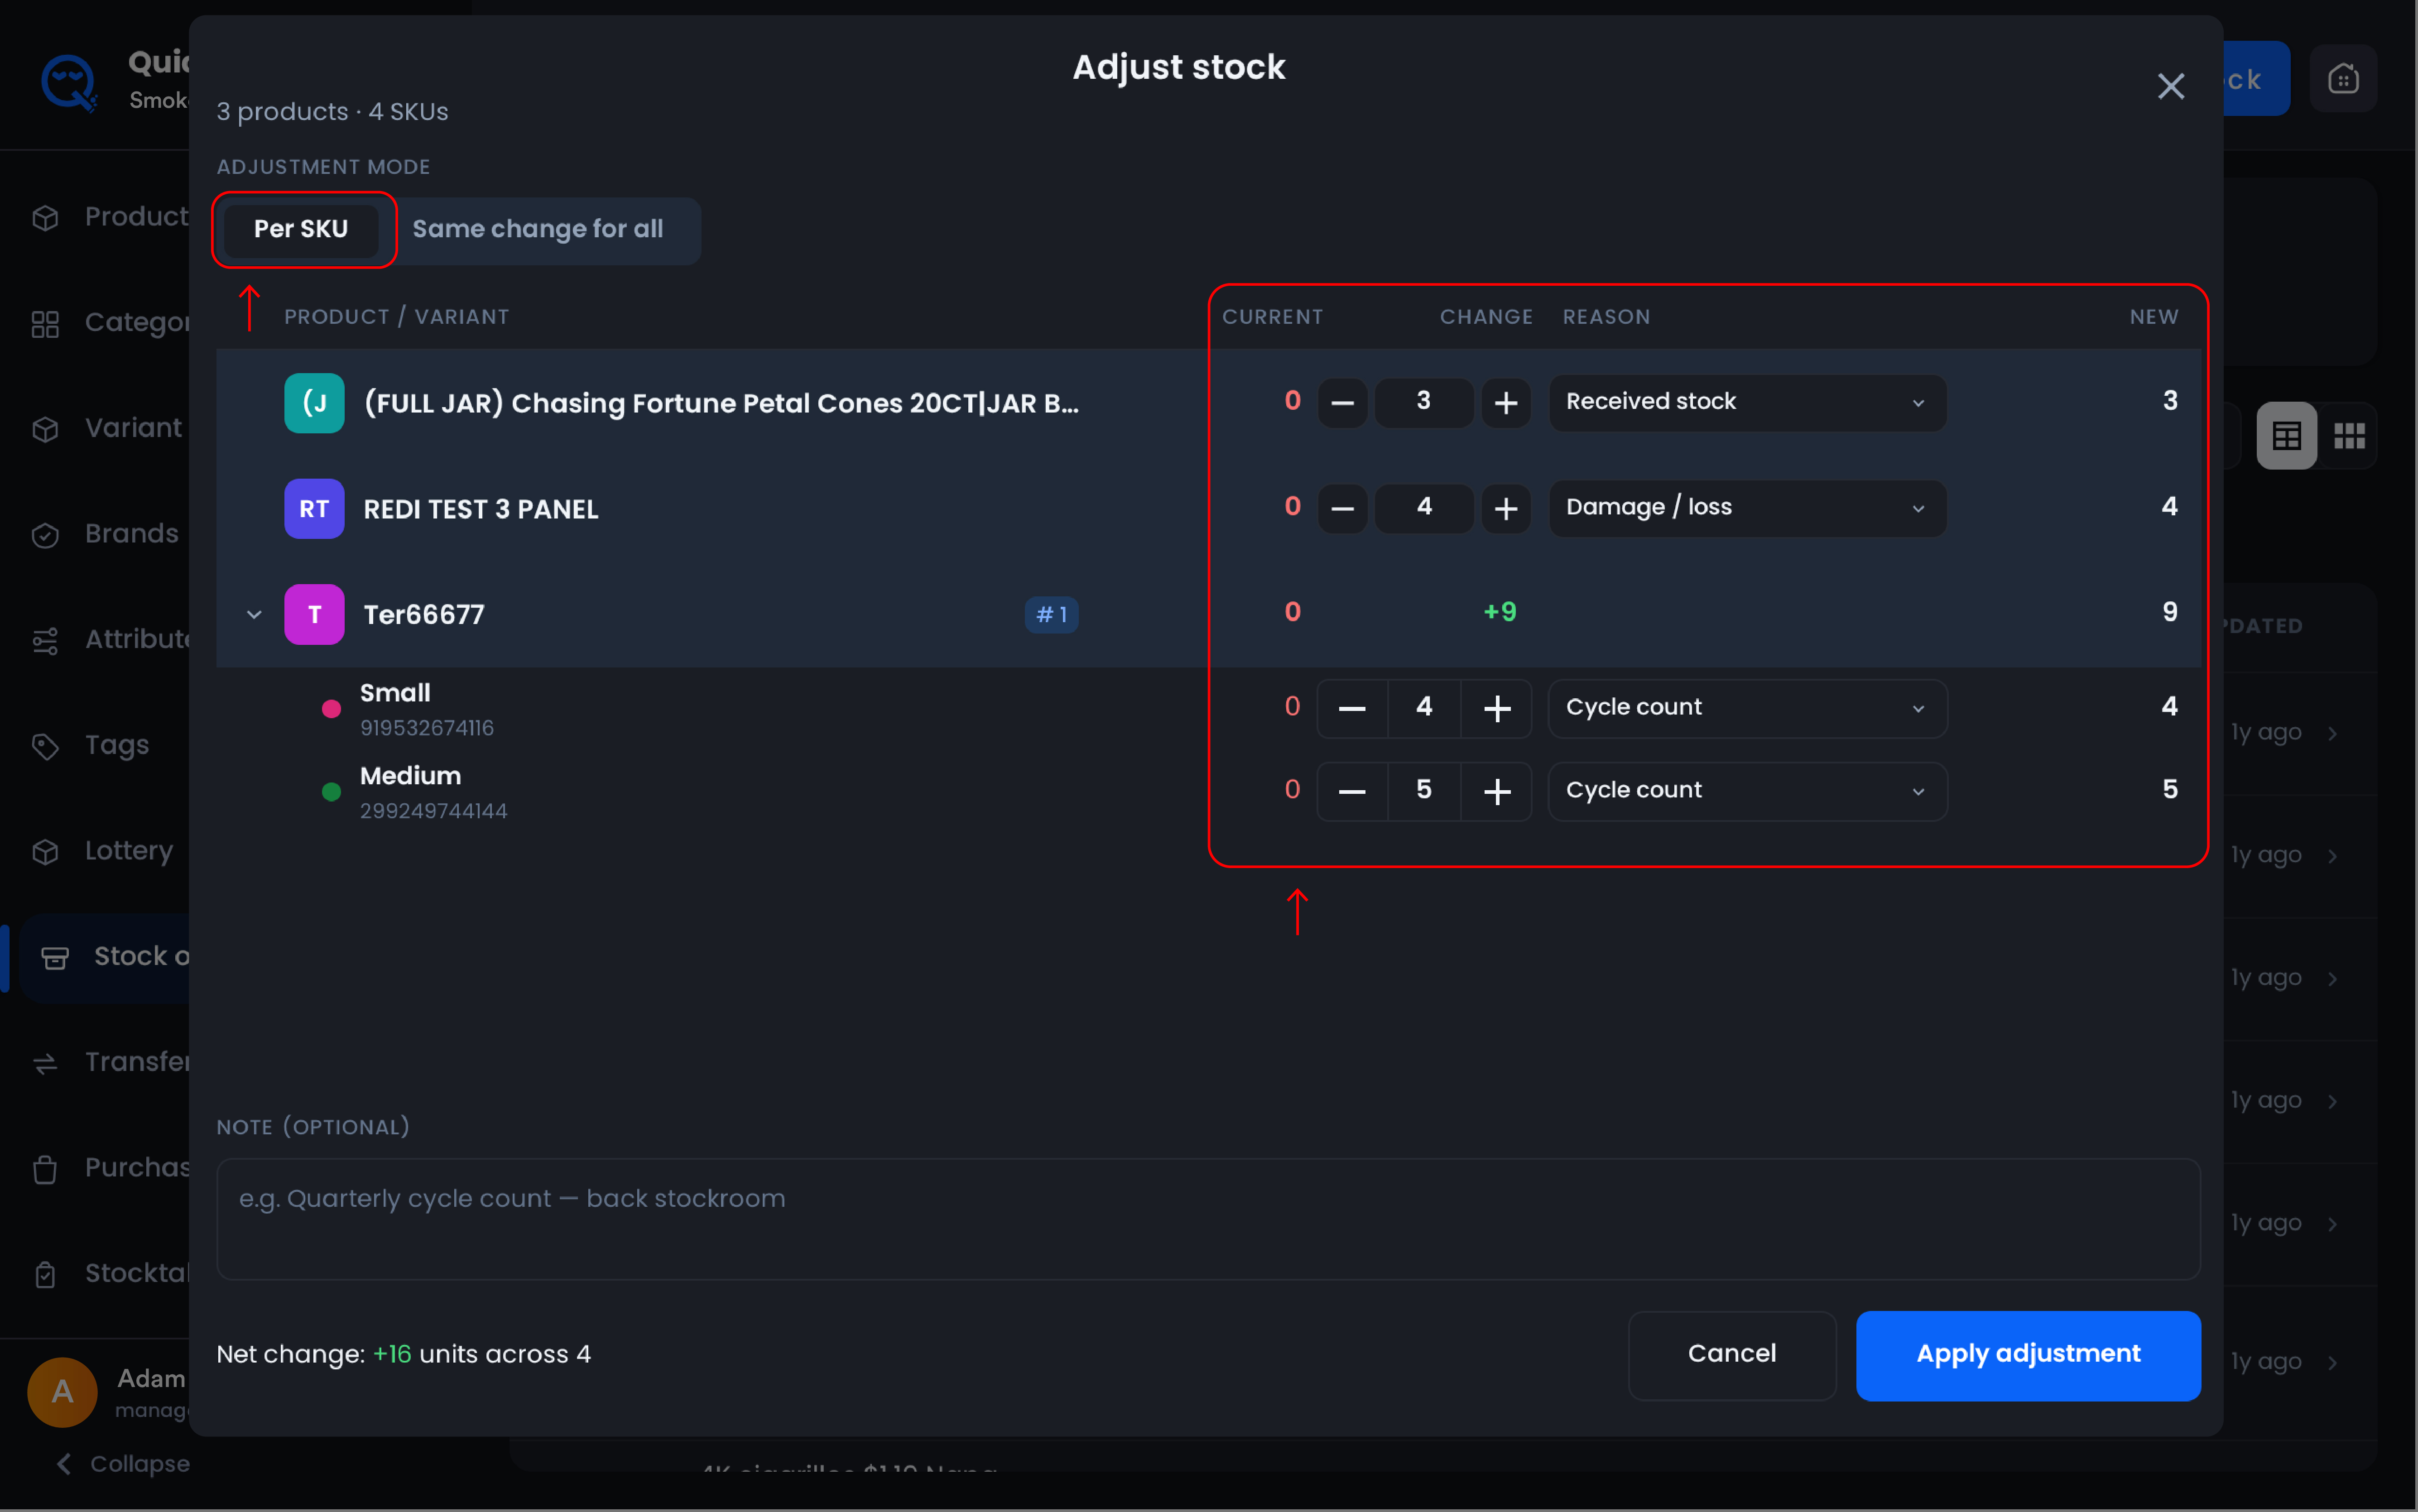
Leave Adjustment mode on Per SKU to set a different change for each item.
-
For each row: use − / + or type the change, then pick a Reason. Products expand to show their variants, each adjusted individually with its own current and new quantity displayed.
-
Add an optional Note, it applies to the whole adjustment.
-
Check the Net change summary at the bottom (e.g. Net change: +2 units across 2), then tap Apply adjustment.
Applying the same change to everything
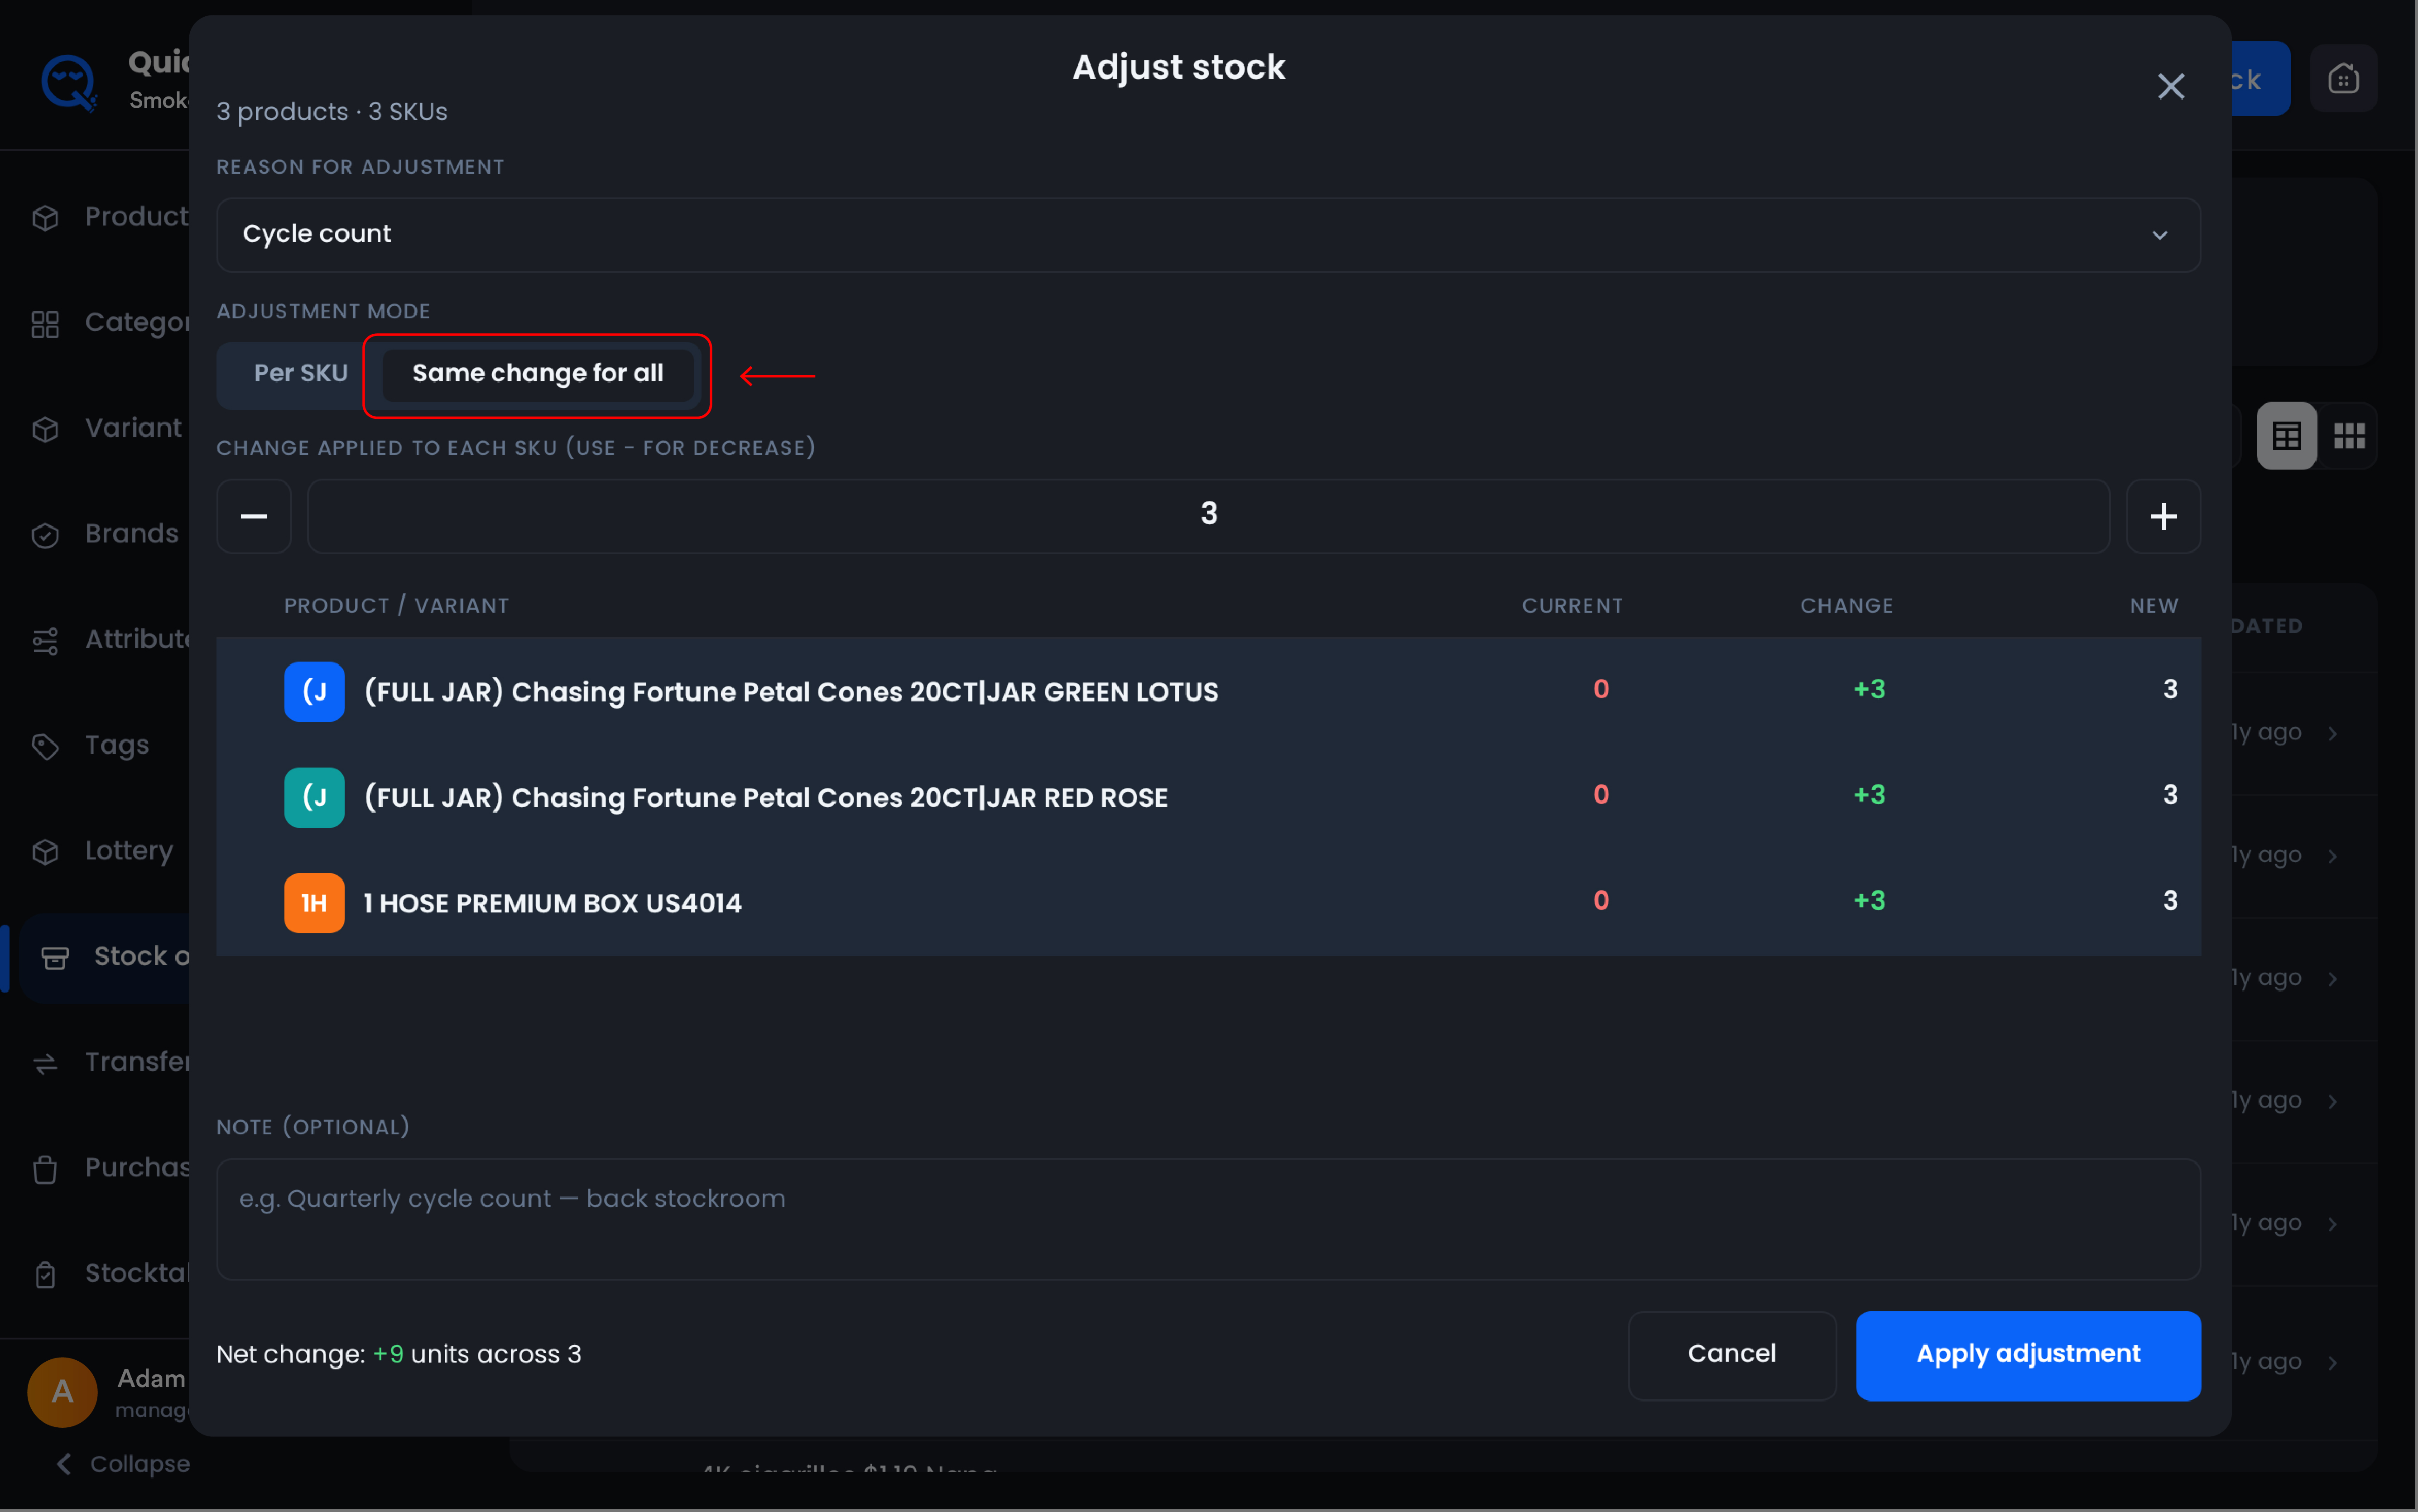
Switch Adjustment mode to Same change for all. A single Reason for adjustment applies to every item, and one change value is applied to each SKU, use a minus value to decrease. Every row updates to show the same change with its own resulting quantity.
💡 Tip. Same change for all suits situations where the correction is uniform, a case of 4 received across several items, or a damaged shipment. Use Per SKU whenever the counts differ.
✅ Best practice. Always choose an accurate reason. Adjustments with a vague reason are impossible to explain at month end, and reason data is what turns repeated shrink into a pattern you can act on.
Bulk actions from card view
In card view, tick products (or use Select all) and an action bar appears at the bottom:
|
Action |
What it does |
|---|---|
|
Adjust |
Open the Adjust stock screen for the selected products |
|
Watch |
Flag the selected products for monitoring |
|
Transfer |
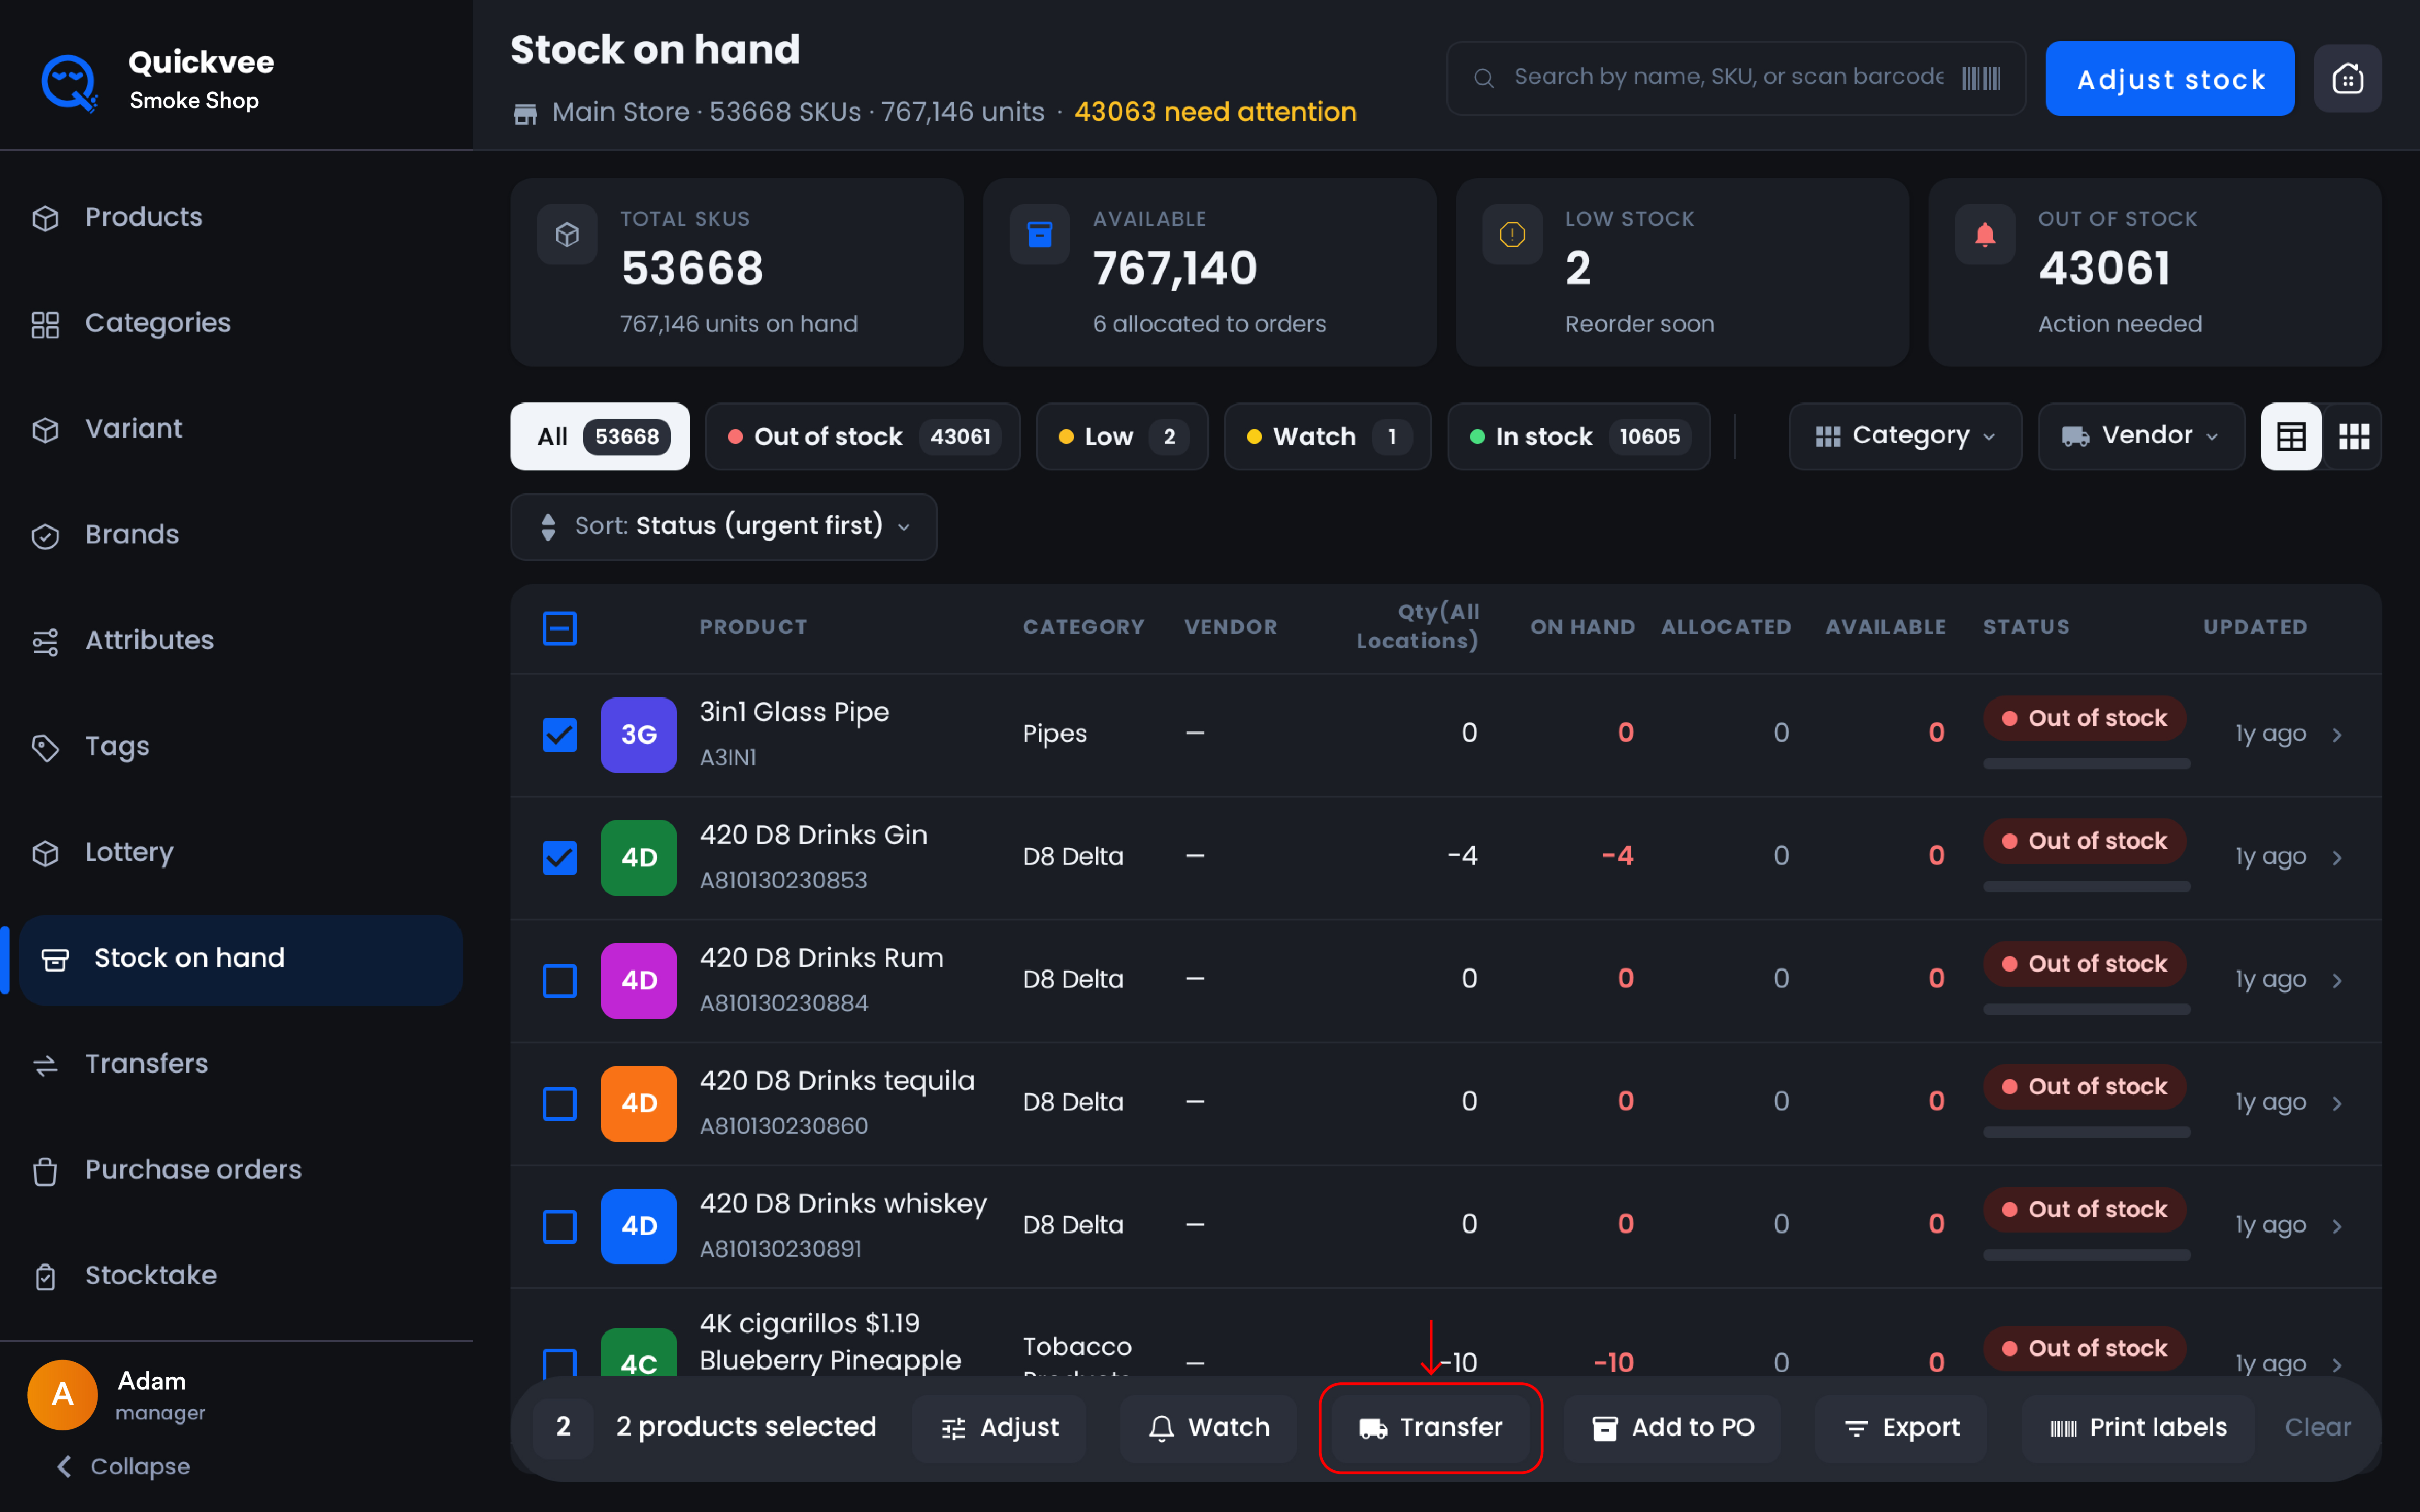
Start a new transfer with the selected products |
|
Add to PO |
Add the selected products to a purchase order |
|
Export |
Export the selection |
|
Print labels |
Print shelf or product labels |
|
Clear |
Clear the selection |
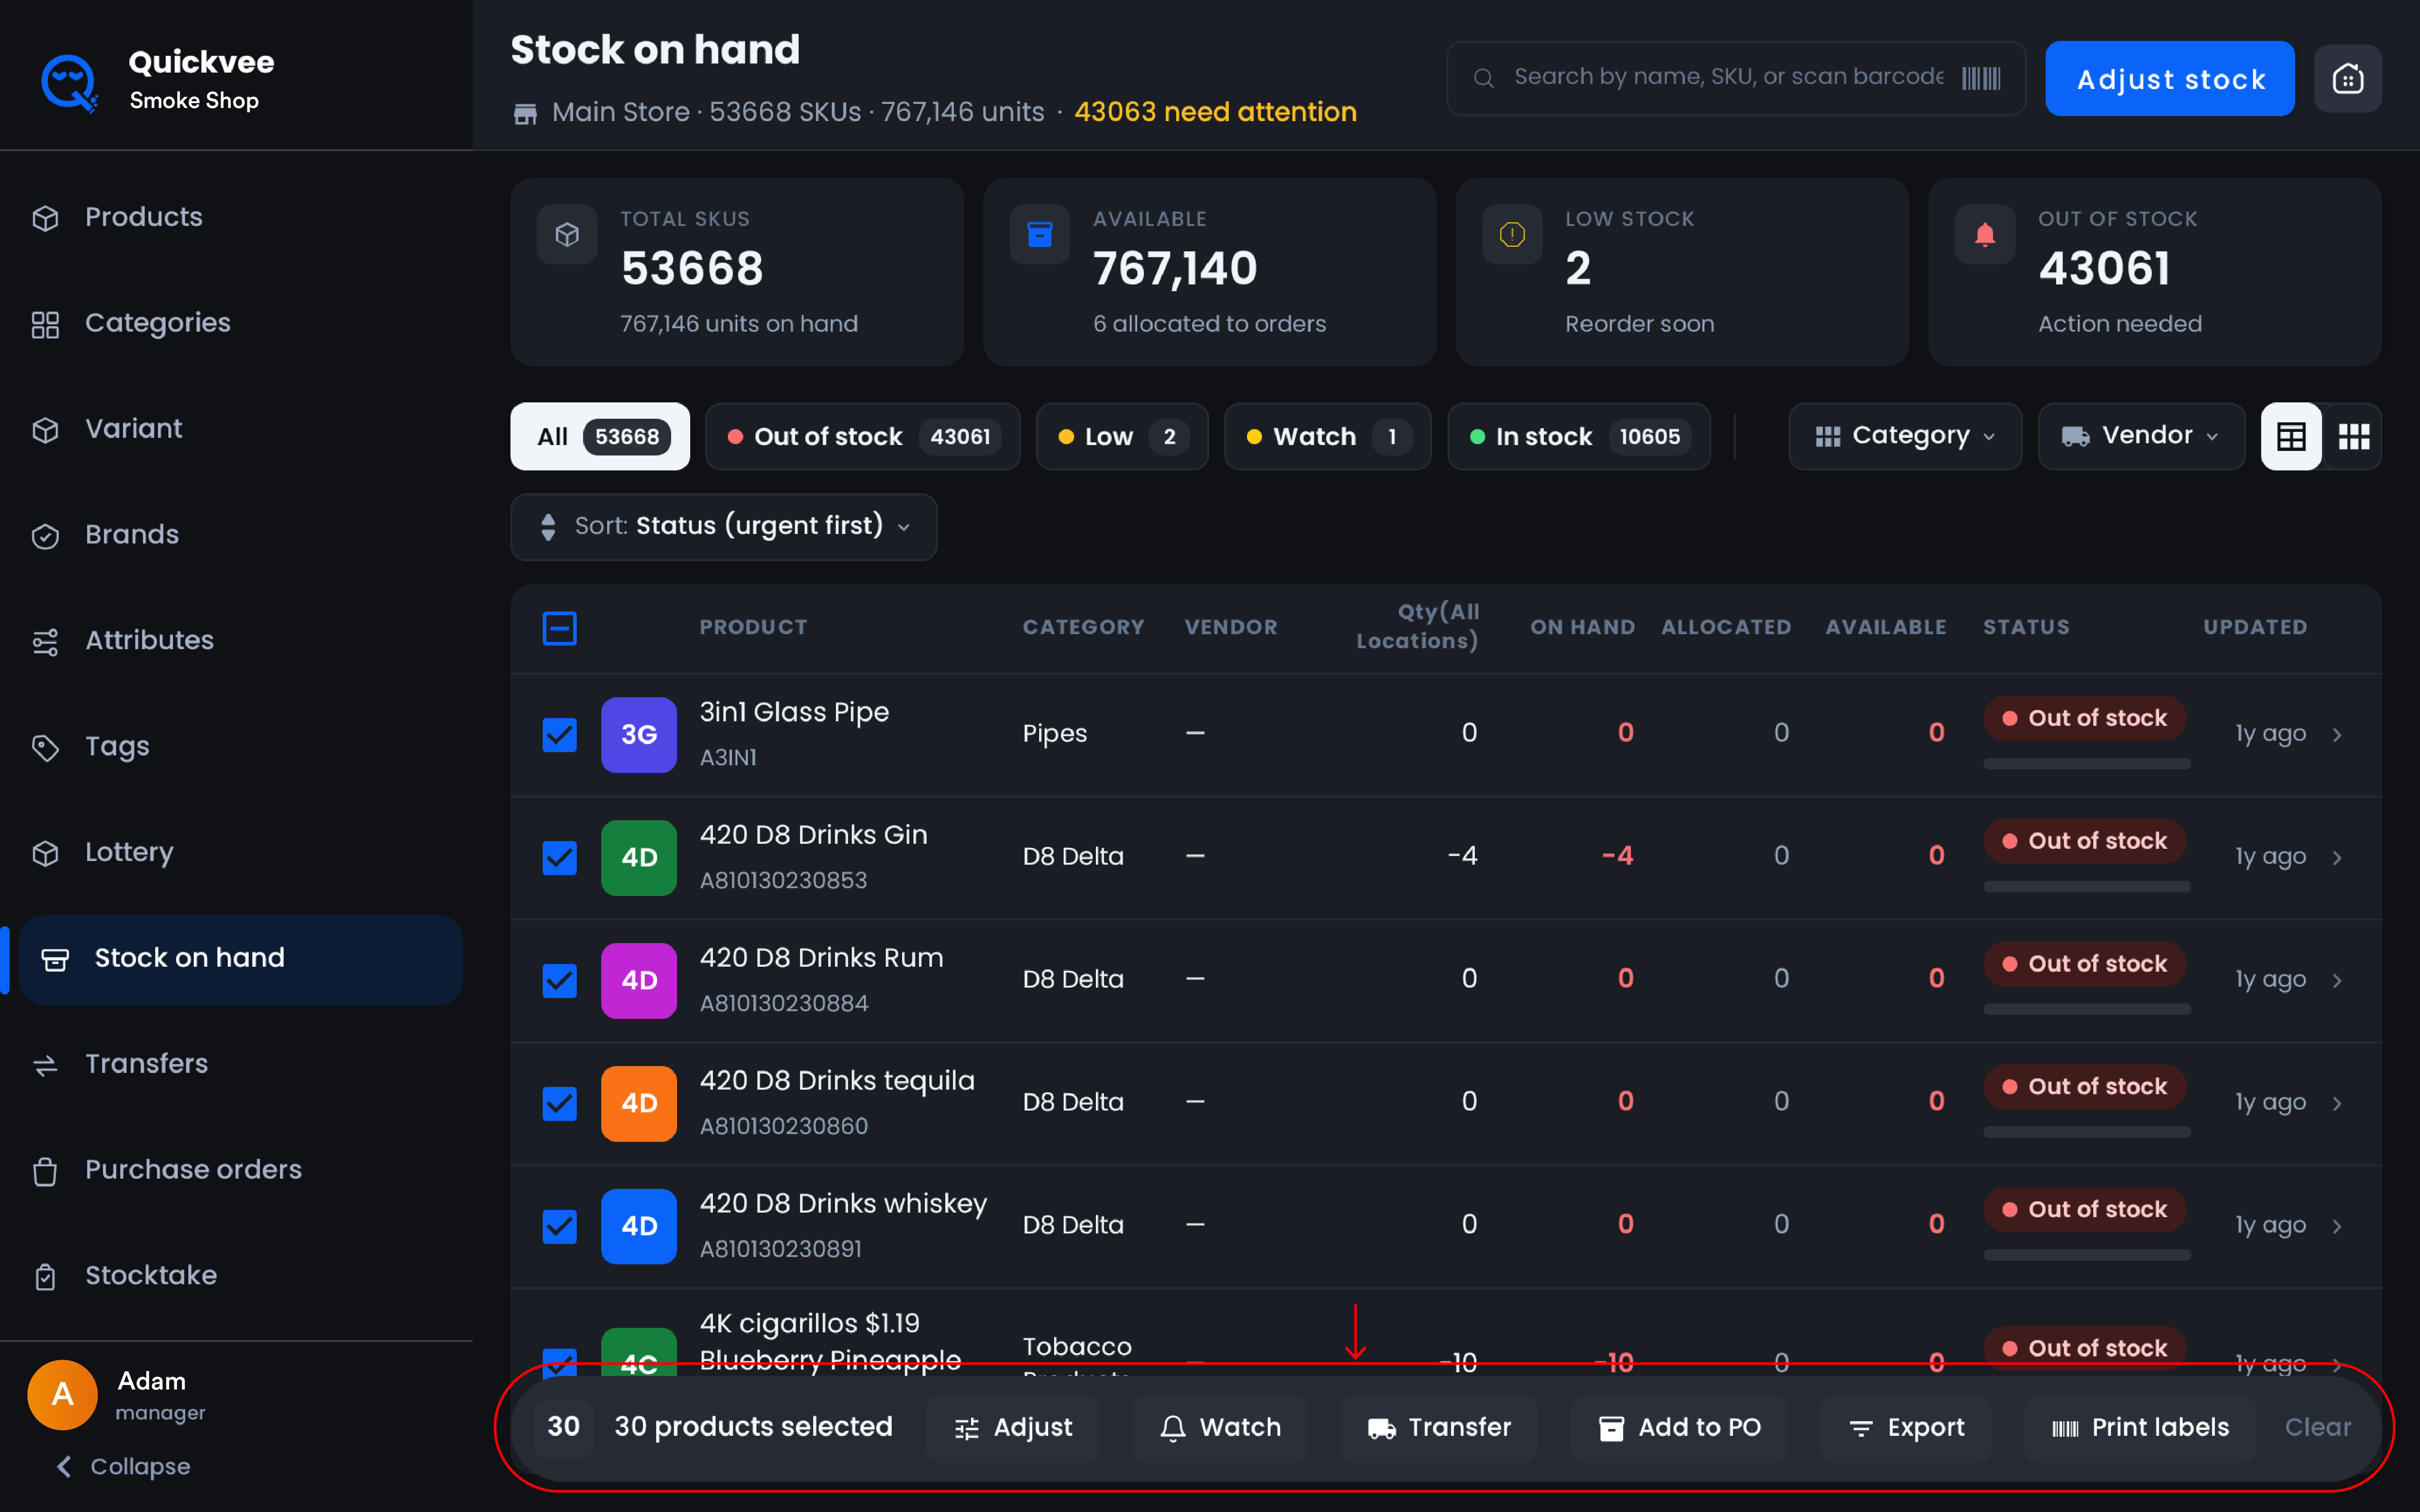
💡 Tip. Use Watch on items worth monitoring between counts, fast movers, shrink-prone products, or anything you've just corrected. Watched items get their own filter chip and a badge on the product.
Starting a transfer from Stock on Hand
Selecting products and tapping Transfer opens New transfer pre-filled with your selection.
-
From shows your current store. Pick the destination in To.
-
Optionally set an Expected arrival date and a Reference ID.
-
Search products, SKUs, sizes, or colors to add more. Each row shows units Available, with − / + and an All button to send everything available.
-
The Transfer panel on the right totals N units across N selected SKUs and lists what you've added, with Select all / Deselect all and a search box.
-
Add an optional Note explaining the transfer.
-
Tap Save as draft to finish later, or Send transfer to dispatch it.
-20260908-103047.jpg?cb=1fdb14c97a94ef7e55fca1204db4e199)
⚠️ Important. Items with zero available quantity can't be transferred, and the panel warns you before sending, for example 4 of 4 selected items can't be transferred (0 available). A product that doesn't exist at the destination store is also flagged on its row.
For the full transfer workflow, see Transfer inventory between stores on the POS.
Receiving and cancelling transfers
Open Transfers to see incoming and outgoing transfers, with counts and unit totals for each, and All / Inbound / Outbound filters. Each transfer shows its reference (e.g. TR-38), direction, source and destination, units, SKU count, and expected date.
Receiving. Open an incoming transfer and tap Receive items. Confirm the received quantity per line using − / +, or tap Receive all remaining. Each line shows what was sent and what's outstanding as received / sent. Add a note (e.g. 2 boxes received, 1 box damaged in transit) and confirm. Anything left over stays open until received or closed out.
Cancelling. Tap Cancel transfer and confirm. The dialog warns that the action cannot be undone and will void the transfer.
📝 Note. A transfer is received at its destination store. If you're viewing an outgoing transfer, the screen tells you which store to switch to in order to receive it.
Frequently asked questions
Why does a product show units on hand but zero available?
Those units are allocated to existing orders. Available is what's left to sell.
Can I adjust several variants of the same product at once?
Yes. Products expand in the Adjust stock screen so each variant is adjusted on its own row.
When should I use Stock on Hand instead of Stocktake?
Use Stock on Hand to correct specific items you already know are wrong. Use Stocktake when counting a section, a category, a vendor's products, or the whole store.
What does Watch do?
It flags a product for monitoring and adds it to the Watch filter, so items you care about are one tap away.
Can I undo a cancelled transfer?
No. Cancelling voids the transfer permanently.