
The Receipt Template section in Station Settings lets merchants fully customize how their printed receipts look — controlling what store information, customer details, line items, order summary labels, and footer content appears on both Payment Receipts and Refund Receipts.
Accessing receipt template
-
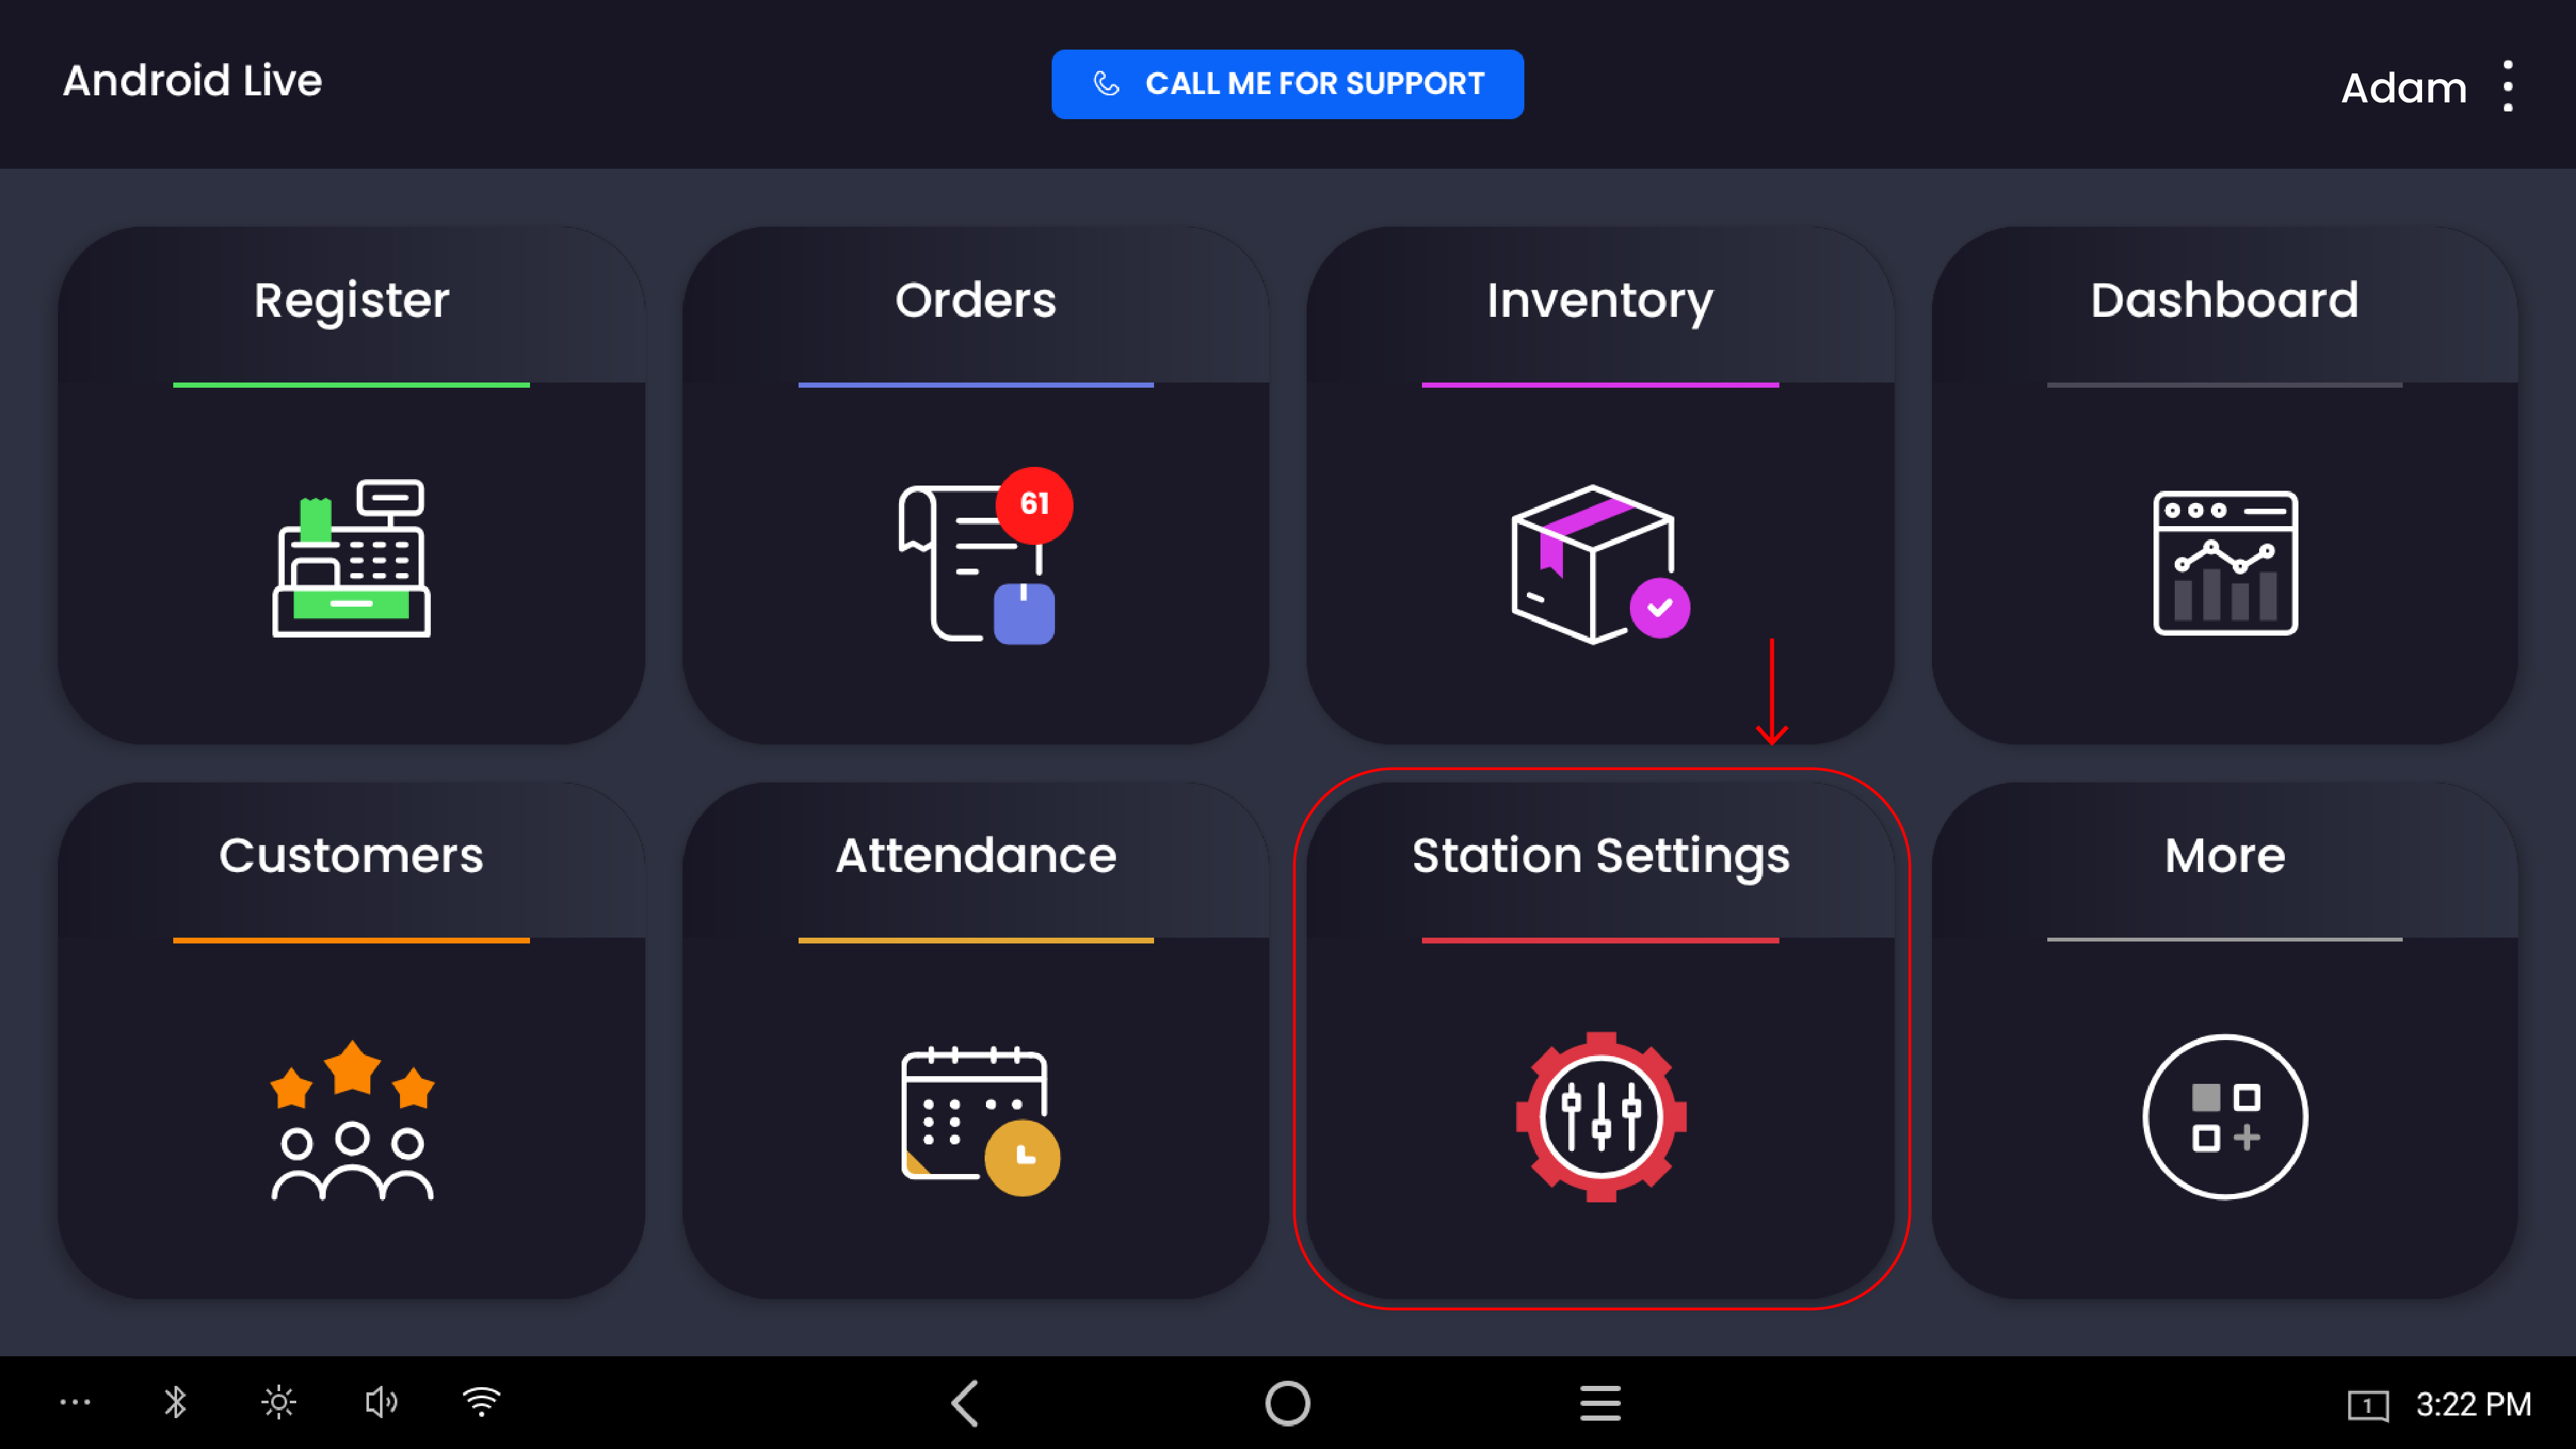
From the POS home screen, tap Station Settings
-
In the left sidebar, tap Receipt Template
The sidebar contains the following sections:
-
Receipt Template
-
Register Settings
-
Quick Add
-
Hardware
-
Rear Display
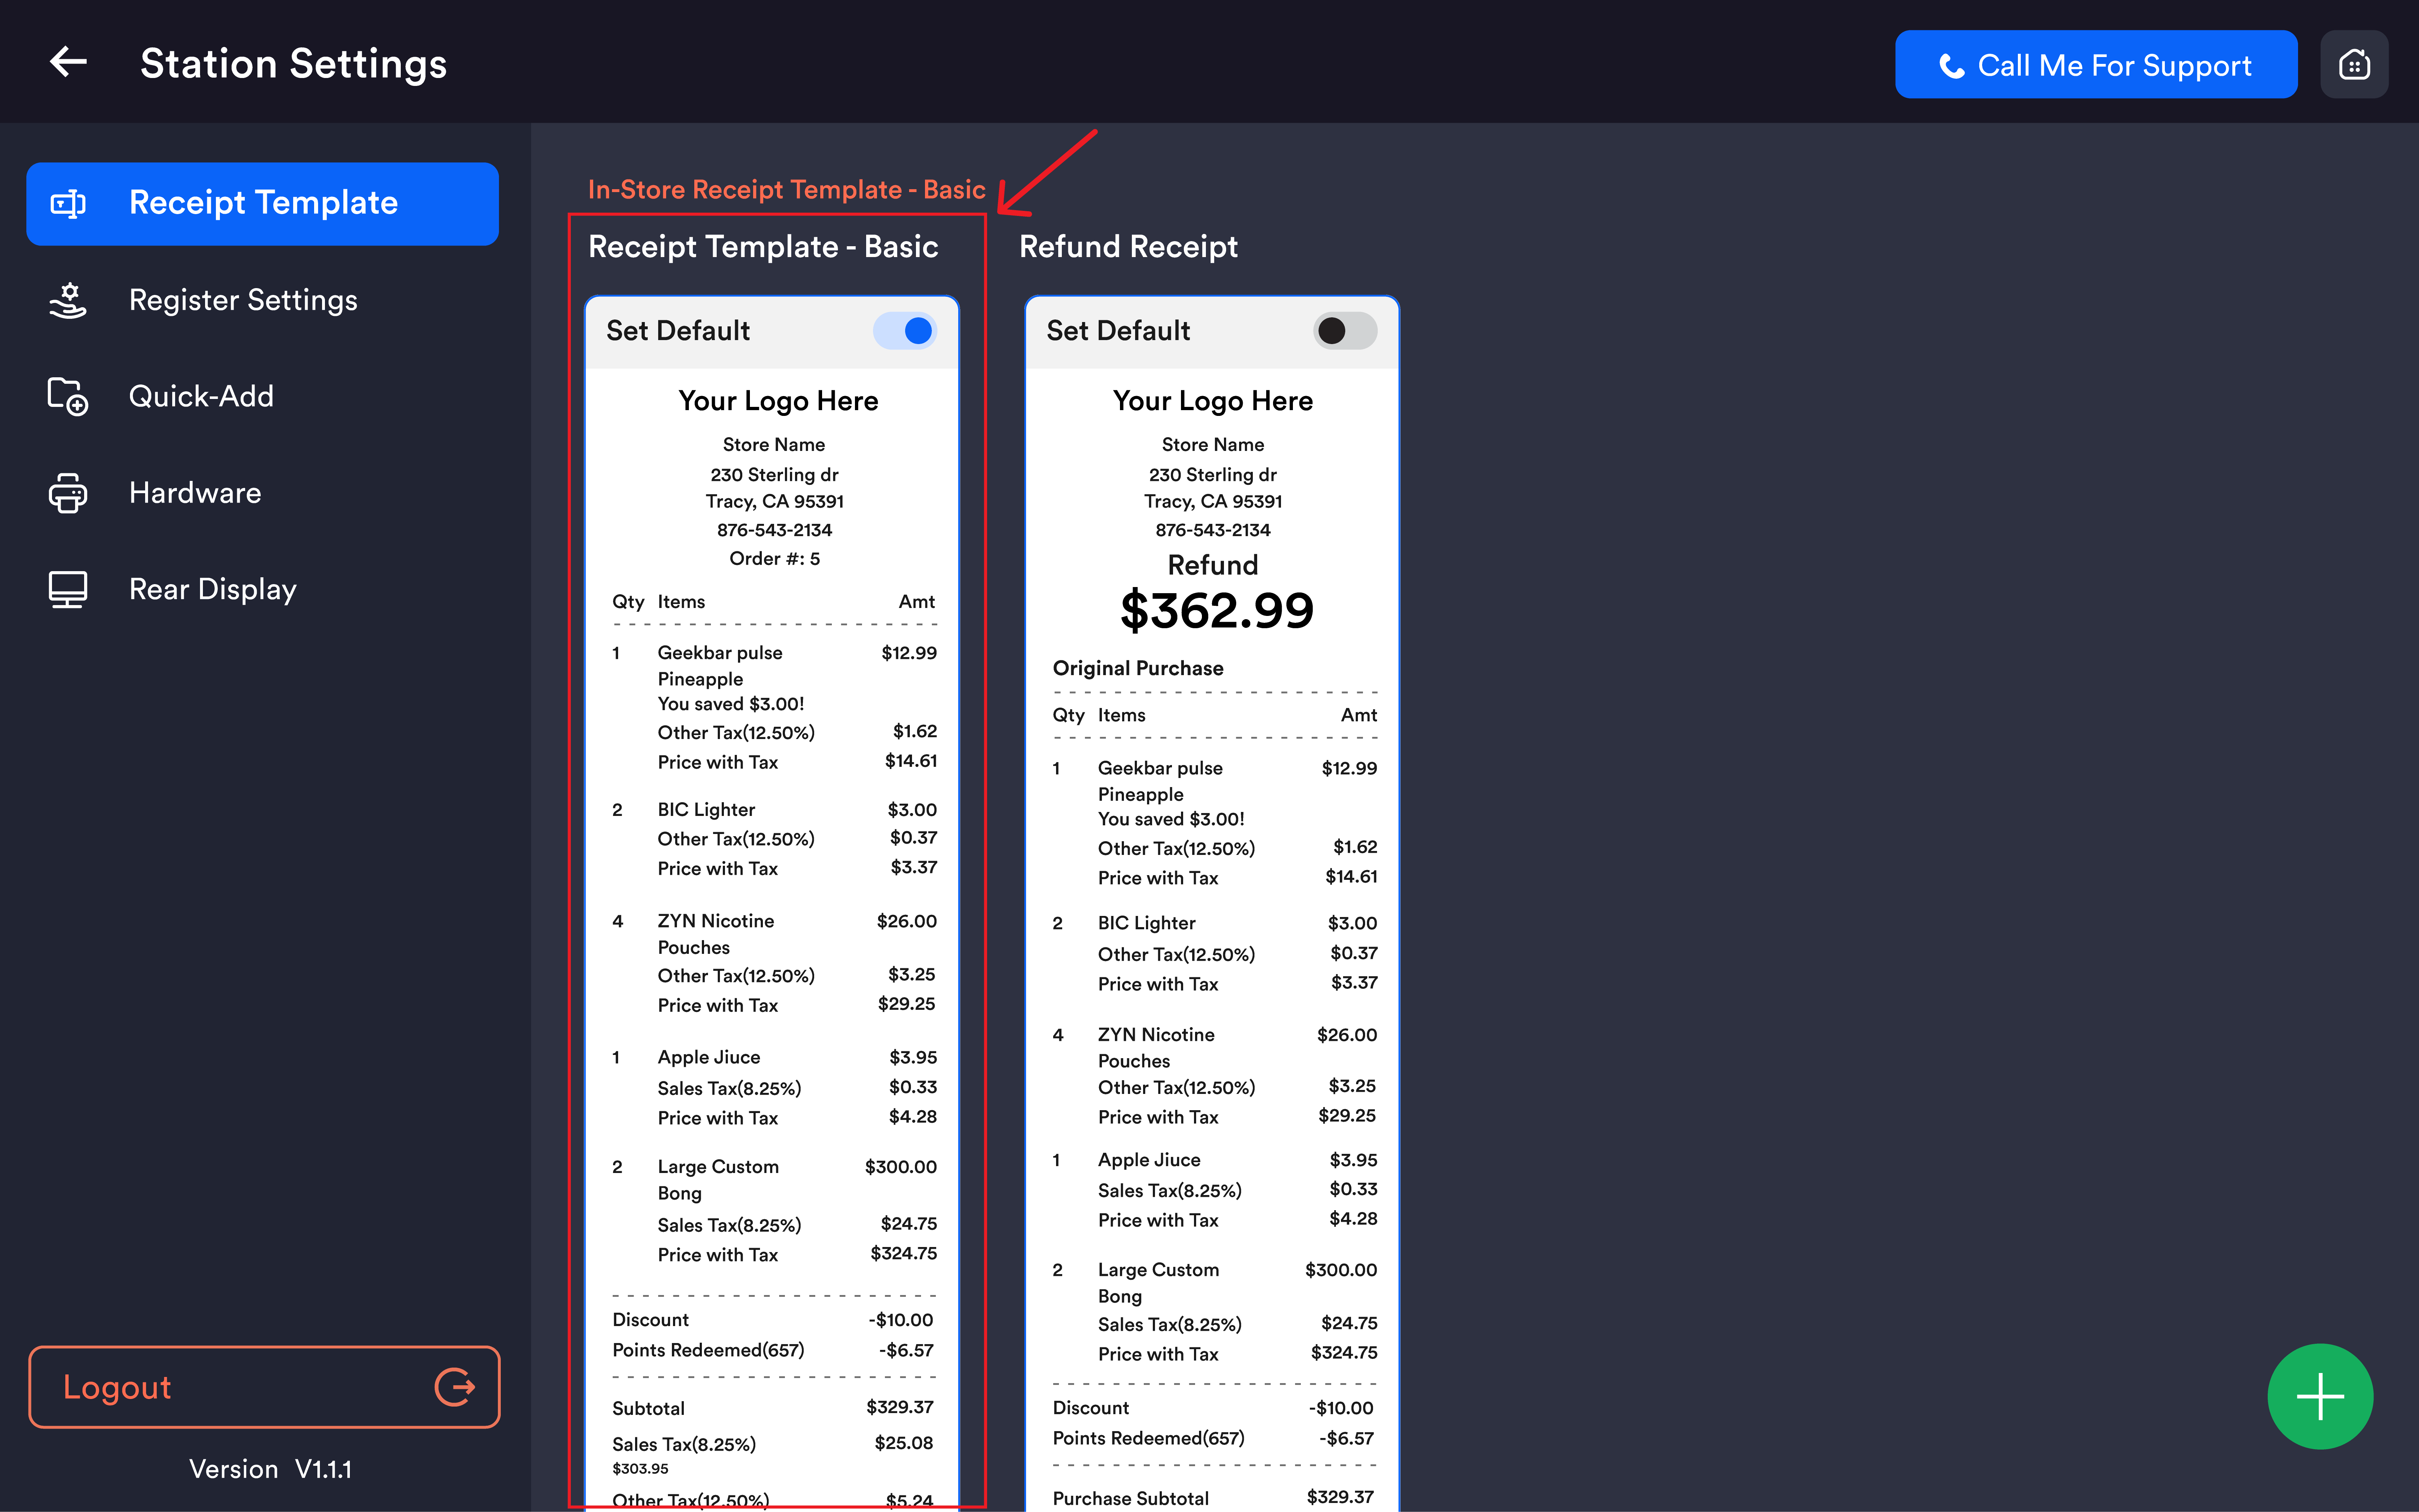
Receipt template overview
The Receipt Template screen shows a live side-by-side preview under In-Store Receipt Template Basic:
|
Receipt type |
Description |
|---|---|
|
Payment Receipt |
Printed after a completed sale — shows store info, items, totals, and payment method |
|
Refund Receipt |
Printed after a refund — shows original purchase, refunded items, and refund total |
Each template has a Set Default toggle to designate the active default. Tap the + button (bottom-right) to create additional templates. Tap any receipt preview to open its edit screen.
Editing a receipt template
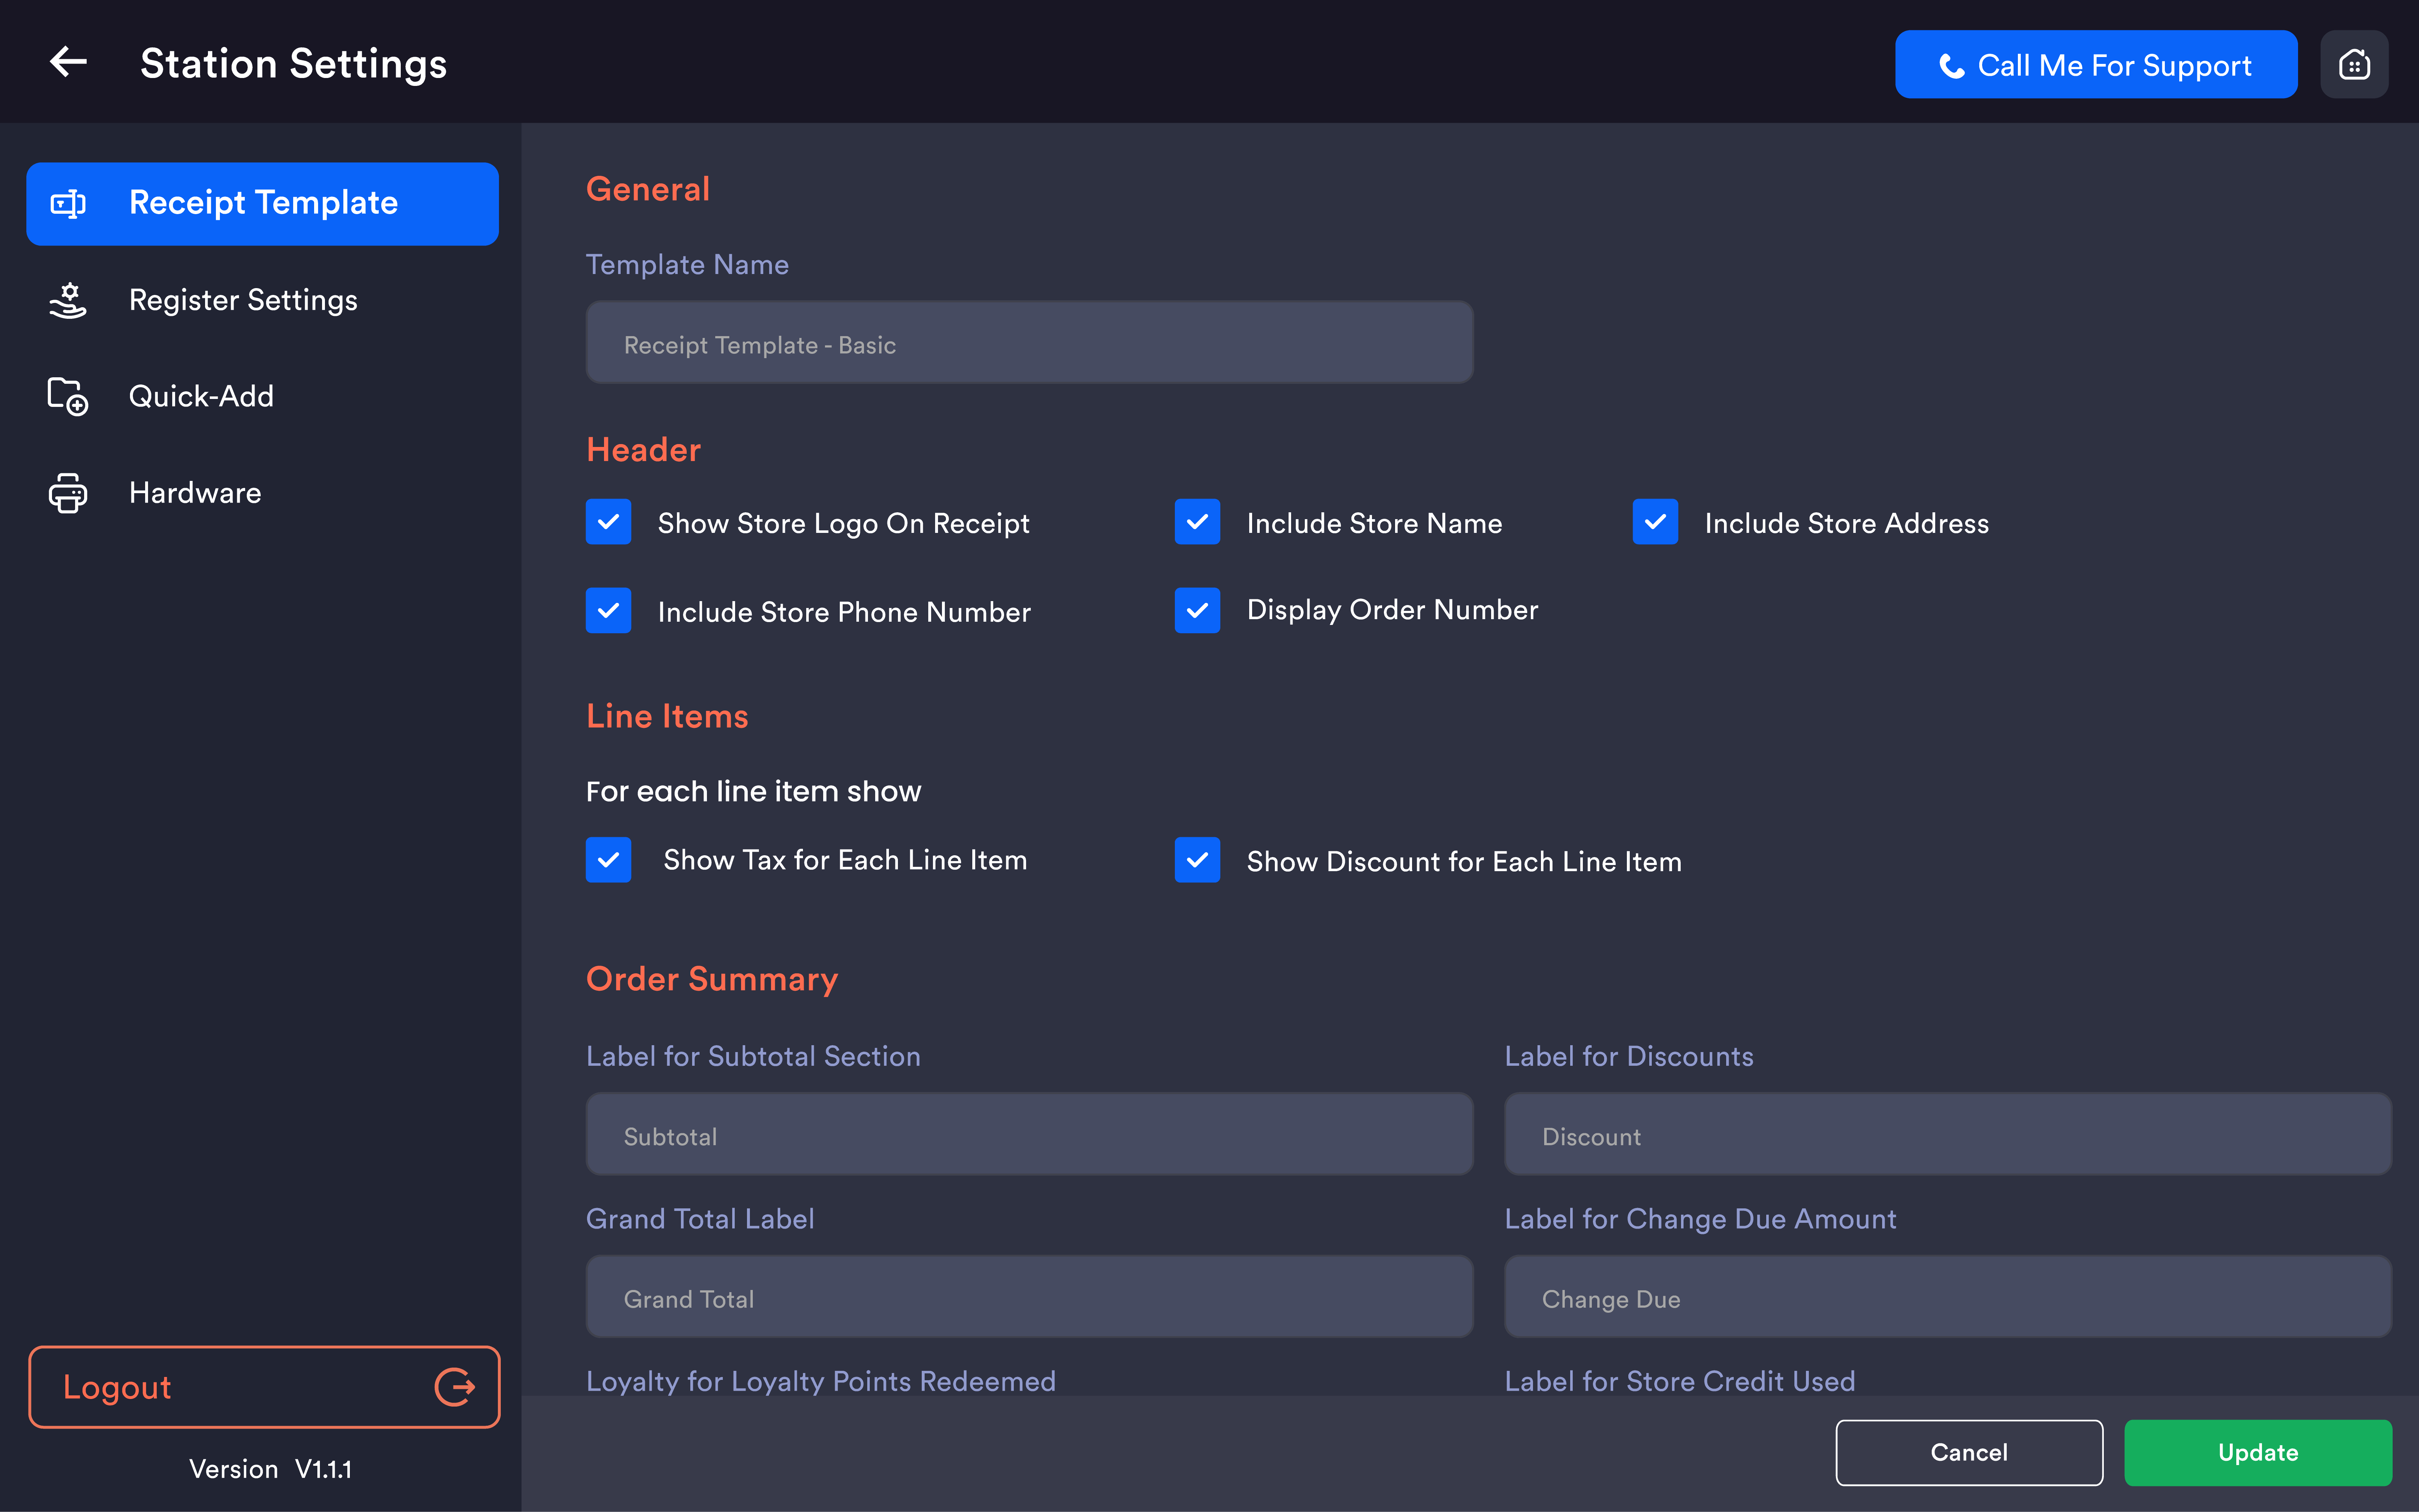
Tapping either receipt opens Edit Receipt Template, divided into the following sections.
General
|
Field |
Description |
|---|---|
|
Receipt Template Name |
Name the template (e.g. "Payment Receipt" or "Refund Receipt") |
Header
Controls what store information appears at the top of the receipt:
|
Option |
Default |
|---|---|
|
Show Store Logo on Receipt |
✅ Enabled |
|
Include Store Name |
✅ Enabled |
|
Include Store Address |
✅ Enabled |
|
Include Store Phone Number |
✅ Enabled |
|
Display Order Number |
Configurable |
Line items
Controls what is shown per product on the receipt:
|
Option |
Description |
|---|---|
|
Show Tax for Each Line Item |
Displays the tax amount applied per product |
|
Show Discount for Each Line Item |
Displays any discount applied per product |
-20260525-152608.png?cb=f3381a992f442dbb405e750e102edc5e)
Order summary
Customizable label names for the receipt totals section:
|
Field |
Default label |
|---|---|
|
Label for Subtotal Section |
Subtotal |
|
Label for Discounts |
Discounts |
|
Grand Total Label |
Total |
|
Label for Change Due Amount |
Change Due |
|
Label for Loyalty Points Redeemed |
Points Redeemed |
|
Label for Store Credit Used |
Store Credit Used |
|
Label for Credit Card Payment |
Credit Card |
|
Label for Debit Card Payment |
Debit Card |
|
Label for Non-Cash Adjustments |
Non-Cash Adjustment |
|
Label for Cash Payments |
Cash Paid |
|
Label for Tips |
Tip |
|
Label for Gift Card Payments |
Gift Card |
Customer information
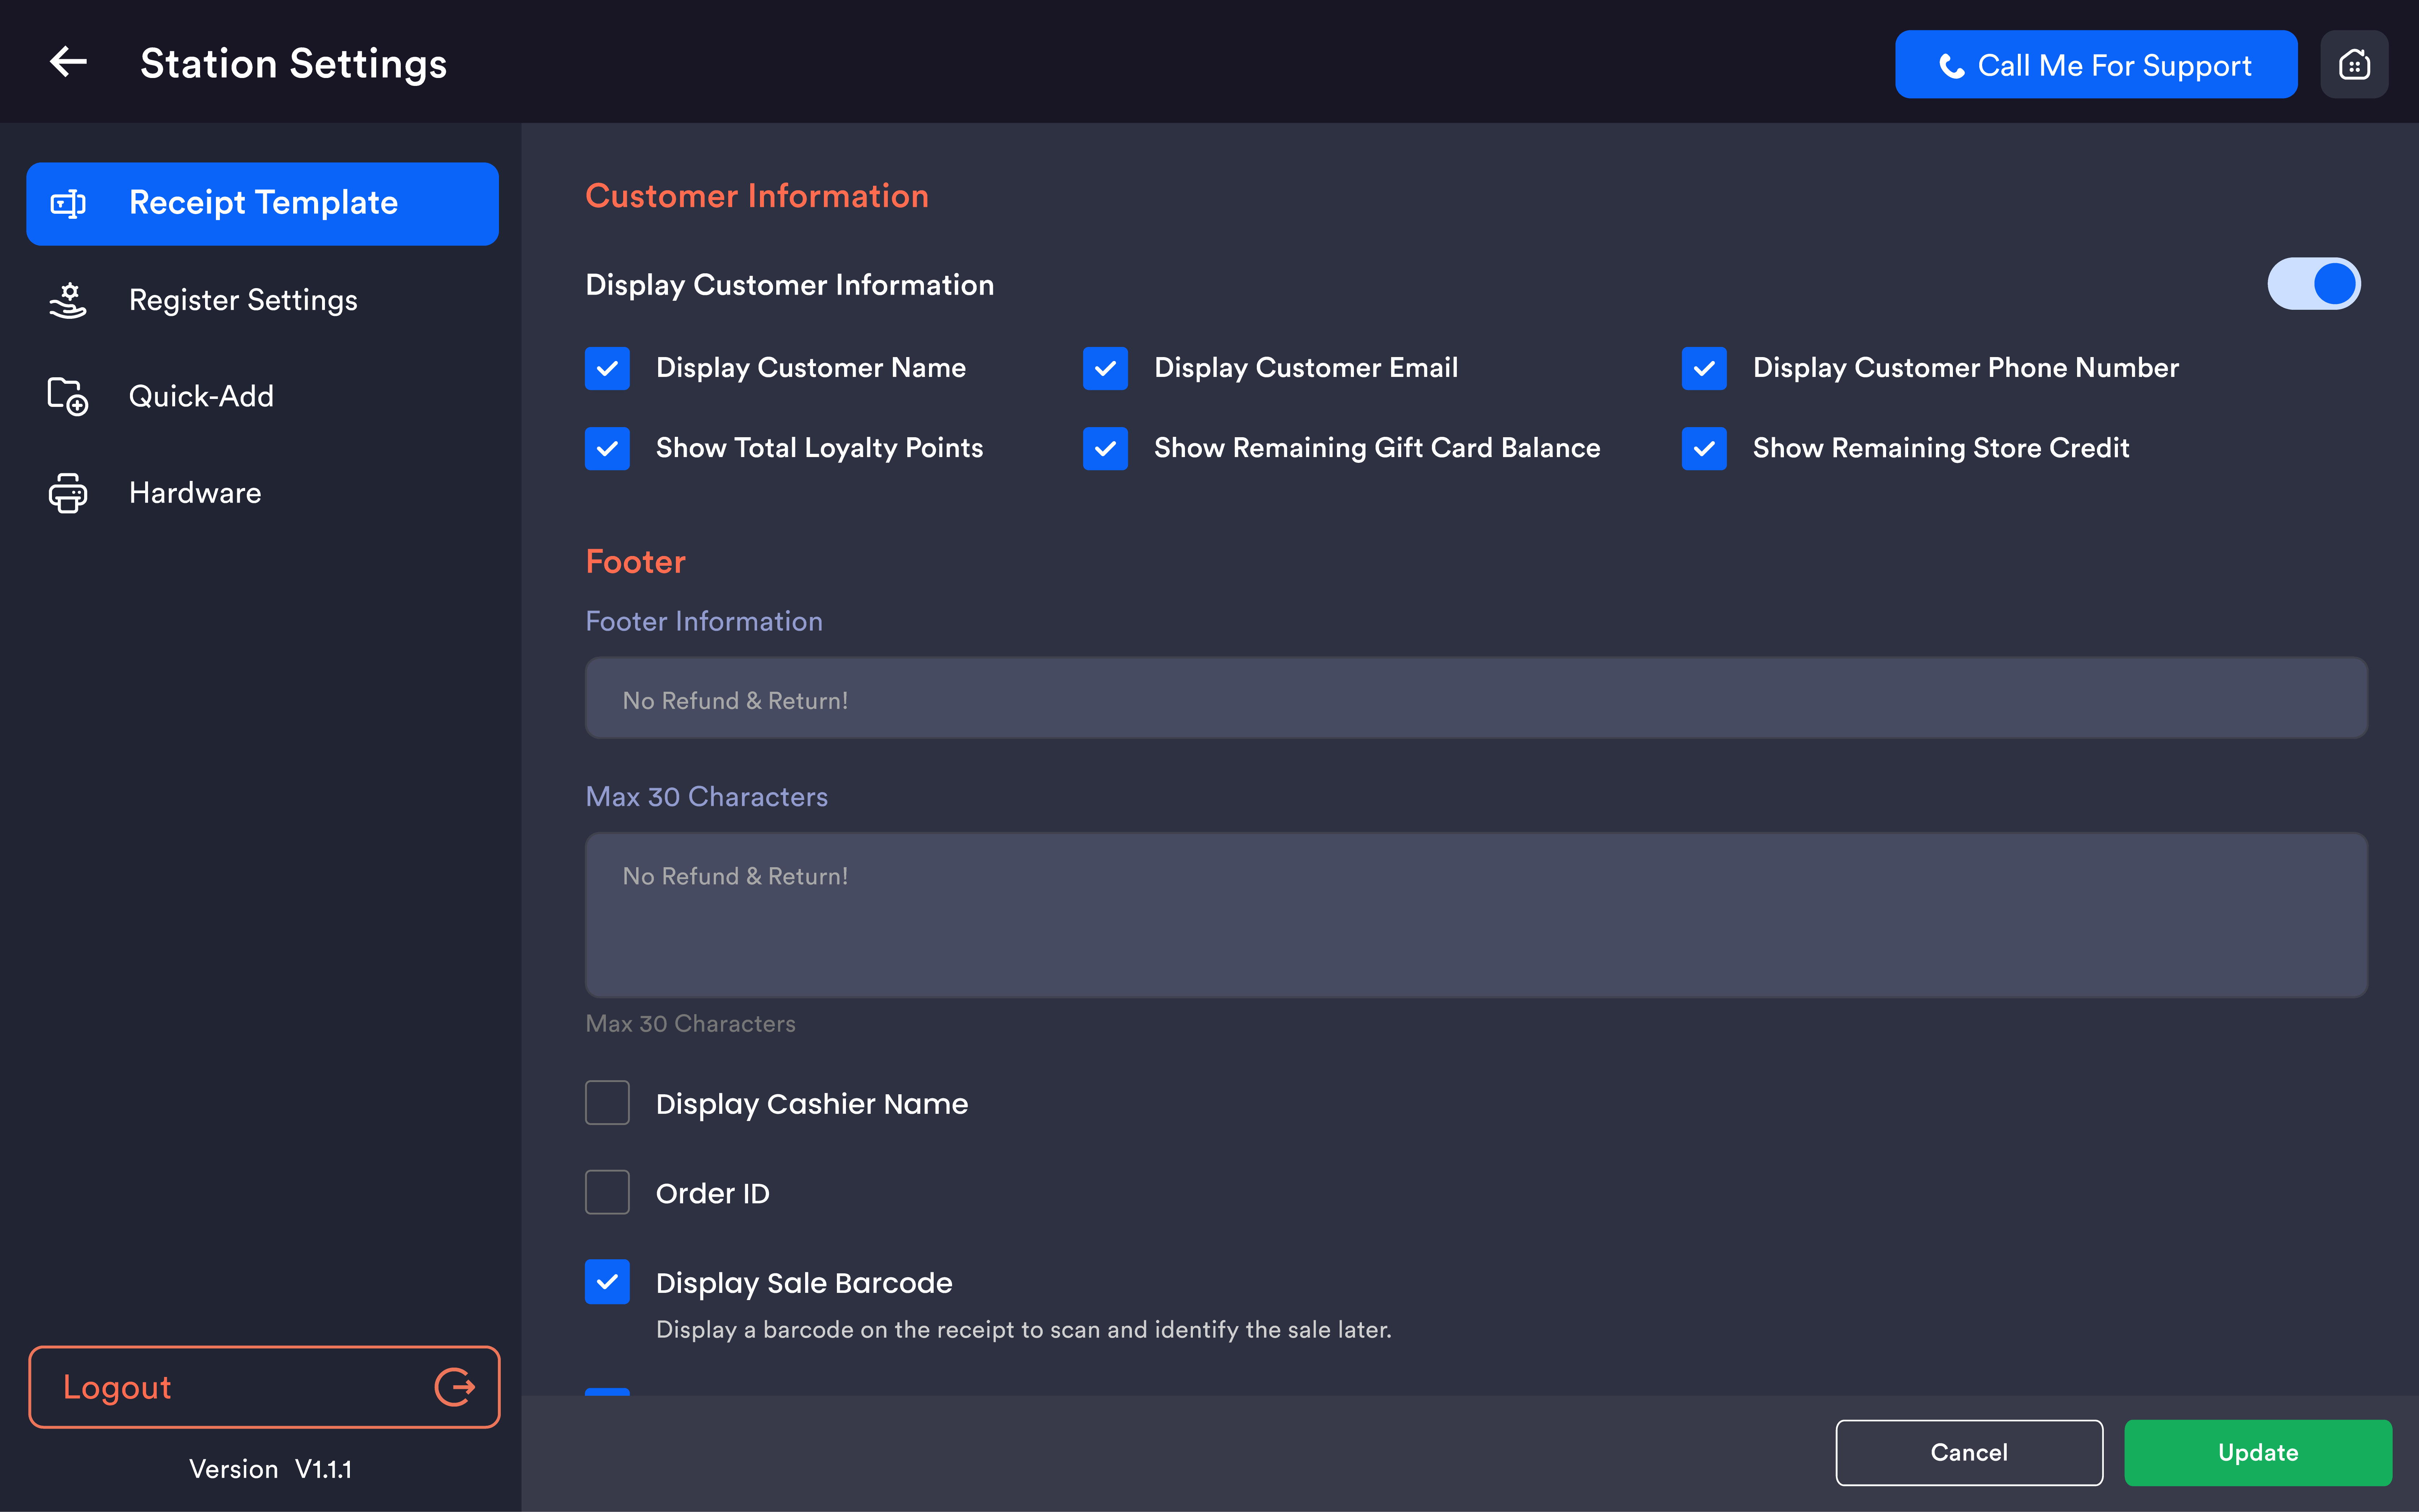
Controls whether customer details are printed on the receipt:
|
Option |
Default |
|---|---|
|
Display Customer Information (master toggle) |
✅ Enabled |
|
Display Customer Name |
✅ Enabled |
|
Display Customer Email |
✅ Enabled |
|
Display Customer Phone Number |
✅ Enabled |
|
Show Total Loyalty Points |
✅ Enabled |
|
Show Remaining Gift Card Balance |
✅ Enabled |
|
Show Remaining Store Credit |
✅ Enabled |
|
Show Earned Loyalty Points on Receipt |
✅ Enabled |
Footer
Controls what appears at the bottom of the receipt. Applies to both Payment Receipt and Refund Receipt templates:
|
Option |
Description |
|---|---|
|
Custom Footer Message |
Two custom footer lines, max 30 characters each |
|
Display Cashier Name |
Shows the name of the employee who processed the sale — applies to both Payment and Refund receipts |
|
Order ID |
✅ Enabled by default |
|
Display Item Sold |
✅ Enabled by default |
|
Show Receipt Barcode for Easy Scanning |
Prints a barcode on the receipt to identify the sale later. On Refund Receipts, the Date and Time are also displayed below the barcode |
|
Include Loyalty and Online Ordering QR Codes |
Prints a QR code and sign-up message for the store's Loyalty Program — appears on receipts where a customer is not already linked to the sale |
|
Loyalty Message |
Customizable text printed below the QR code (e.g. "Register your details with the Quickvee Loyalty Program") |
|
Custom Promotion Message |
Optional additional promotional message printed on the receipt |
Saving changes
After making any changes, tap Update to save. Tap Cancel to discard all changes.
Note: Changes made to the receipt template labels and visibility settings are reflected on all printed receipts going forward. Ensure the template is configured correctly before starting a shift.