
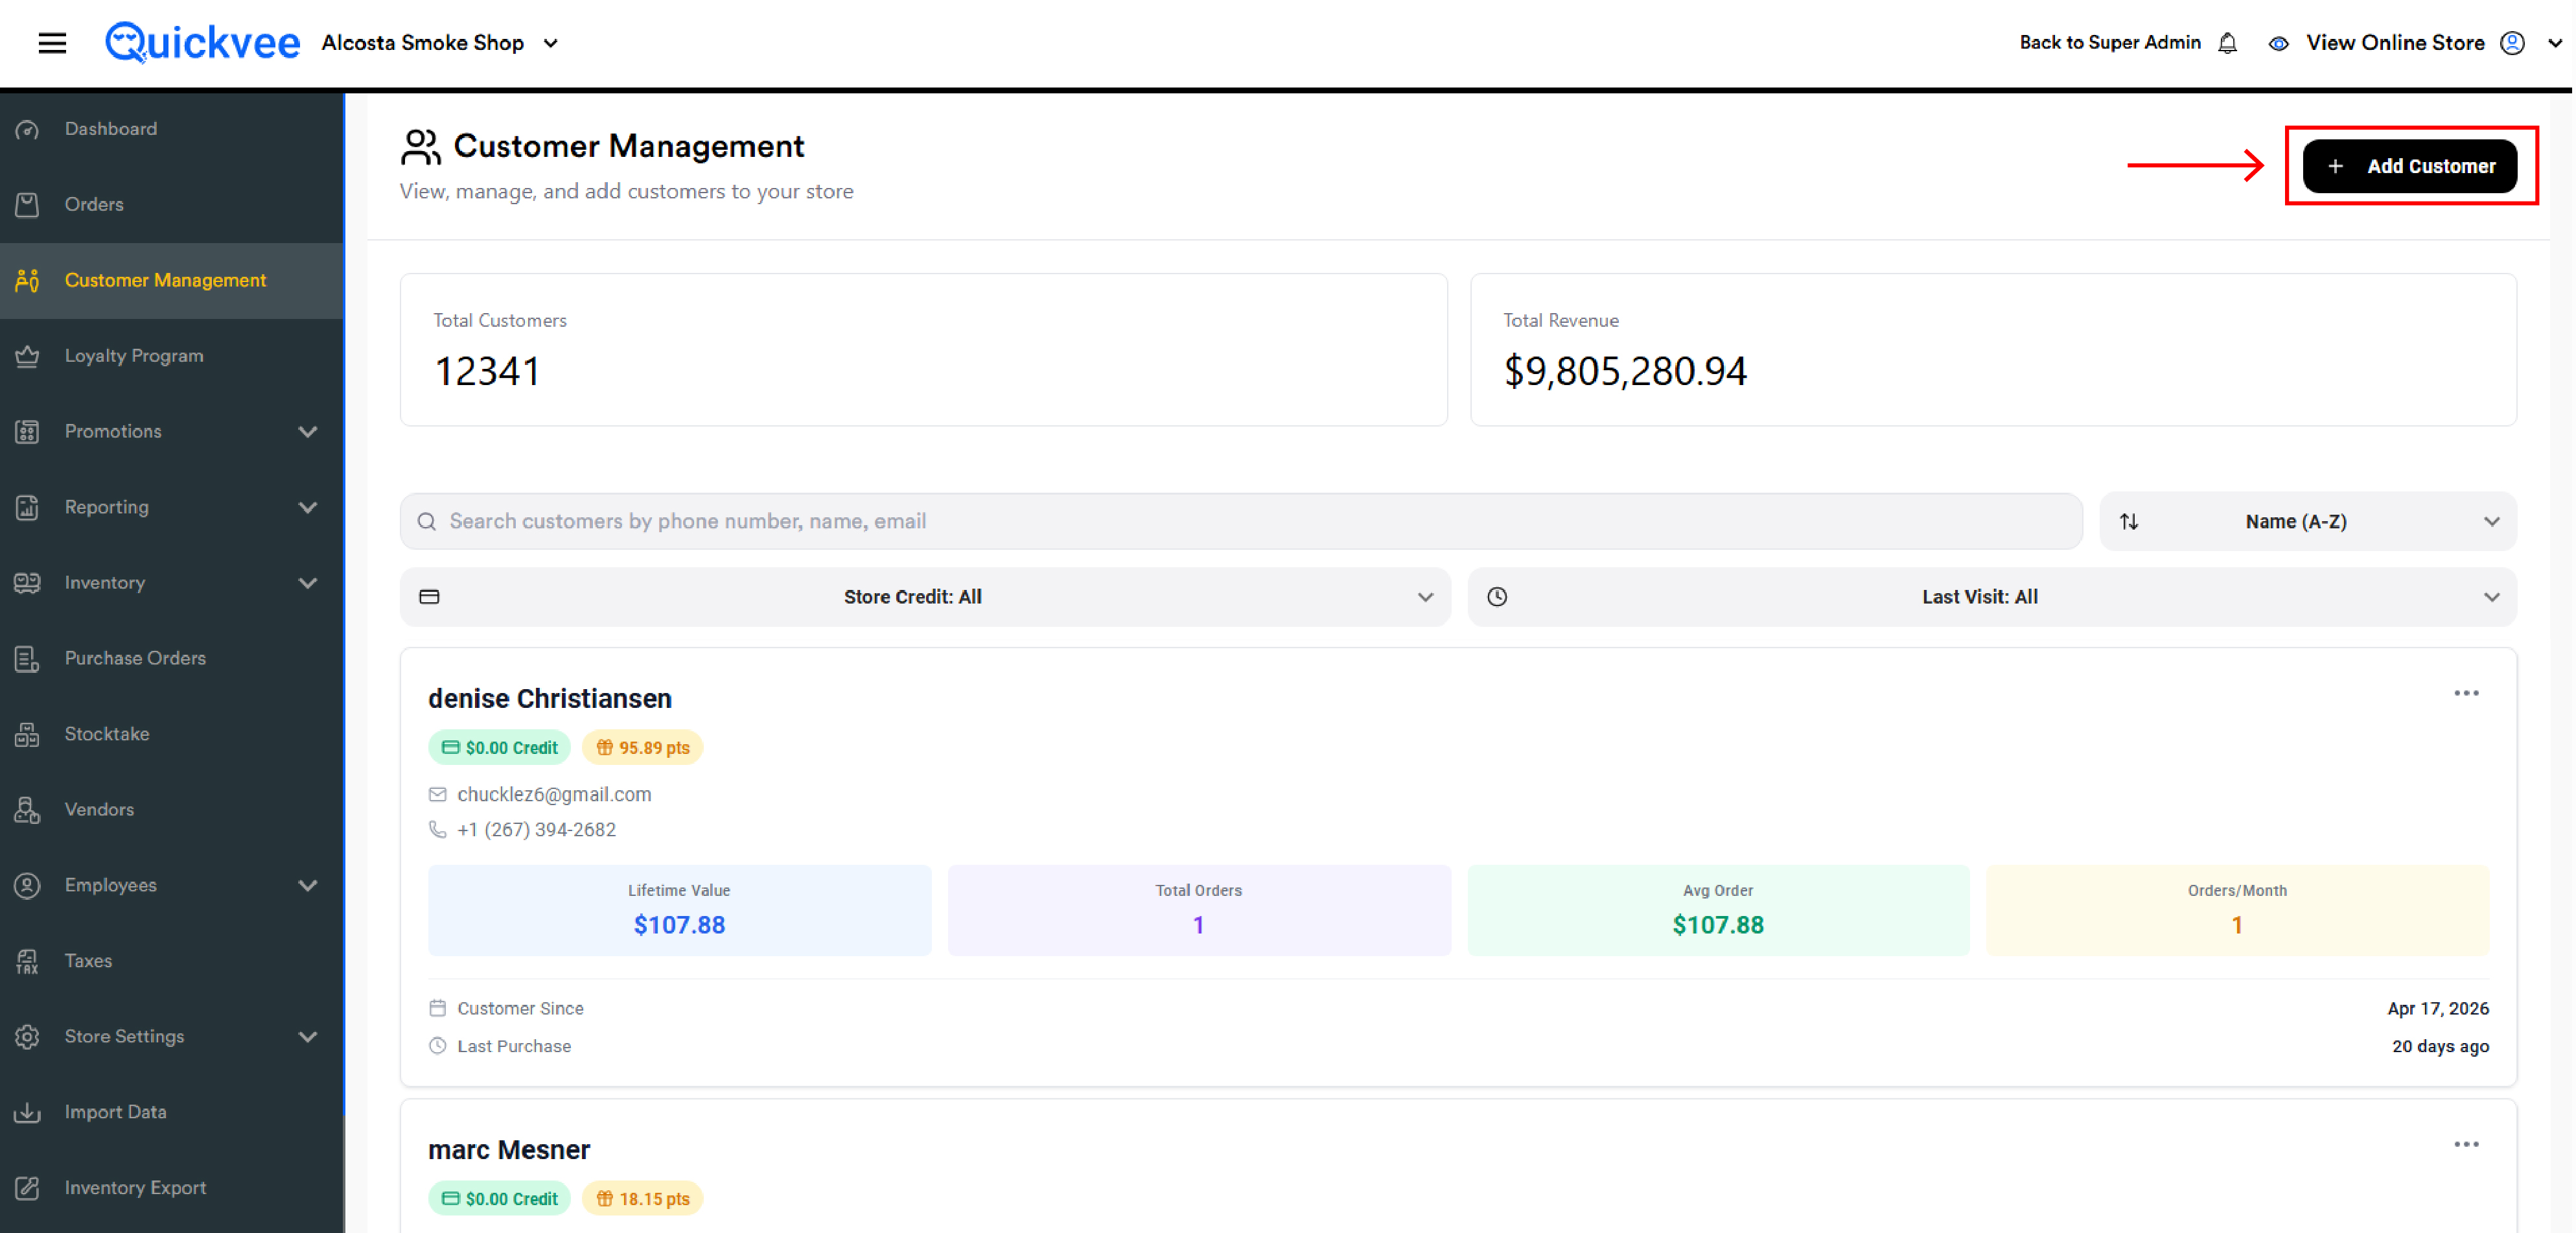
The Customer Management module is your store's address book. Every customer who has been added at the register, who signed up online, or who you've added manually appears here. Each customer card shows a snapshot of their value to your store — lifetime spend, total orders, average order, and how many orders per month — alongside their loyalty points and store credit balance.
From here you can add new customers, edit details, adjust loyalty points or store credit, merge duplicate accounts, view a customer's full order history, disable inactive accounts, and delete customers entirely.
Where to find it: Sign in to your merchant backend → side menu → Customer Management.
The Customer List
The page header shows two store-wide totals at the top:
|
Stat |
What it shows |
|---|---|
|
Total Customers |
The count of every customer in your store, including disabled and zero-purchase accounts |
|
Total Revenue |
The lifetime sum of every order across every customer |
Below the totals, every customer appears as a card — newest first by default. You can change the order using the sort dropdown.
-20260528-103434.jpg?cb=c51c4b1f3aa8a37e6a4702377c8ff310)
Each customer card
|
Element |
What it shows |
|---|---|
|
Name |
The customer's display name. Customers without a saved name appear as |
|
Store Credit |
The current store credit balance. Can be negative if a refund pushed it below zero. |
|
Loyalty Points |
The current points balance, formatted to two decimals |
|
Email and Phone |
Primary contact info |
|
Lifetime Value |
The total amount this customer has paid, net of refunds. Only updates when an order is completed (not pending). |
|
Total Orders |
Count of completed orders |
|
Avg Order |
Lifetime Value ÷ Total Orders |
|
Orders/Month |
Average completed orders per calendar month since the customer was added |
|
Customer Since |
The date the customer was first added to your store |
|
Last Purchase |
The date of the most recent completed order. Shown alongside how many days ago. |
The four metrics — Lifetime Value, Total Orders, Avg Order, and Orders/Month — are derived from completed orders only. Pending or in-progress orders don't move these numbers, and refunds reduce them in real time.
Searching, sorting, and filtering
Three controls sit above the customer list:
-
Search — Find a customer by phone number, name, or email. Partial matches work.
-
Sort dropdown — Switch the order: Name (A–Z or Z–A), Lifetime Value, Last Visit, etc.
-
Store Credit filter — Limit the list to customers with a credit balance, no balance, or all.
-
Last Visit filter — Limit to customers who visited recently, a long time ago, or any time.
Adding a new customer
Click Add Customer at the top right of the page to open the form.
Fields
|
Field |
Required |
Notes |
|---|---|---|
|
First Name |
Yes |
|
|
Last Name |
No |
Recommended — accounts without a last name will display awkwardly in some places |
|
|
Yes |
Must be a valid email format |
|
Phone |
Yes |
Defaults to the +1 country code; type the 10-digit number |
|
Date of Birth |
No |
Pick from the calendar or type directly using |
|
Address |
No |
Street address line |
|
Suite/Apt# |
No |
|
|
City |
No |
|
|
State |
No |
Choose from the dropdown |
|
Zip |
No |
|
|
Customer Notes |
No |
Free-text — useful for tagging preferences, allergies, VIP status, anything you want staff to know |
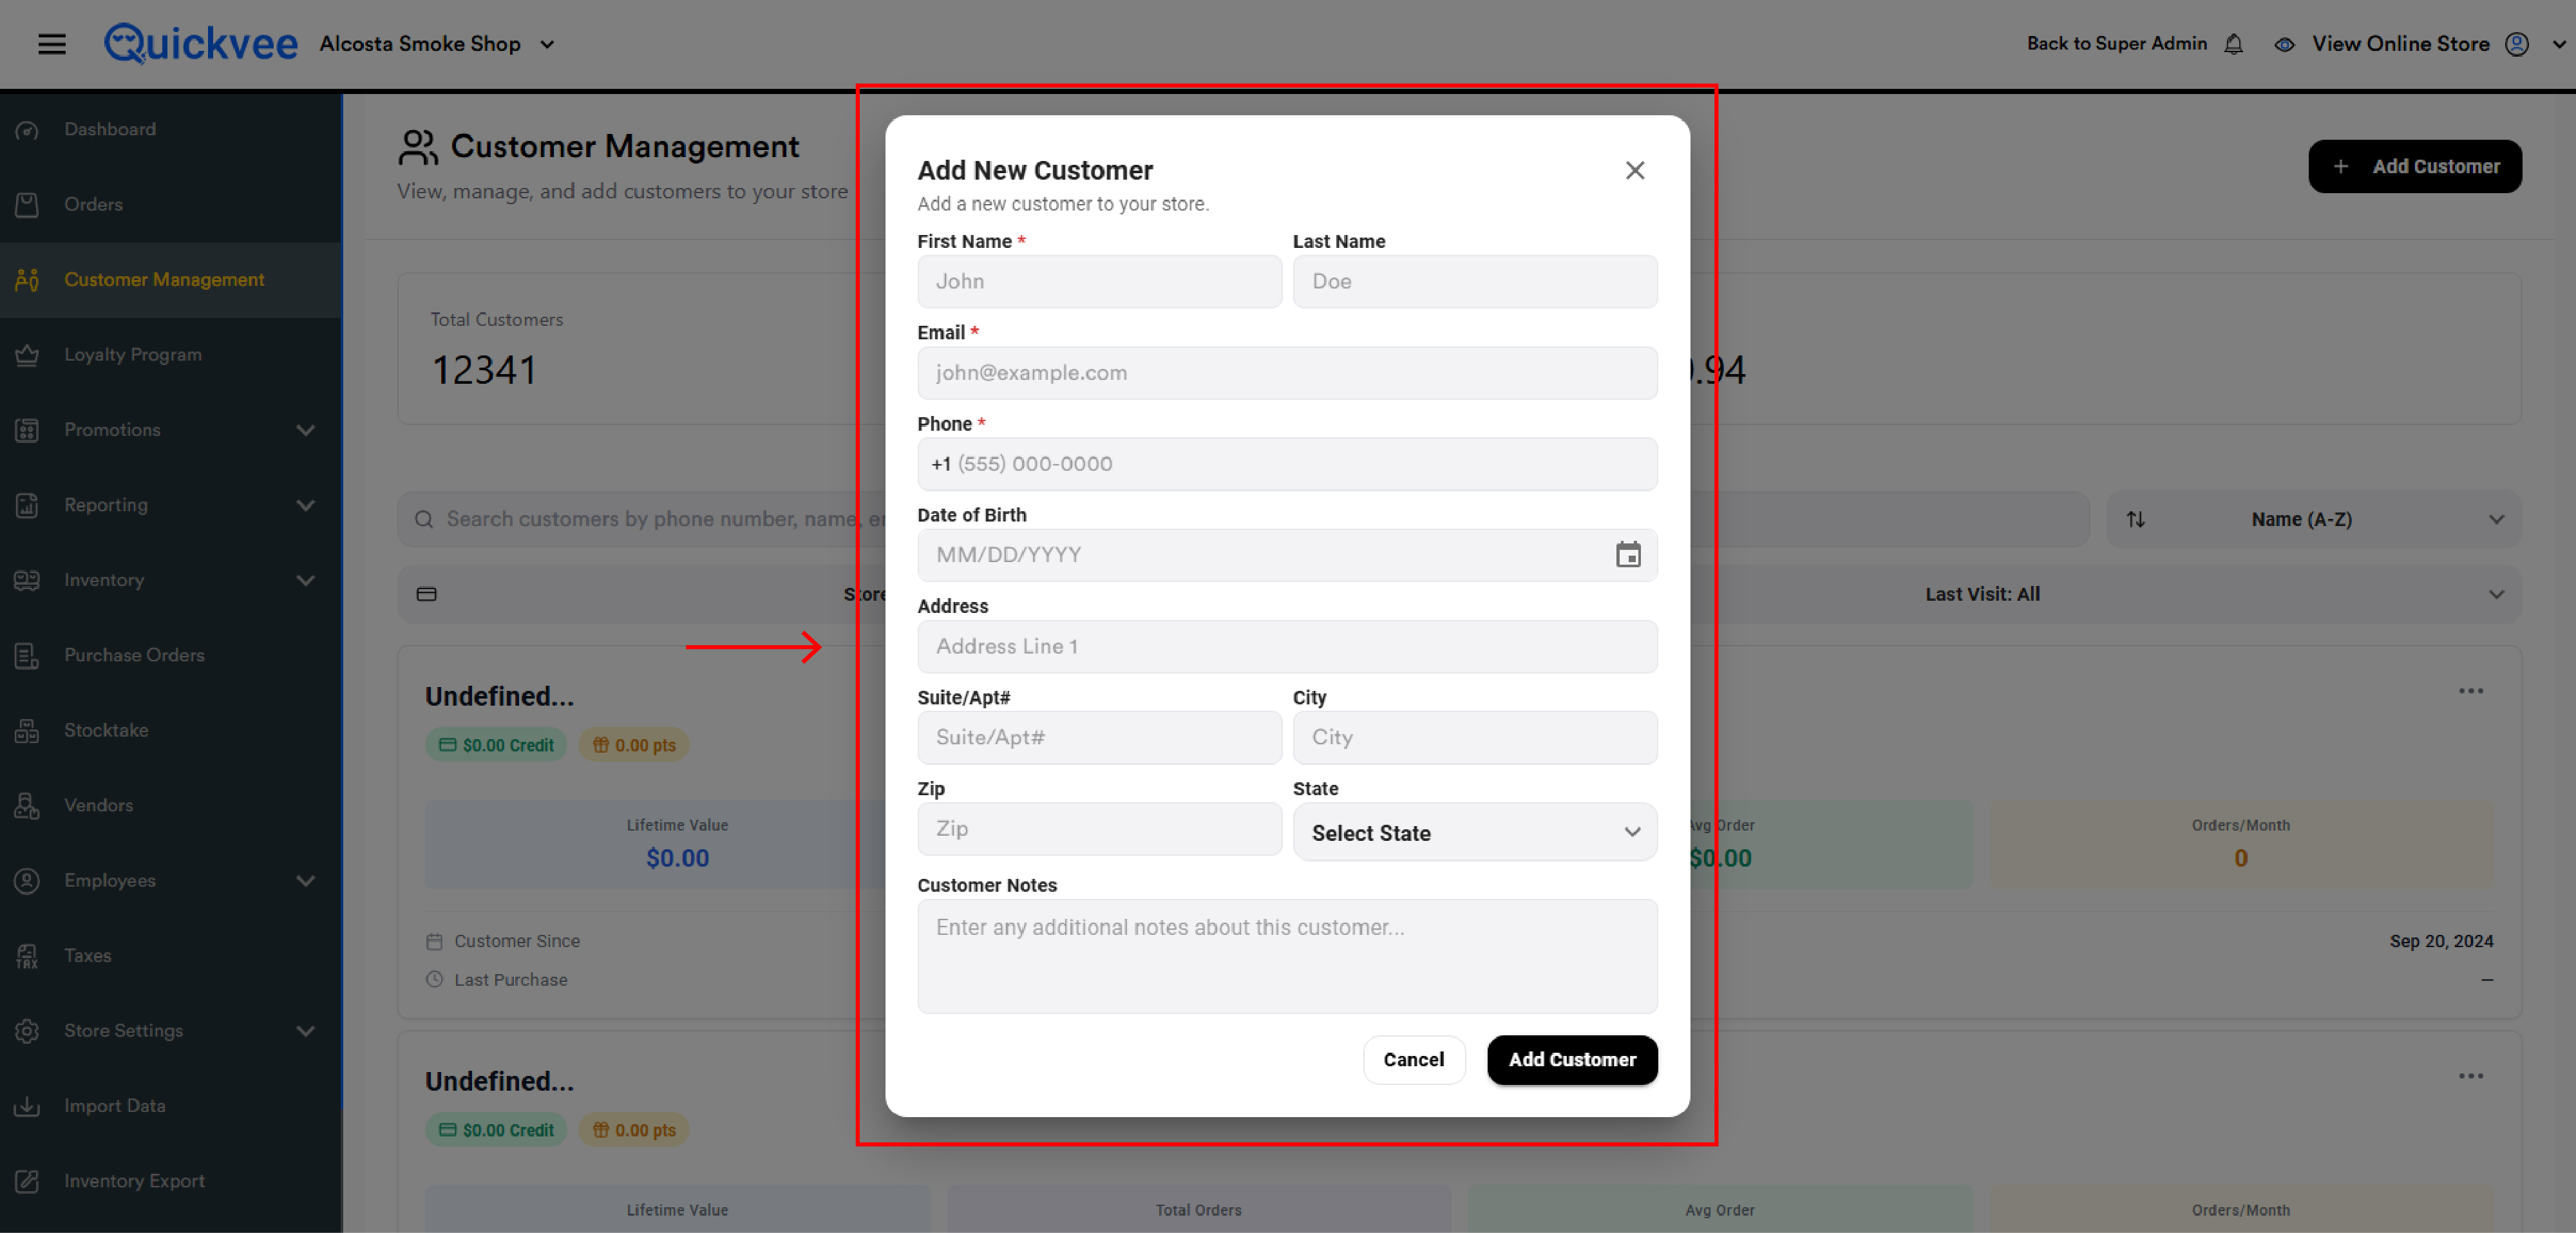
Click Add Customer at the bottom to save, or Cancel to discard.
Newly added customers appear in the list immediately. Their Customer Since date is set to today and all four lifetime metrics start at zero.
Editing a customer
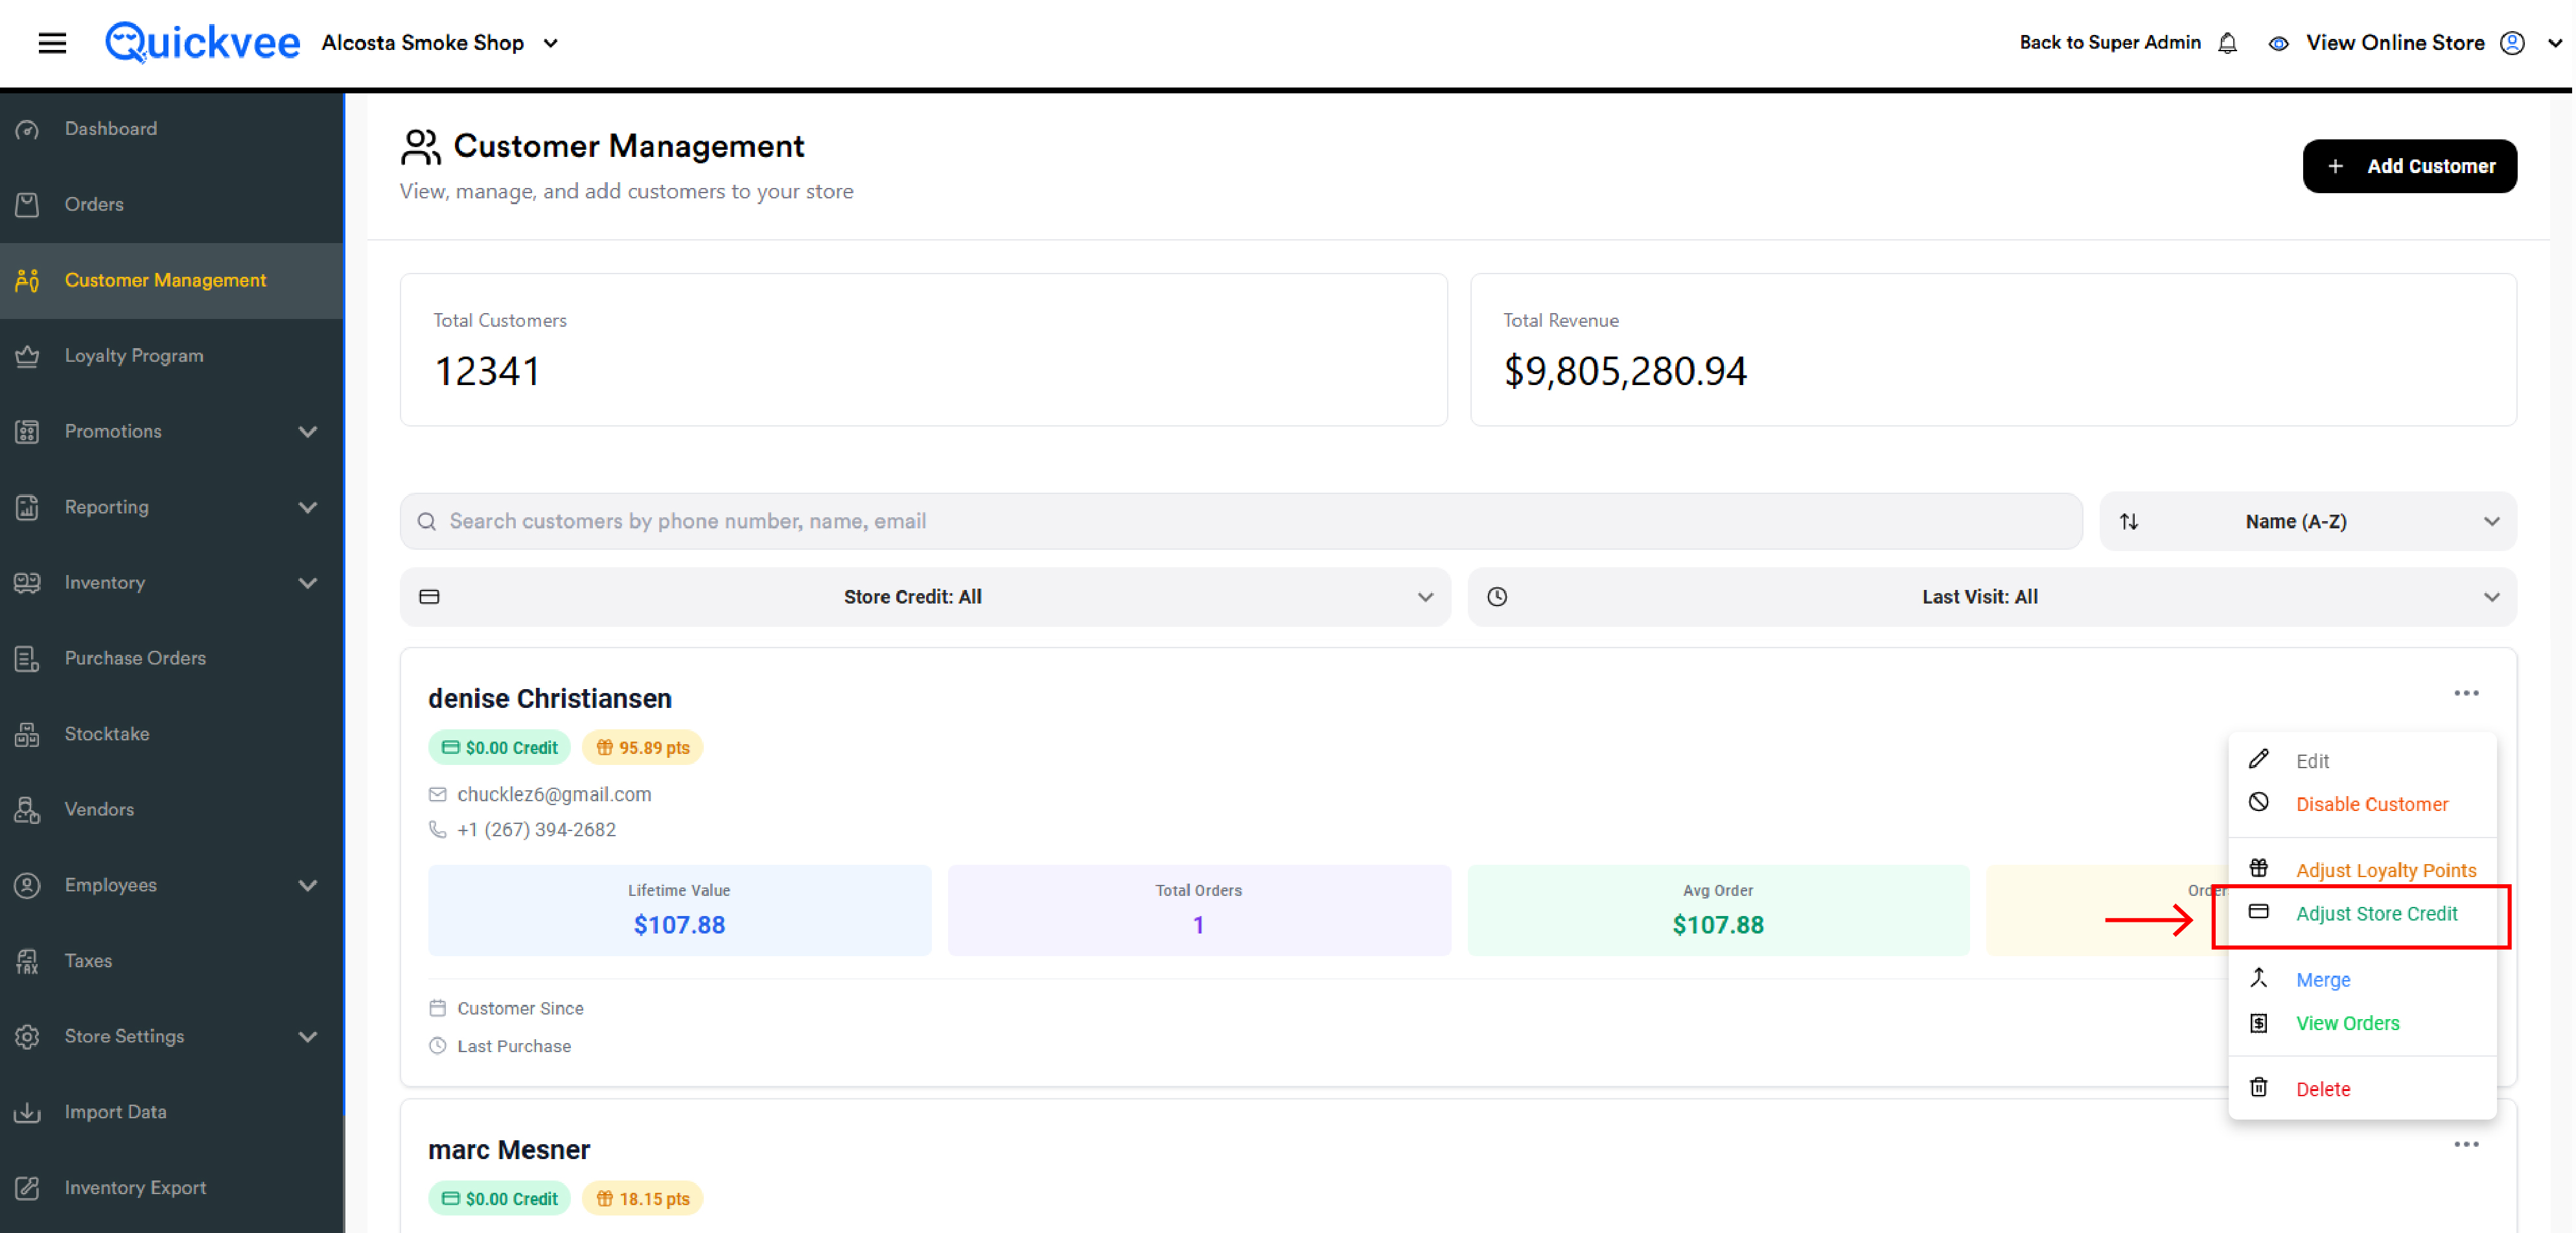
On any customer card, click the kebab menu (the three dots ⋯ at the top-right of the card) and choose Edit. The Edit Customer form opens with all current details pre-filled.
You can update any field — name, contact info, address, notes — and click Save Changes. The card refreshes immediately with the new details.
Changing a customer's email or phone updates the record but does not change their order history, store credit, or loyalty balance — those are tied to the account, not the contact info.
Adjusting Store Credit
To add or remove store credit manually — for example, to issue a goodwill credit, correct an error, or hand-load a credit purchased in cash — open the kebab menu on the customer's card and choose Adjust Store Credit.
The Adjust Store Credit modal shows:
-
The customer's name
-
The Current Balance (read-only)
-
An Adjustment Type toggle: Add or Remove
-
An Amount field — required, in dollars
-
A Note field — required for both Add and Remove
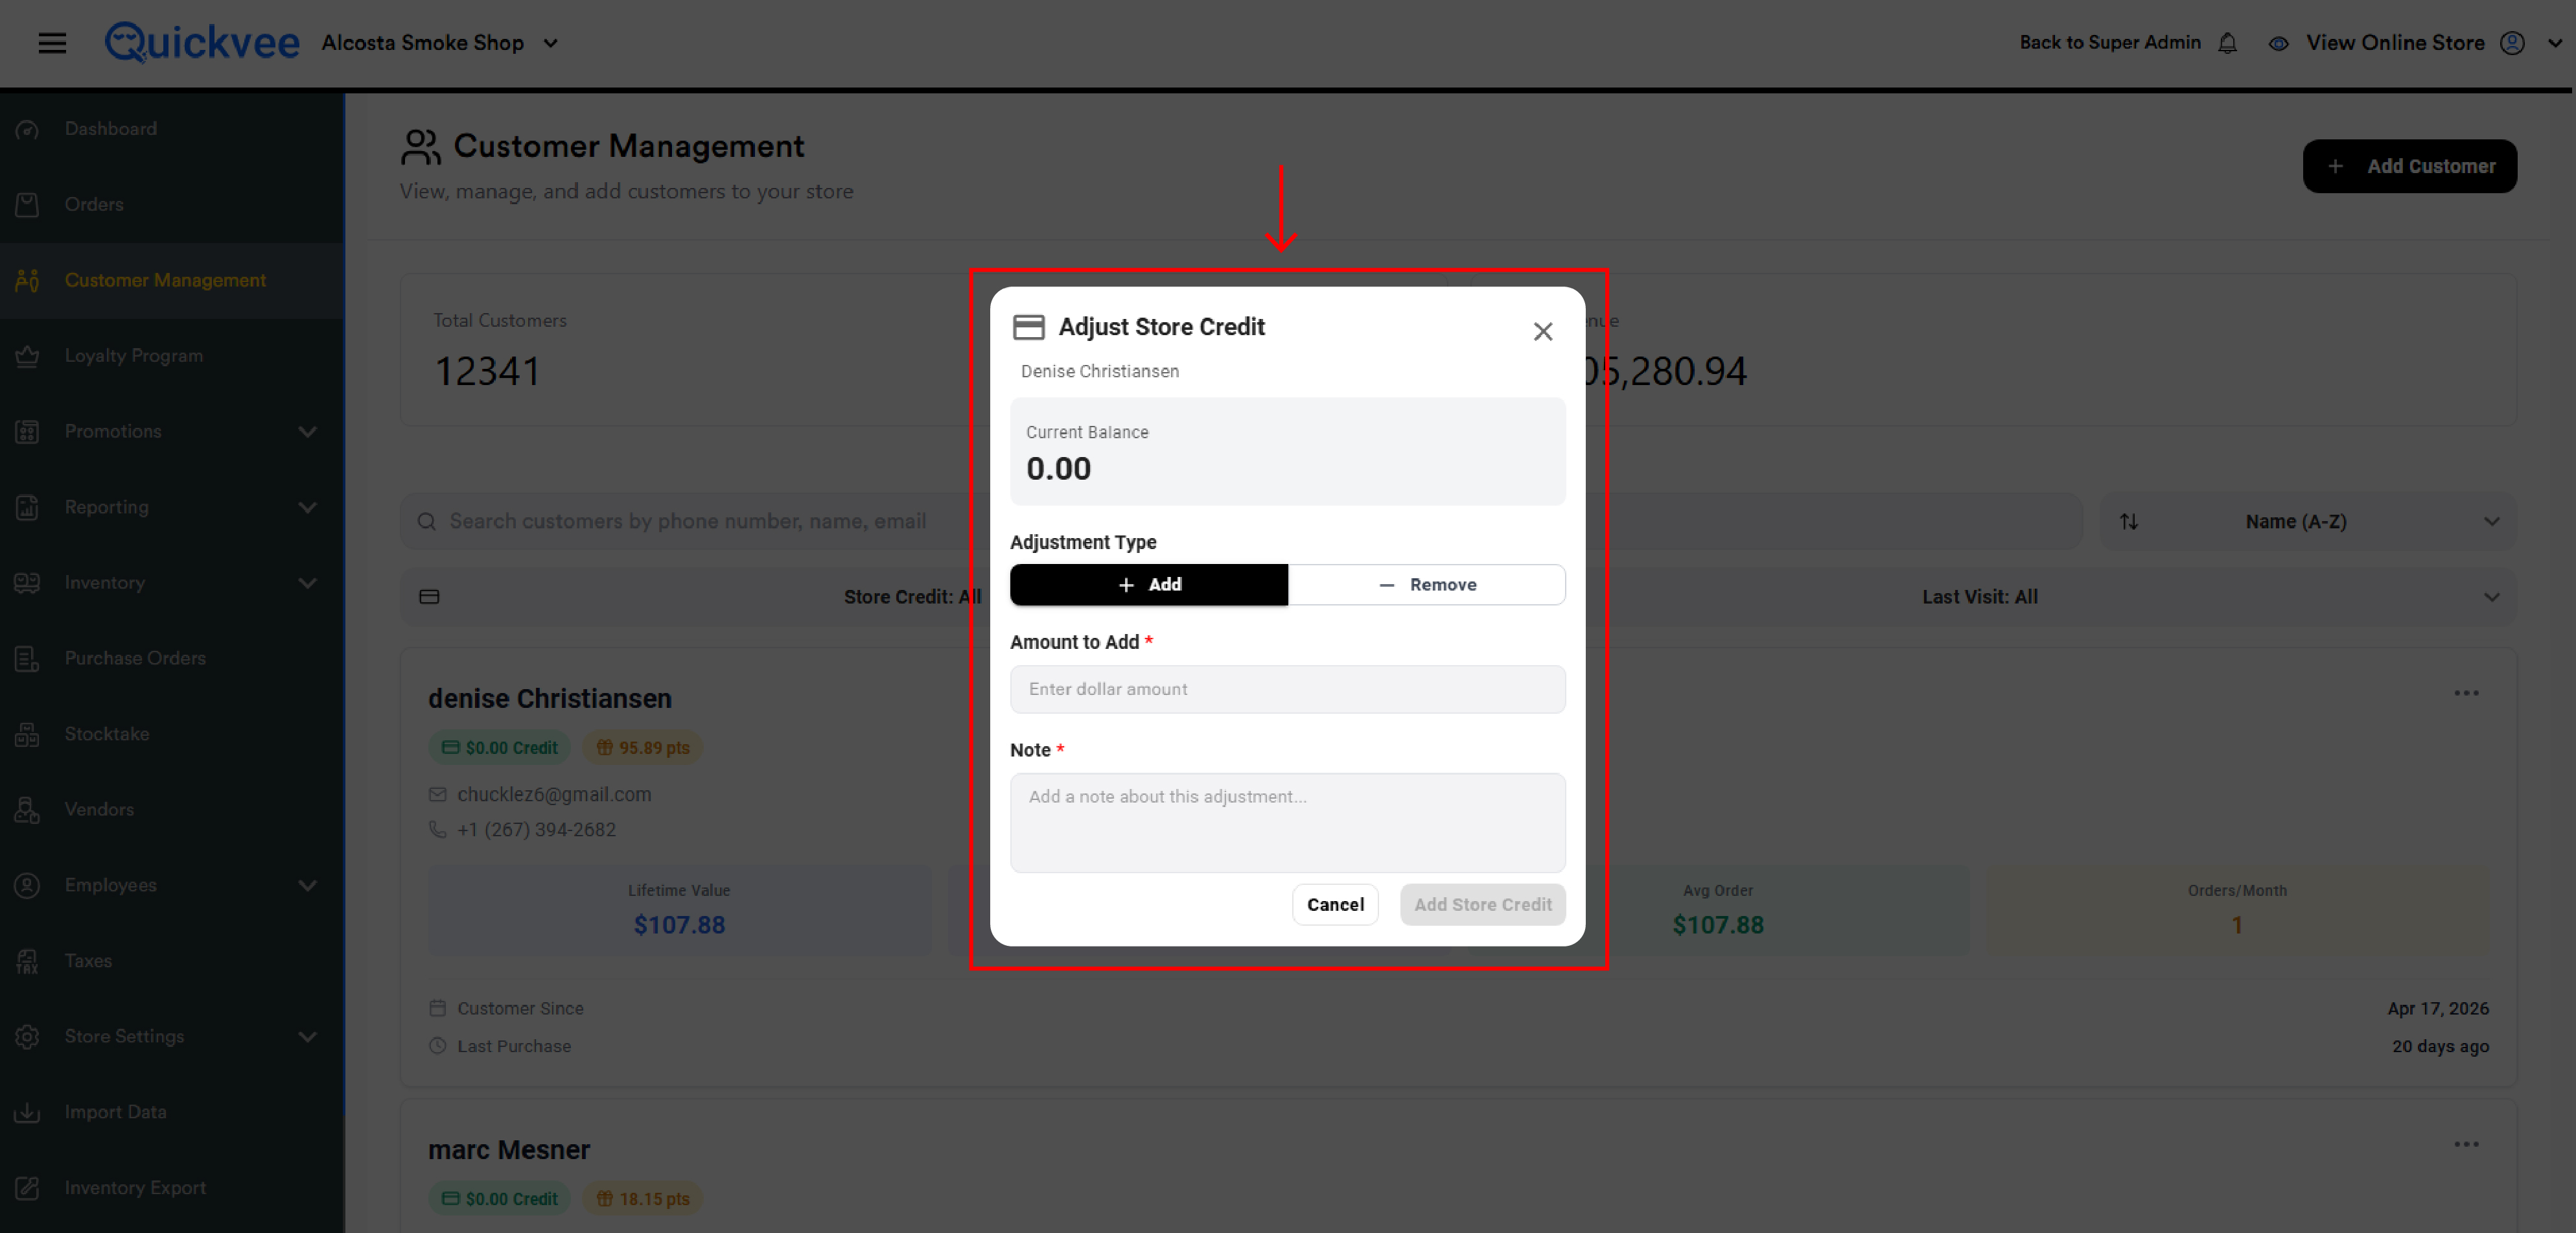
Click Add Store Credit (or Remove Store Credit) to apply.
Rules
-
Removing more than the current balance is blocked. The form shows "Cannot remove more than current balance" and disables the submit button.
-
The Note is mandatory — every adjustment is recorded against your account for audit, and the note explains why.
-
Don't double-click the submit button. Each click is a separate adjustment, so multiple clicks can deduct (or add) more than you intended.
Manual store credit adjustments respect employee permissions. If an employee doesn't have the Manual Store Credit Adjustment permission, this option is hidden from their kebab menu.
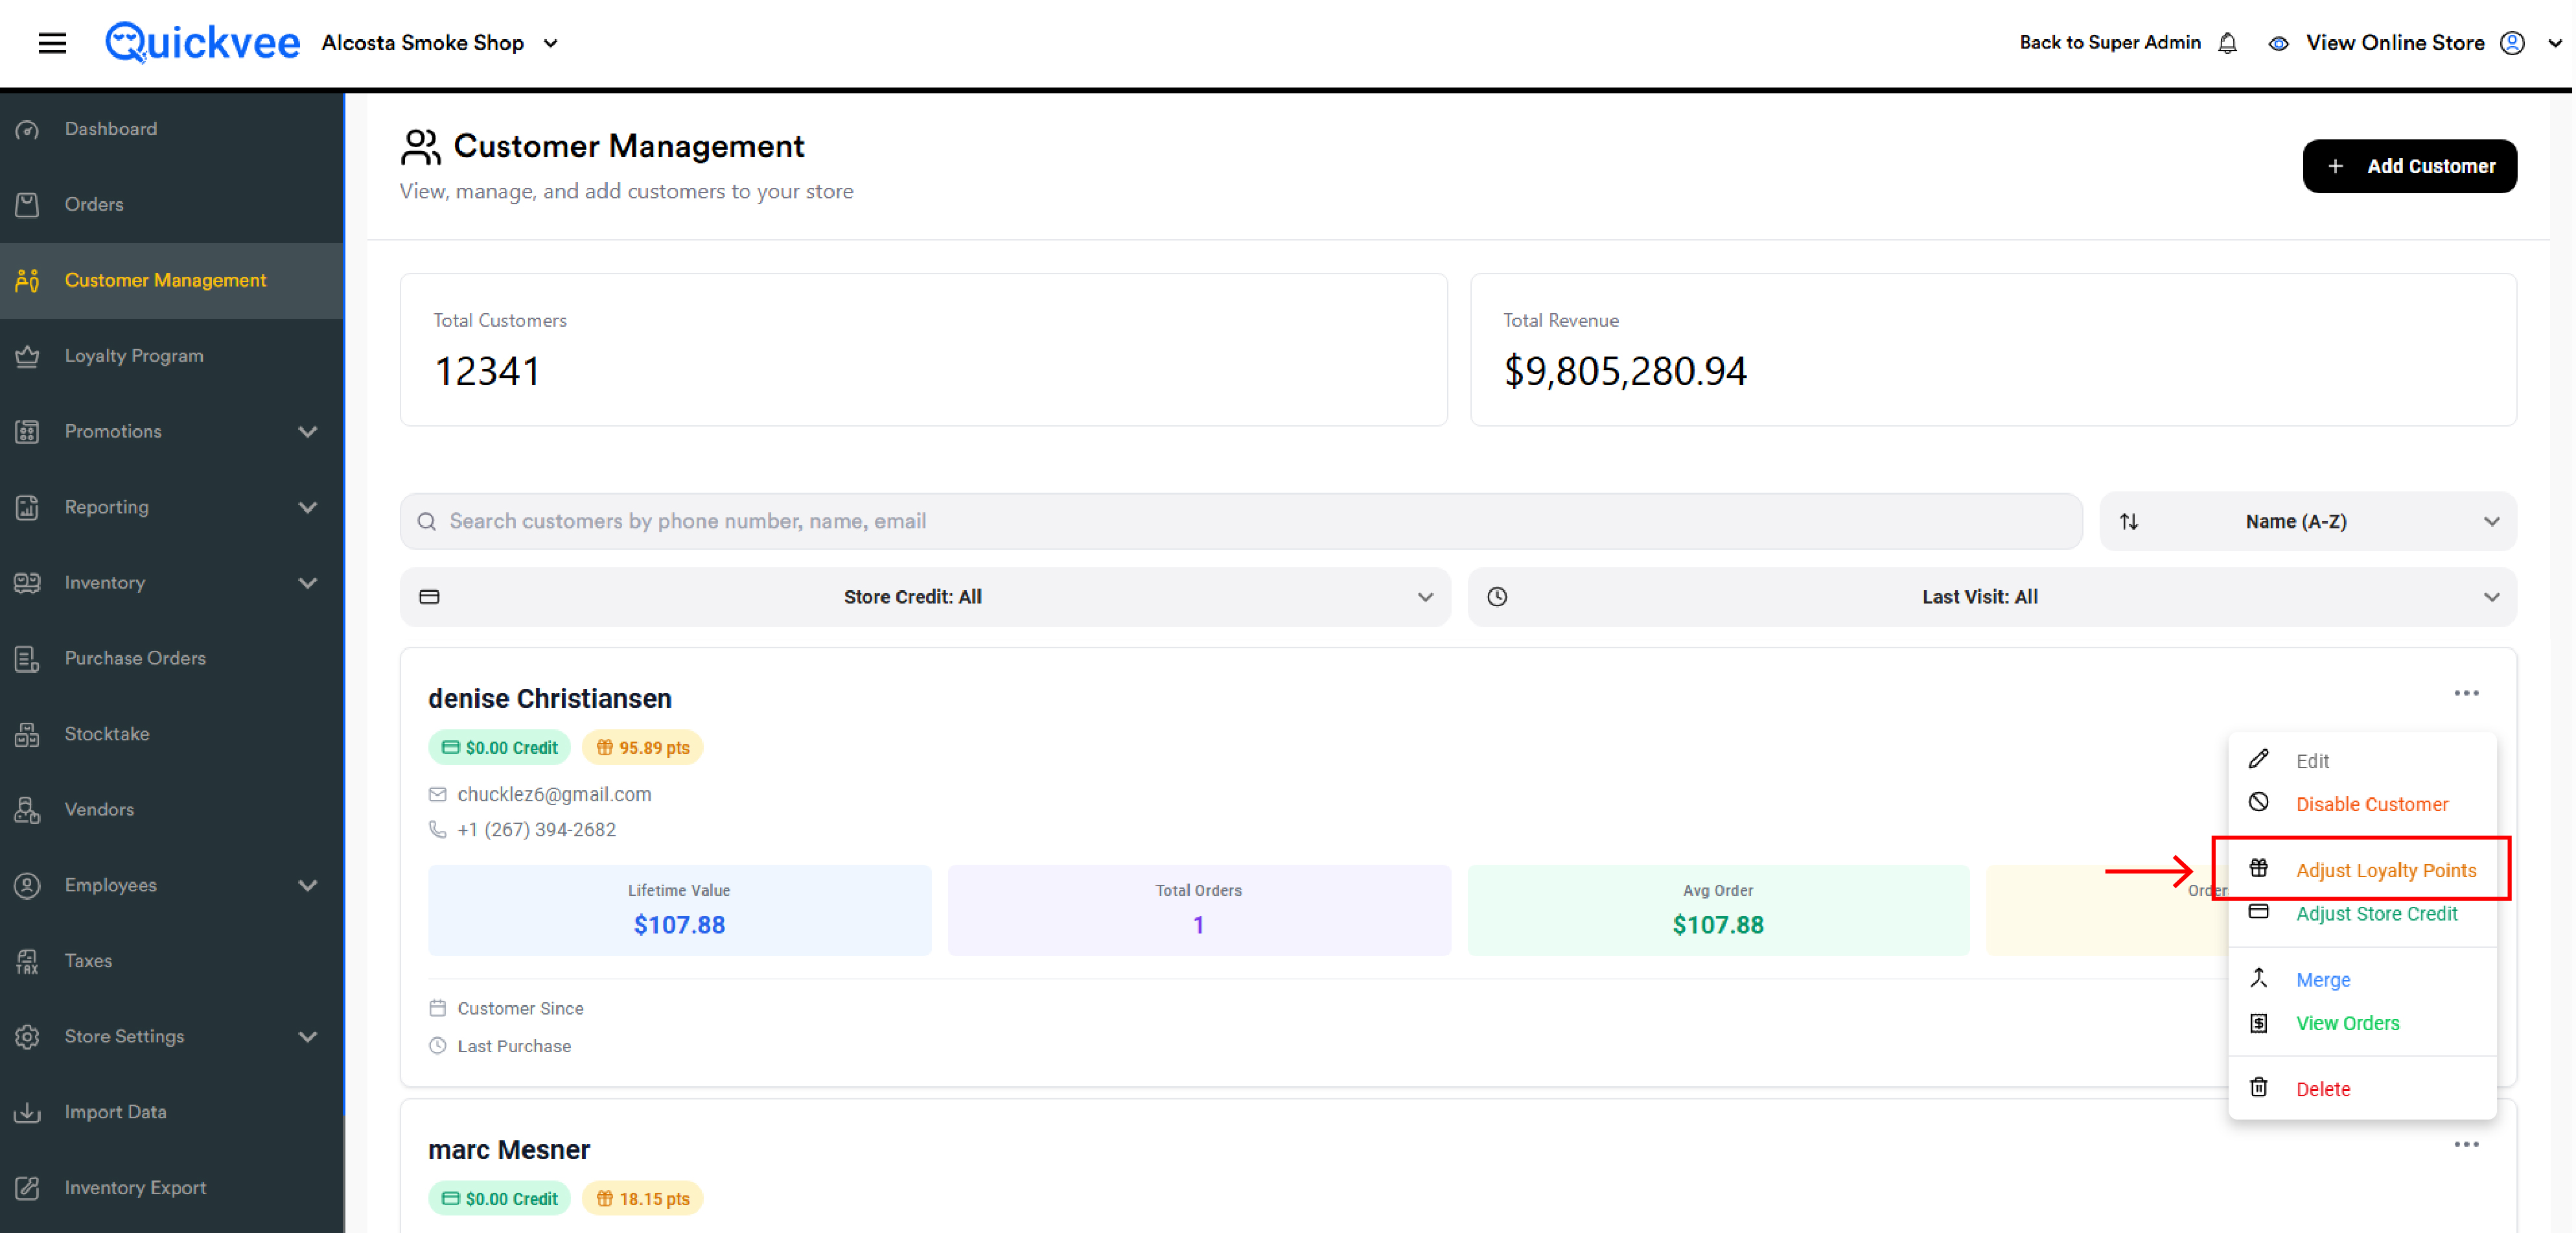
Adjusting Loyalty Points
Use the kebab menu → Adjust Loyalty Points to manually grant or remove points. The flow mirrors store credit:
-
Customer name and Current Balance at the top
-
Add / Remove toggle
-
Amount field — required, in points
-
Note field — optional for points (unlike store credit)
Click Add Loyalty Points (or Remove Loyalty Points) to apply.
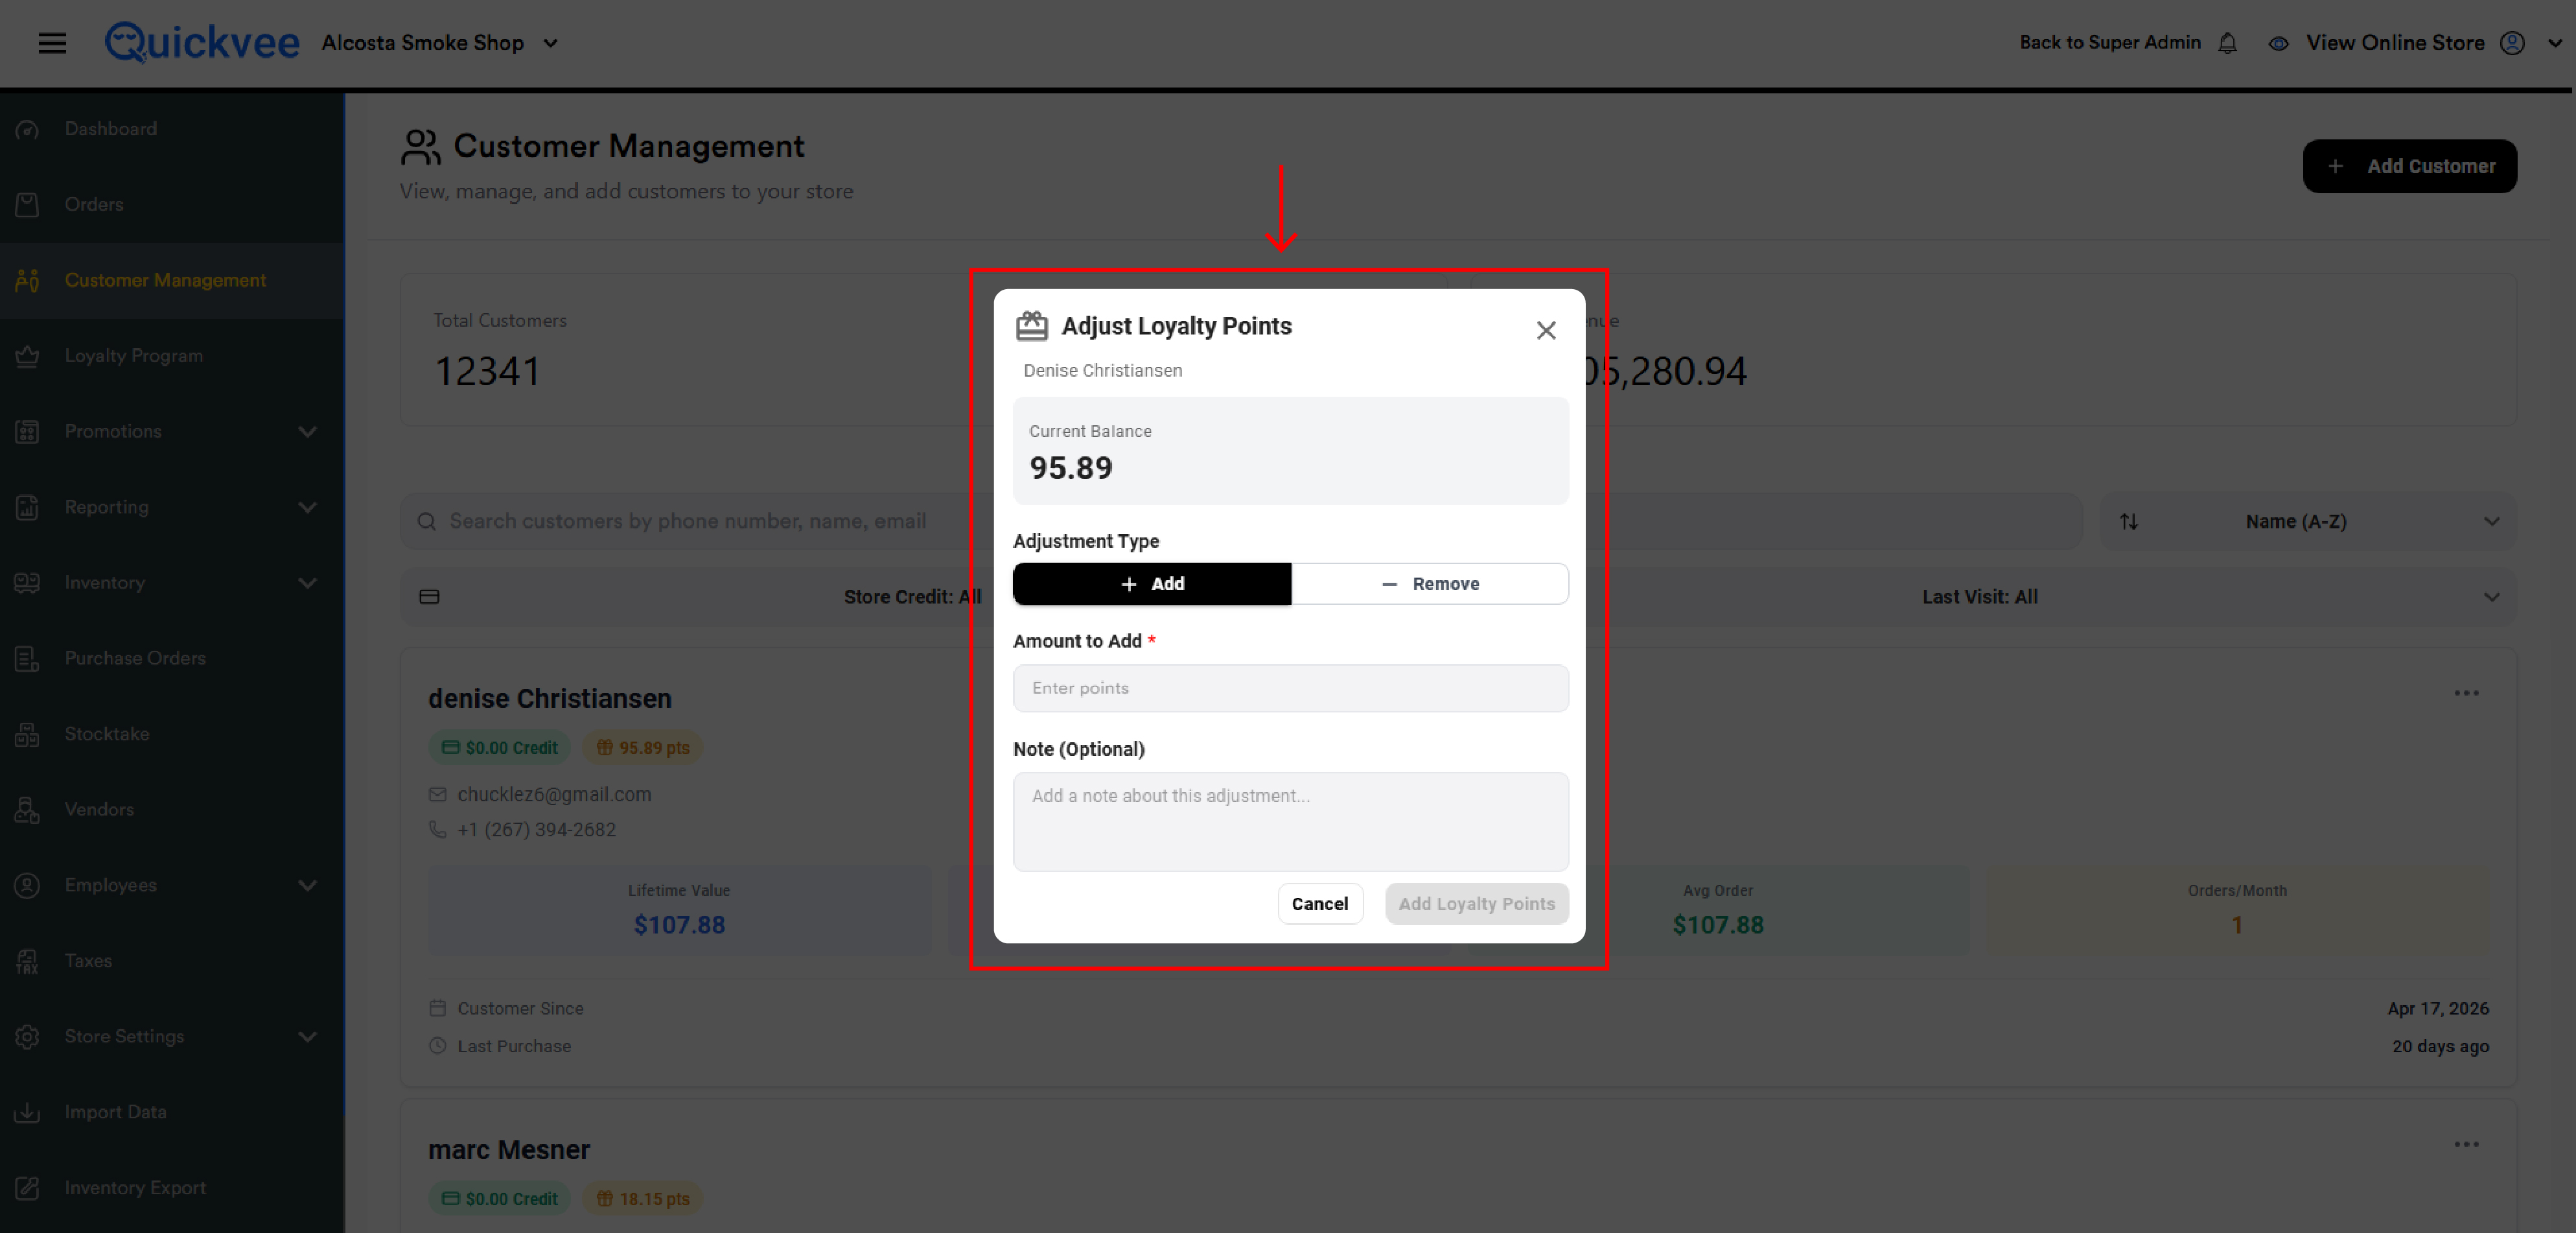
Like store credit, removing more points than the customer has is blocked, and rapid-fire clicking the submit button can cause excess adjustments — wait for confirmation before clicking again.
Merging Customer Accounts
When the same person ends up with two accounts — usually because of a typo or because they signed up online and again at the register — use Merge to consolidate them.
How merge works
-
Click the kebab menu on the account you want to keep and choose Merge.
-20260528-104833.jpg?cb=d10c29b7f00355feba554aab2d7bccd5)
-
The Merge Customer Account modal opens. The card you started from is shown as the Source Account — this is the one that will stay active.
-
In Merge Into Account (will be deleted), search by name or email and select the duplicate account you want to absorb.
-
Confirm the merge.
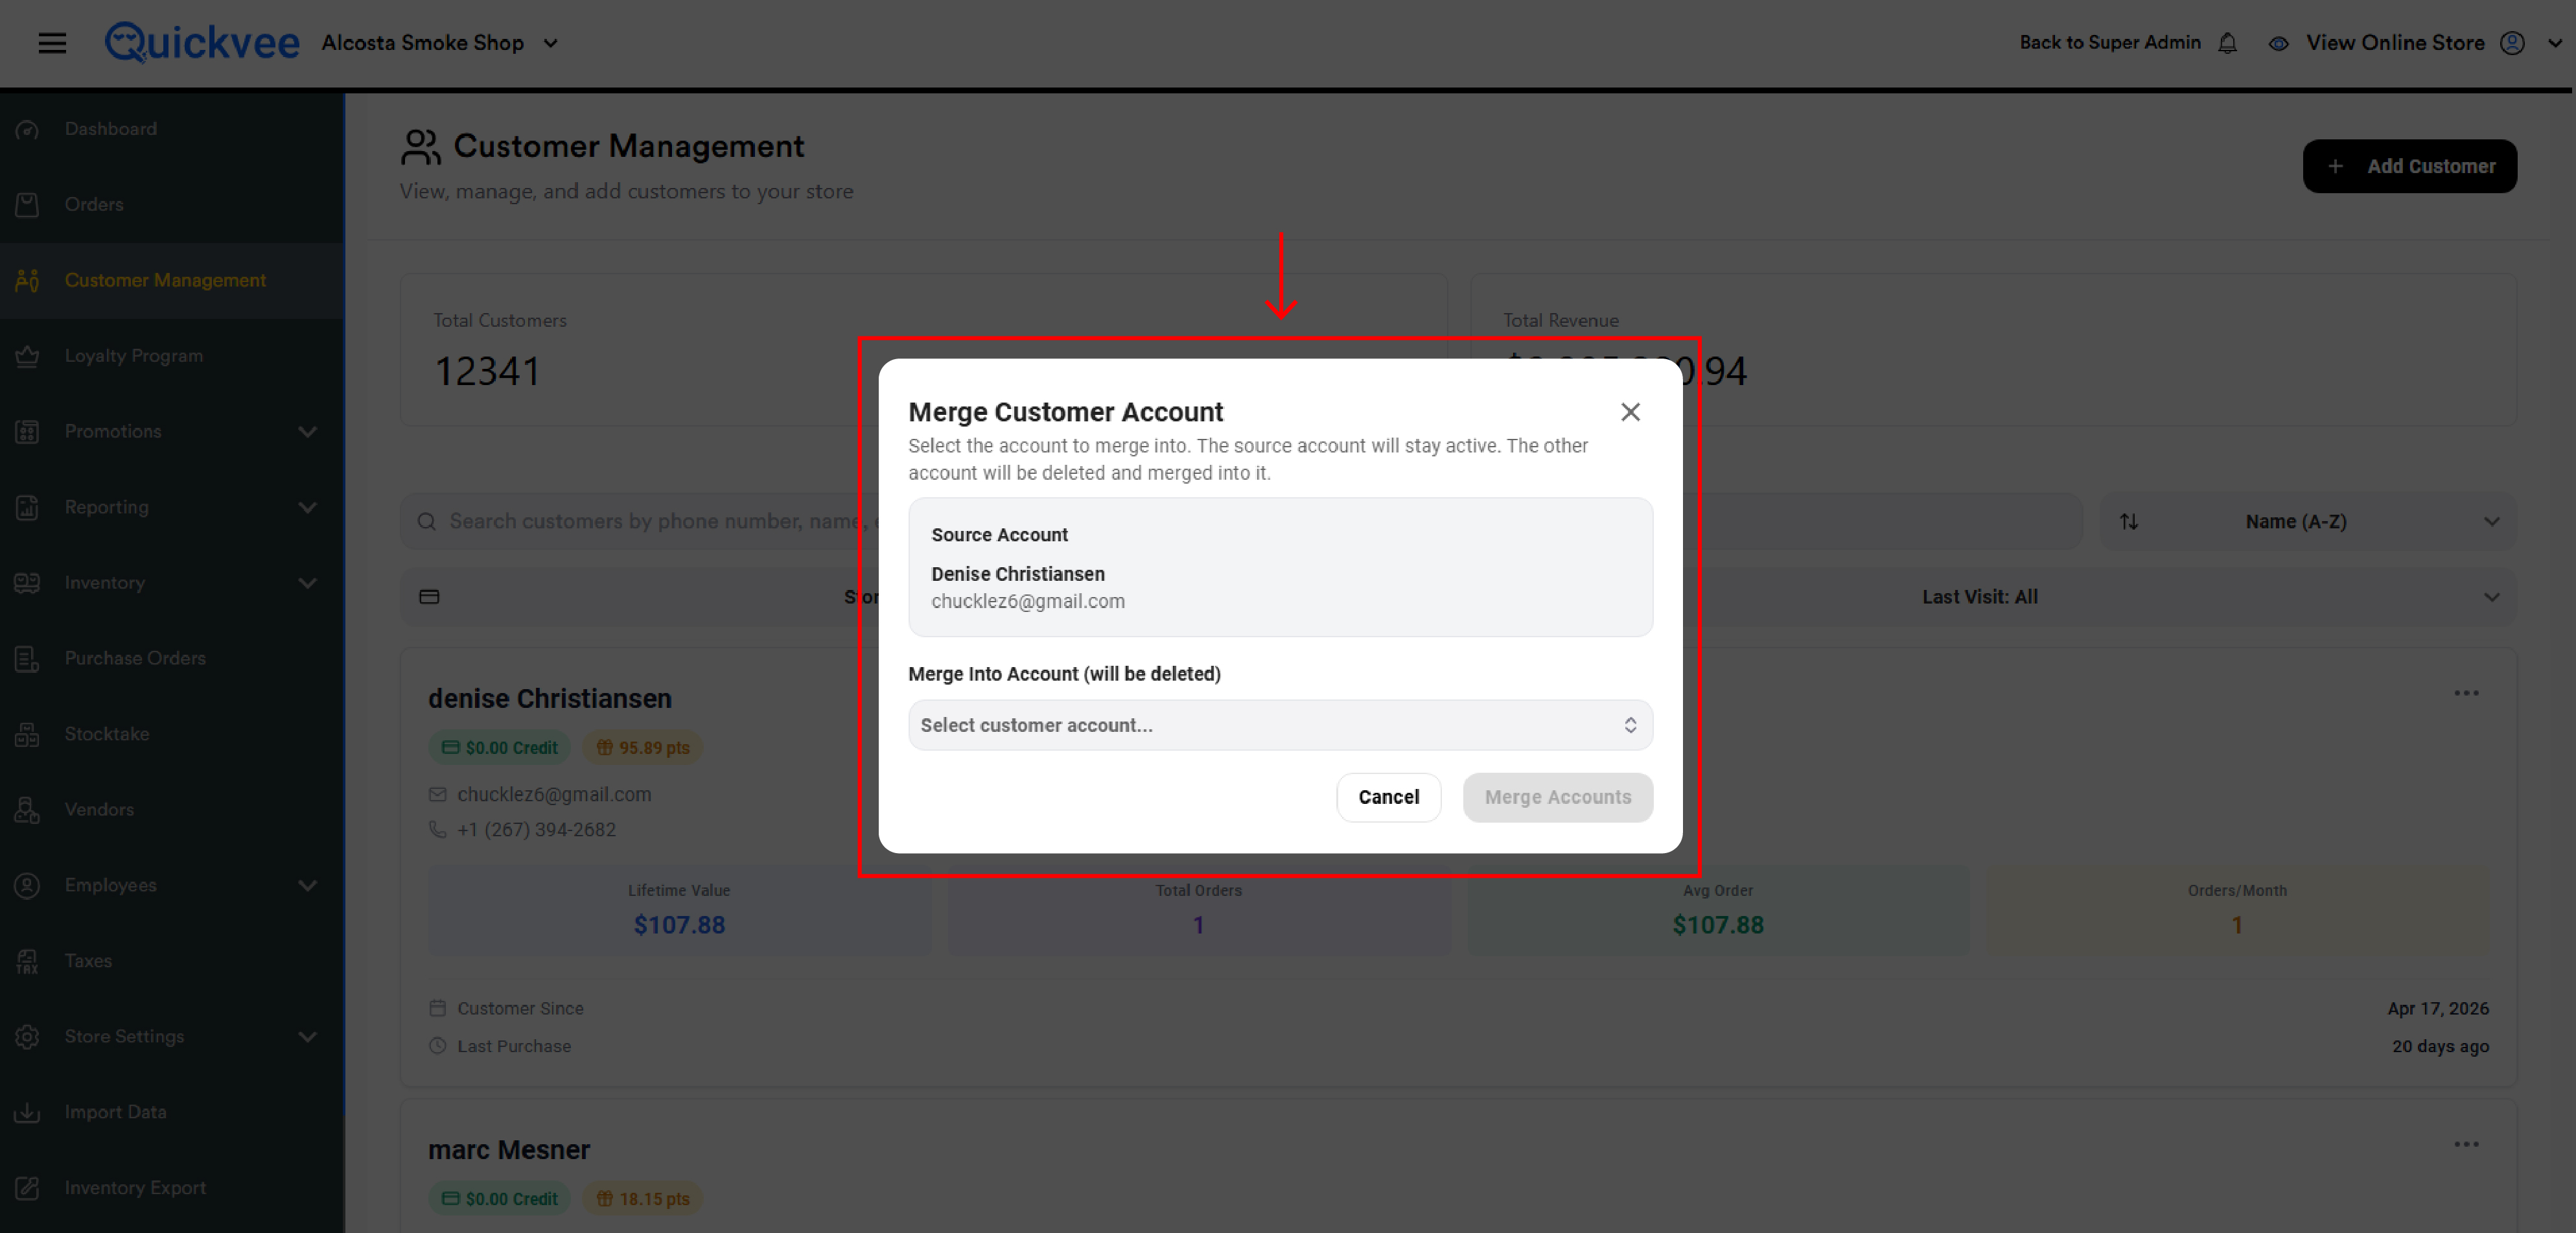
The duplicate account is deleted. Its order history, store credit, loyalty points, and lifetime metrics are all moved into the source account.
The source is the one you keep, the target is the one that's deleted. Read the labels carefully — once a merge is committed, it cannot be undone. If you pick the wrong direction, you'll lose the wrong account.
The Merge action is permission-gated. Employees without the Customer Merge permission won't see this option.
Viewing Order History
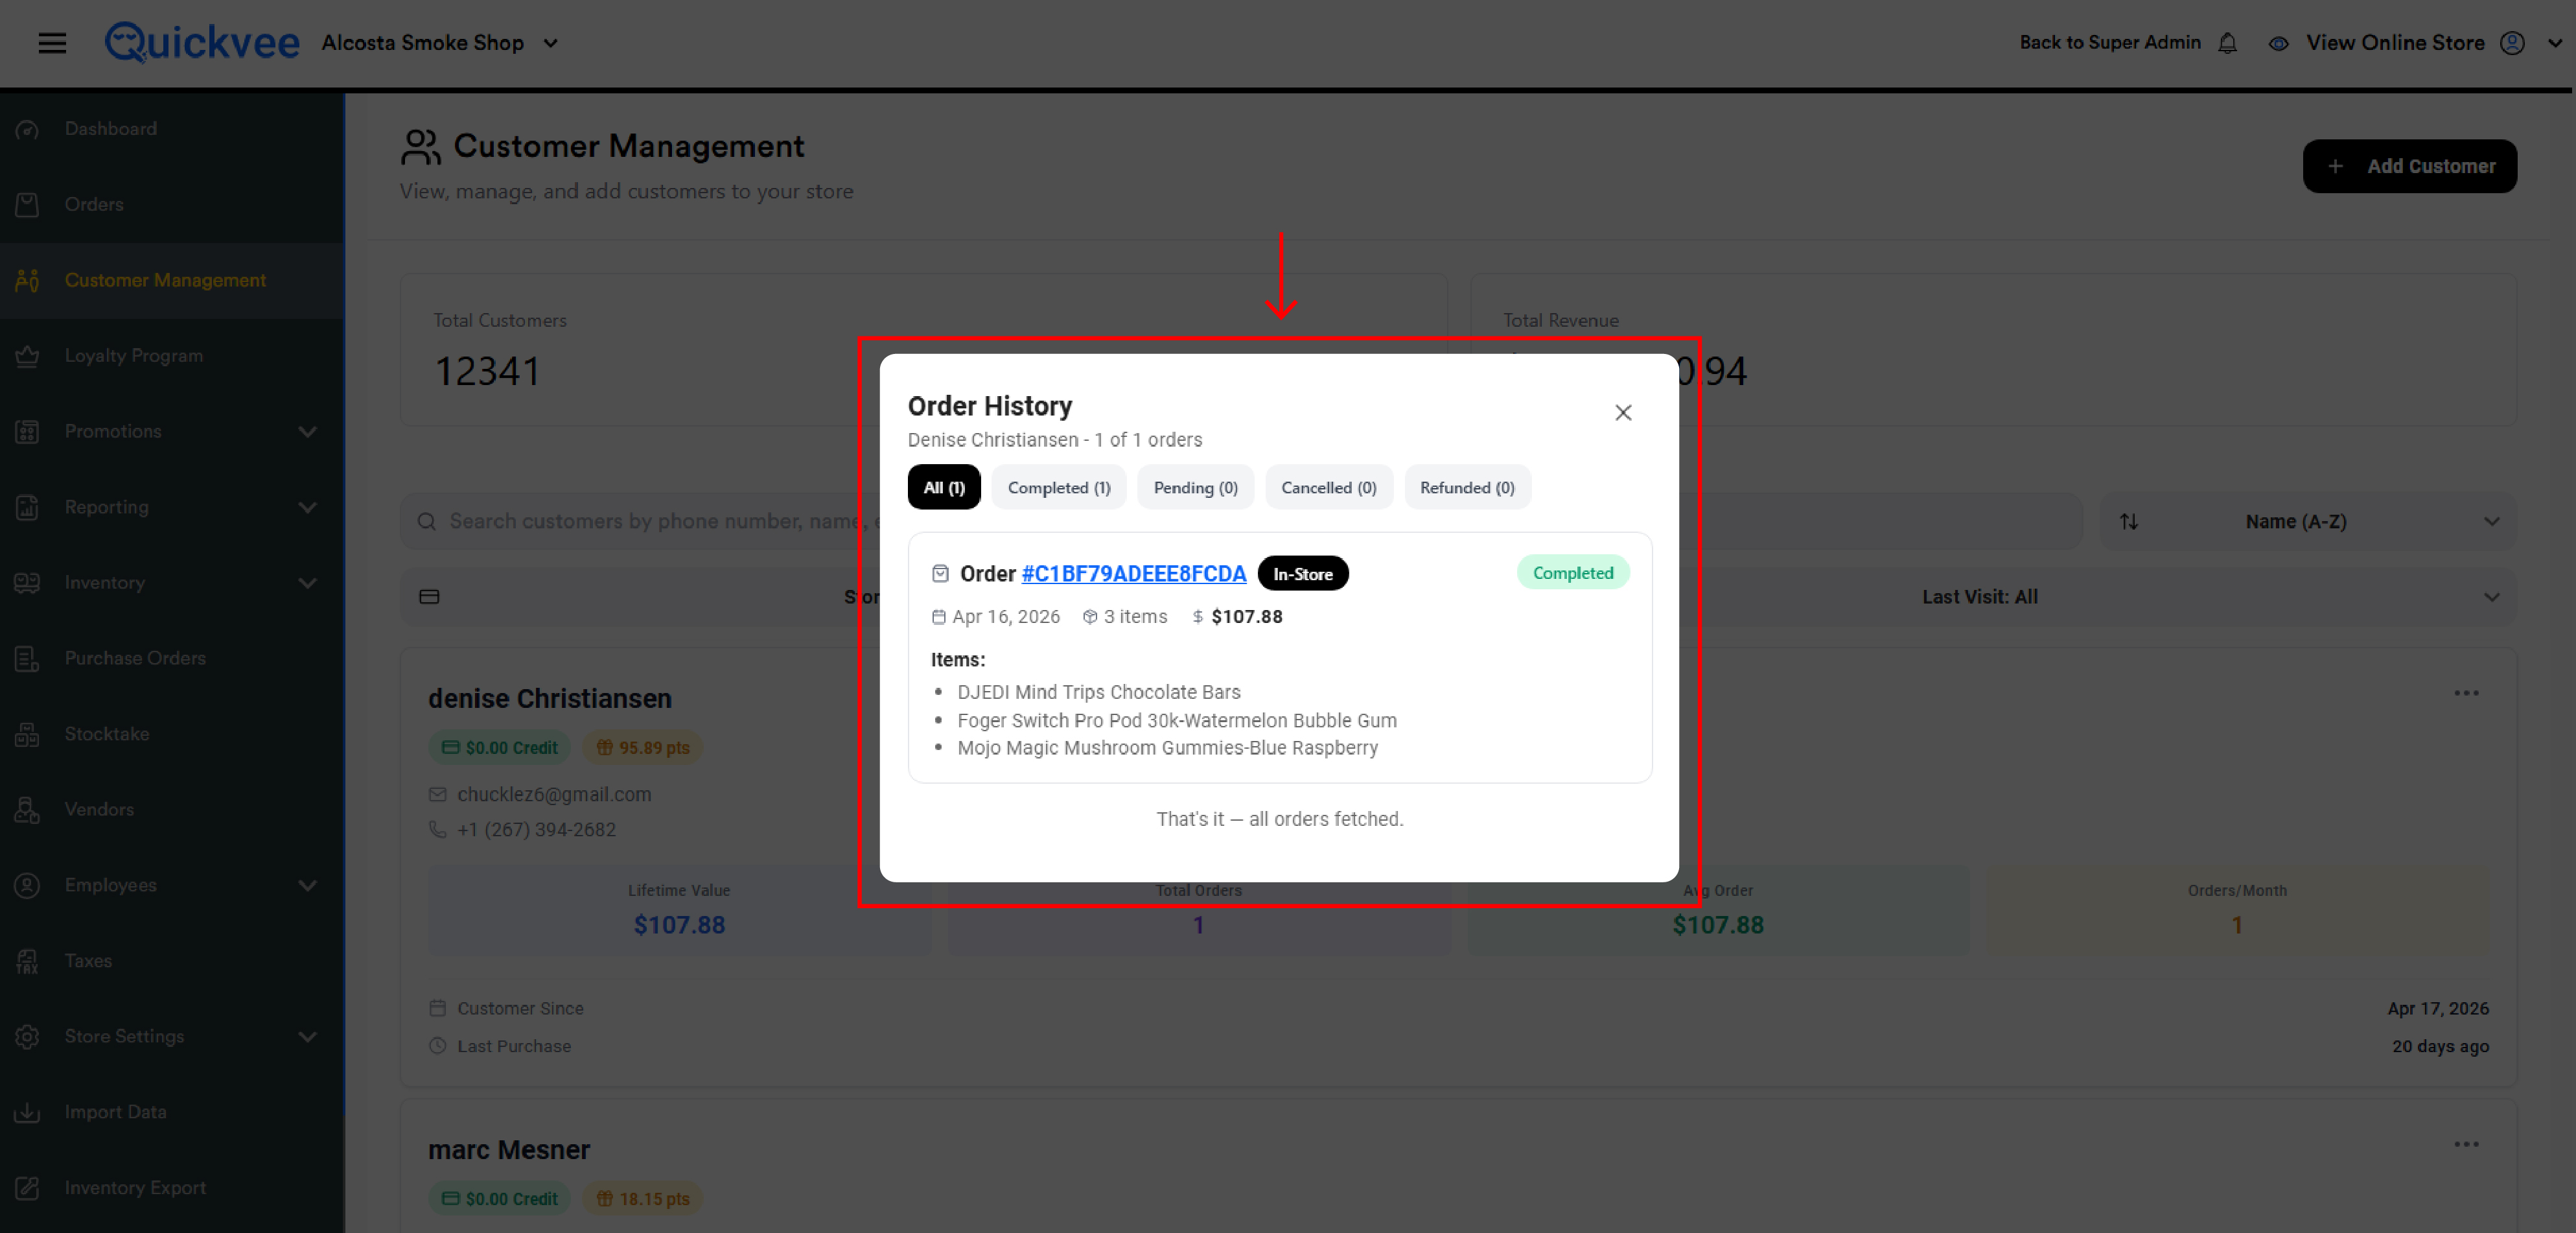
Click the kebab menu → View Orders to open the Order History modal for a customer. The header shows the customer's name and the total order count (e.g. "aalu — 10 of 10 orders").
Filter tabs
The five tabs at the top filter by status, with the count for each in parentheses:
-
All — every order regardless of status
-
Completed — successfully fulfilled orders
-
Pending — orders that are placed but not yet completed
-
Cancelled — orders that were cancelled before completion
-
Refunded — orders that have been refunded (full or partial)
Each order row shows
-
Order # — the order ID, clickable to open the order detail page
-
Channel badge —
In-Store(POS) orOnline(web ordering) -
Status badge — coloured by status (green Completed, yellow Pending, red Refunded, etc.)
-
Date of the order
-
Item count and Total
-
An Items preview listing the products in the order, with a "more N items" link if there are too many to show
If a tab has no orders, the modal shows "No orders found."
Disabling a Customer
Disabling is a soft-block — the customer record stays, but the account is marked inactive. Use this for customers who shouldn't earn or redeem rewards, who have unresolved issues, or who you want to retire without losing their history.
Click the kebab menu → Disable Customer.
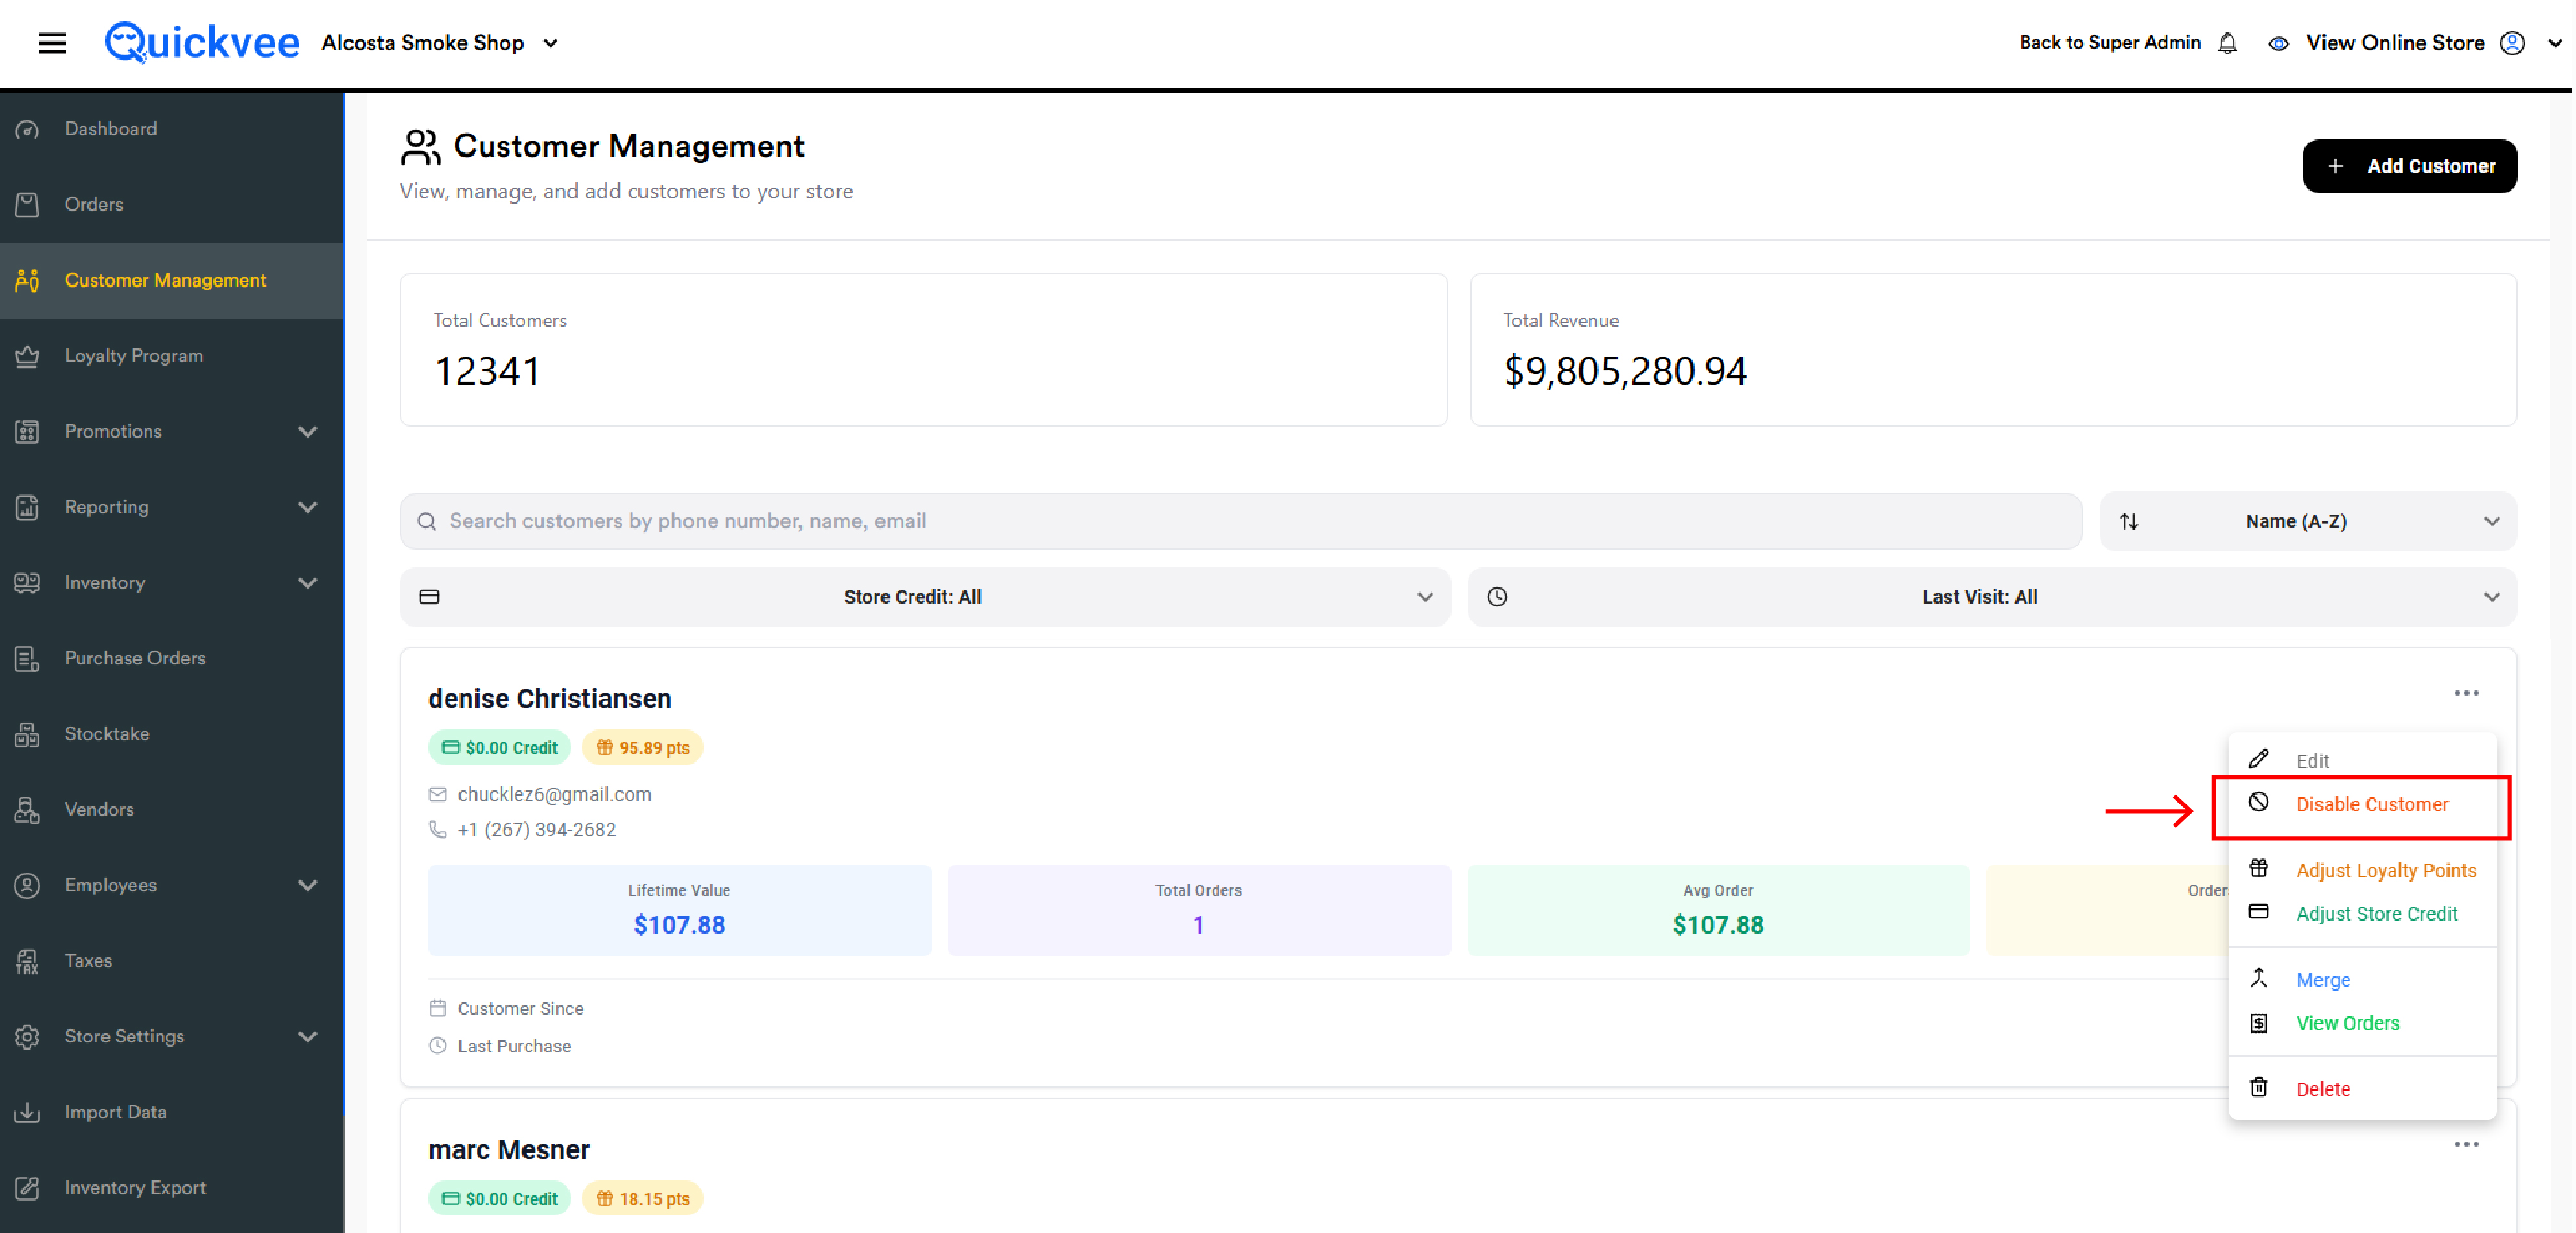
Disabled customers remain visible in your list and remain attached to their past orders. Their loyalty earning is paused while they're disabled. Re-enable them at any time from the same menu.
Deleting a Customer
Click the kebab menu → Delete to permanently remove a customer from your store.
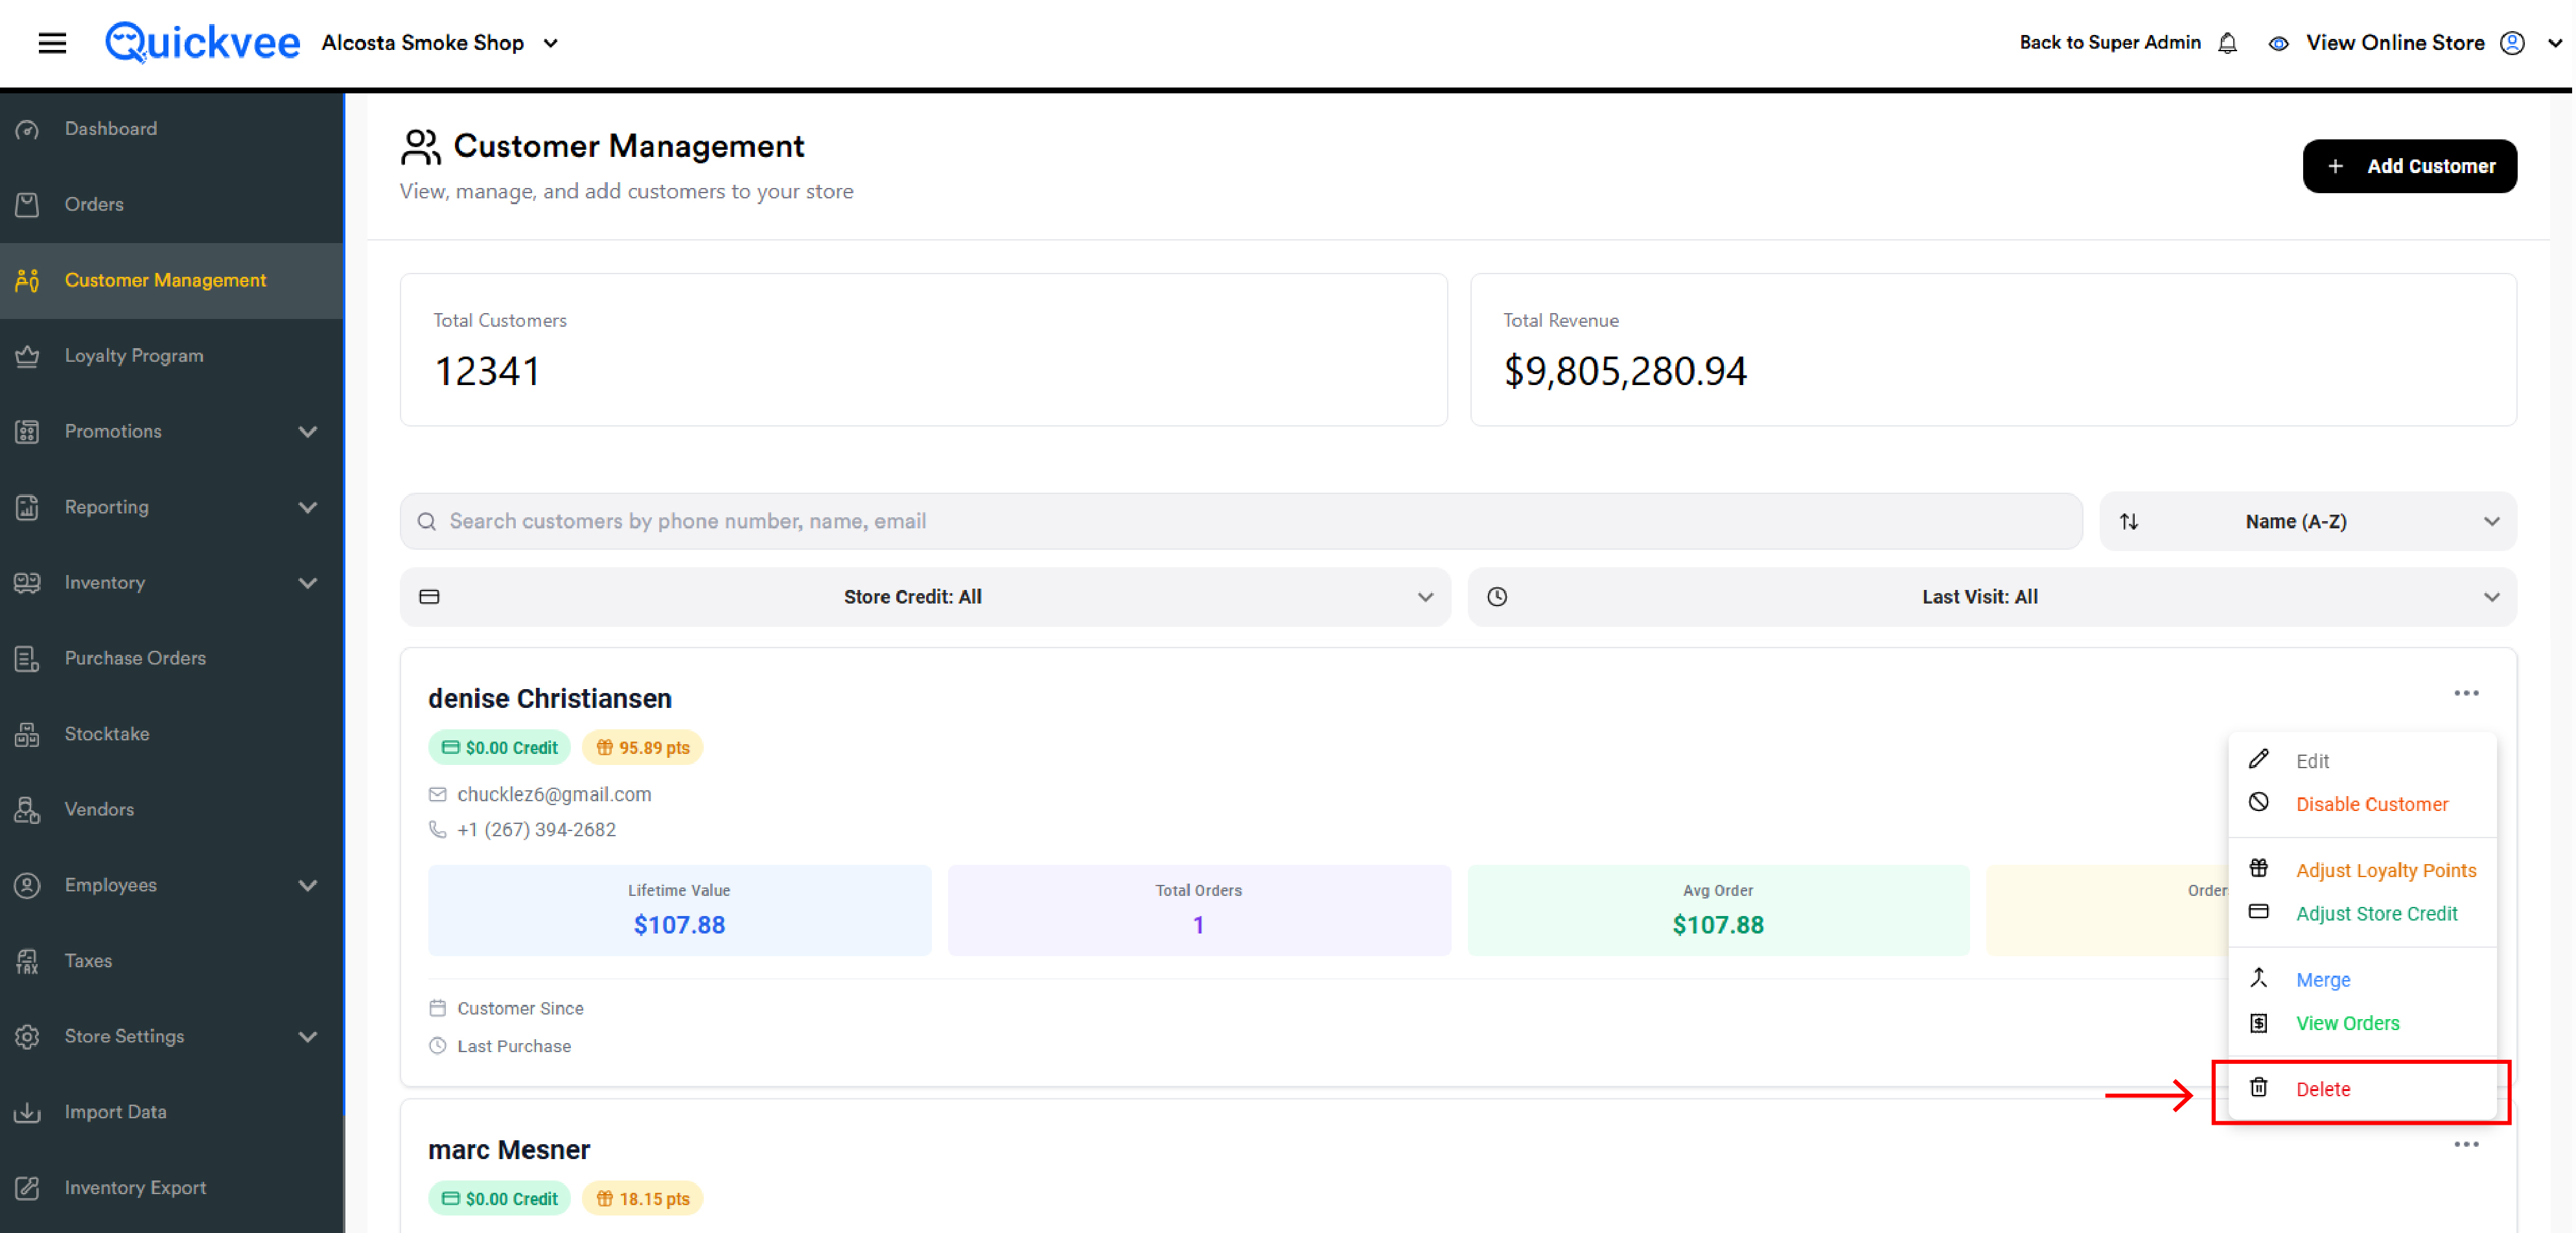
Deletion is permanent. Order history attached to the customer remains in your reports, but the customer record itself — name, contact info, store credit balance, loyalty balance — is gone. Use Disable instead if you might want the account back later, and use Merge if it's a duplicate.
Permissions
Every kebab menu action is permission-gated. Configure these in Employees → Permissions:
-
Edit Customer, Disable Customer, Delete Customer — basic record management
-
Adjust Store Credit and Adjust Loyalty Points — manual balance adjustments. These directly affect what customers can spend or earn, so limit them to managers.
-
Customer Merge — irreversible and high-impact. Restrict tightly.
-
View Orders — read-only access to a customer's history
When a permission is disabled, the corresponding option is hidden from the employee's kebab menu — they cannot reach the action through any other path.
Common Questions
A customer placed an order but their Lifetime Value didn't update. Lifetime Value updates when an order is completed, not when it's placed. Pending orders do not contribute. Once the order is marked complete, the LTV, Total Orders, Avg Order, and Orders/Month all refresh.
A customer's store credit went negative after a refund. This happens when a refund is issued to store credit on an order placed before the customer existed (or before merge), or when a refund exceeds the credit on file. The negative balance is real — it represents an amount the customer is owed against future purchases. Use Adjust Store Credit → Add to settle it if you'd rather pay them out separately.
Search isn't finding a customer I know exists. Search matches against name, email, and phone number. Try a partial phone number (last 4 digits often work), or search by email domain. If nothing comes up, the customer may have been deleted or attached to a duplicate account that was merged away.
I picked the wrong direction in a merge — can I split them back? No. Merge is permanent. The deleted account is gone and its data has already been folded into the source. The only recovery is to add the deleted person as a new customer and rebuild from there.
Why does a customer show stats but their Order History is empty? This is rare and usually indicates the customer's orders have been moved to another account through a merge, or there's a temporary sync delay. Refresh the page; if the issue persists, check whether the customer was a merge target.
Can I import customers in bulk? Not from this screen — bulk customer import is handled through the Import Data module in the side menu.
My total customer count looks wrong after I sorted the list. The Total Customers number at the top of the page should always reflect every customer in the store, regardless of sort or filter. If you're seeing a different number after sorting, refresh the page to recalculate.