
Customer Groups is how multi-store merchants tie their locations together for shared customer profiles, loyalty points, store credit, gift cards, and loyalty settings. A single group can pull two, three, or all of your stores into one unified loyalty universe — points earned at one location are redeemable at any other in the group, store credit issued at one store is usable at another, and you manage a single loyalty configuration that applies everywhere in the group.
This article covers the Customer Group setup itself, the new Loyalty Program configuration that sits on top of it, the Bonus Points Programs you can layer in, and how customers are assigned to groups.
Where to find it
There are two sides to this feature, both in the merchant backend sidebar:
|
Module |
What it does |
|---|---|
|
Customer Management → Customer Groups |
Create the groups themselves. Pick which stores belong to each group. |
|
Loyalty Program |
Configure the loyalty earn rate, redemption value, minimum balance, and Bonus Points Programs per group. |
The legacy single-store loyalty configuration remains in Loyalty Program (old) for backward compatibility, but new configuration should go through the new Loyalty Program module.
What gets shared inside a Customer Group
When you create a group with two or more stores, six things are automatically synchronized across every store in the group:
|
What's shared |
What it means |
|---|---|
|
Customer profiles |
A single customer profile across every grouped store. Updating a customer's email at Store A updates it at Store B. |
|
Loyalty points |
A customer's points balance is unified across the group. Earn 50 points at Store A, redeem all 50 at Store B. |
|
Store credit |
Store credit issued at any group store is spendable at any other group store. |
|
Gift cards |
A gift card sold at Store A can be redeemed at Store B. |
|
Loyalty settings |
One loyalty configuration applies to every store in the group — same earn rate, redemption value, minimum balance, and Bonus Points Programs. |
|
Orders |
Visible only in the originating store. A purchase at Store A doesn't appear in Store B's Orders list — only in Store A's. |
Orders are deliberately not shared across grouped stores, even when everything else is. Each store sees only its own transactions, which keeps store-level reporting, inventory deduction, and accounting clean. The customer is shared; the order history is per-store.
The Customer Groups list
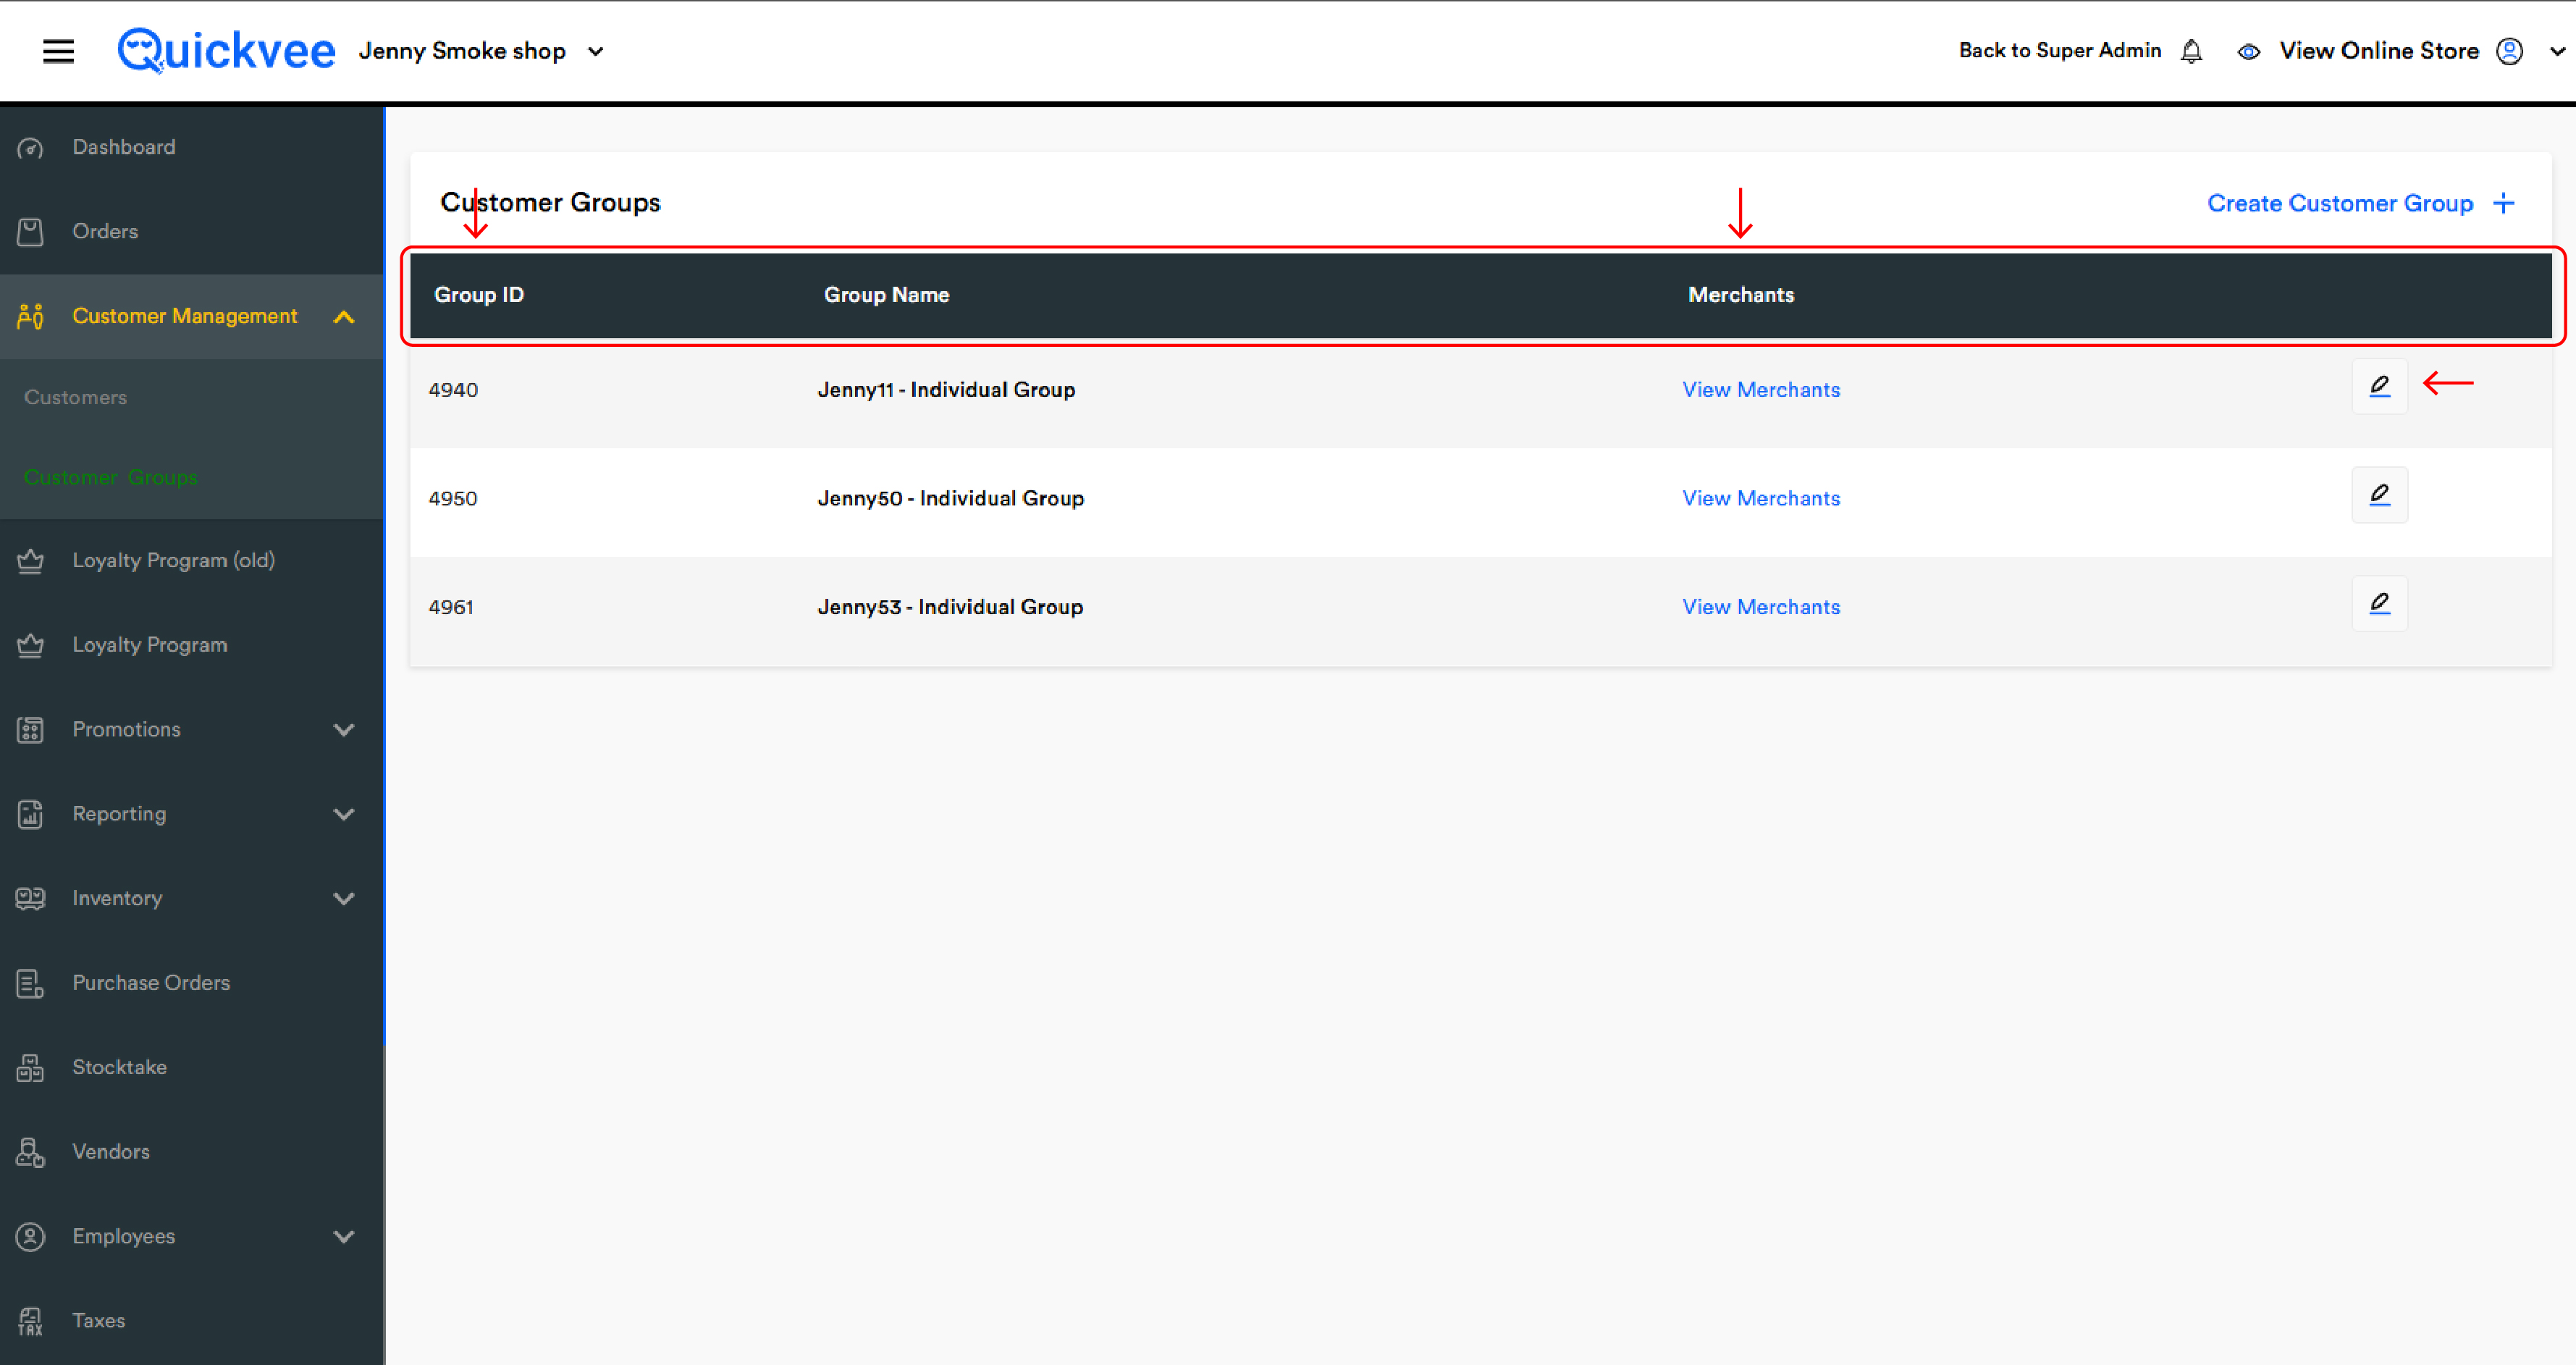
From the sidebar, go to Customer Management → Customer Groups. The page shows a table of every group you've created:
|
Column |
What it shows |
|---|---|
|
Group ID |
The internal numeric ID of the group (e.g. 6713, 6716, 6717). |
|
Group Name |
The display name you gave the group (e.g. All Merge Group, Chaitanya Shop 2 - Individual Group 3). |
|
Merchants |
A View Merchants link that opens a pop-up listing every store currently in the group. |
|
(edit pencil) |
Opens the Update Customer Group screen. |
The Create Customer Group + button at the top-right starts a new group.
Tip: Every new merchant starts with one auto-created group per store — an Individual Group with just that store inside. If you only operate one store, the default Individual Group is all you'll ever need. If you operate more than one, that's when you create your own merged group to share data between locations.
Creating a Customer Group
Click Create Customer Group +. The form opens with an Important notice at the top — read it carefully, because creating a group changes how data flows between the stores you put inside it:
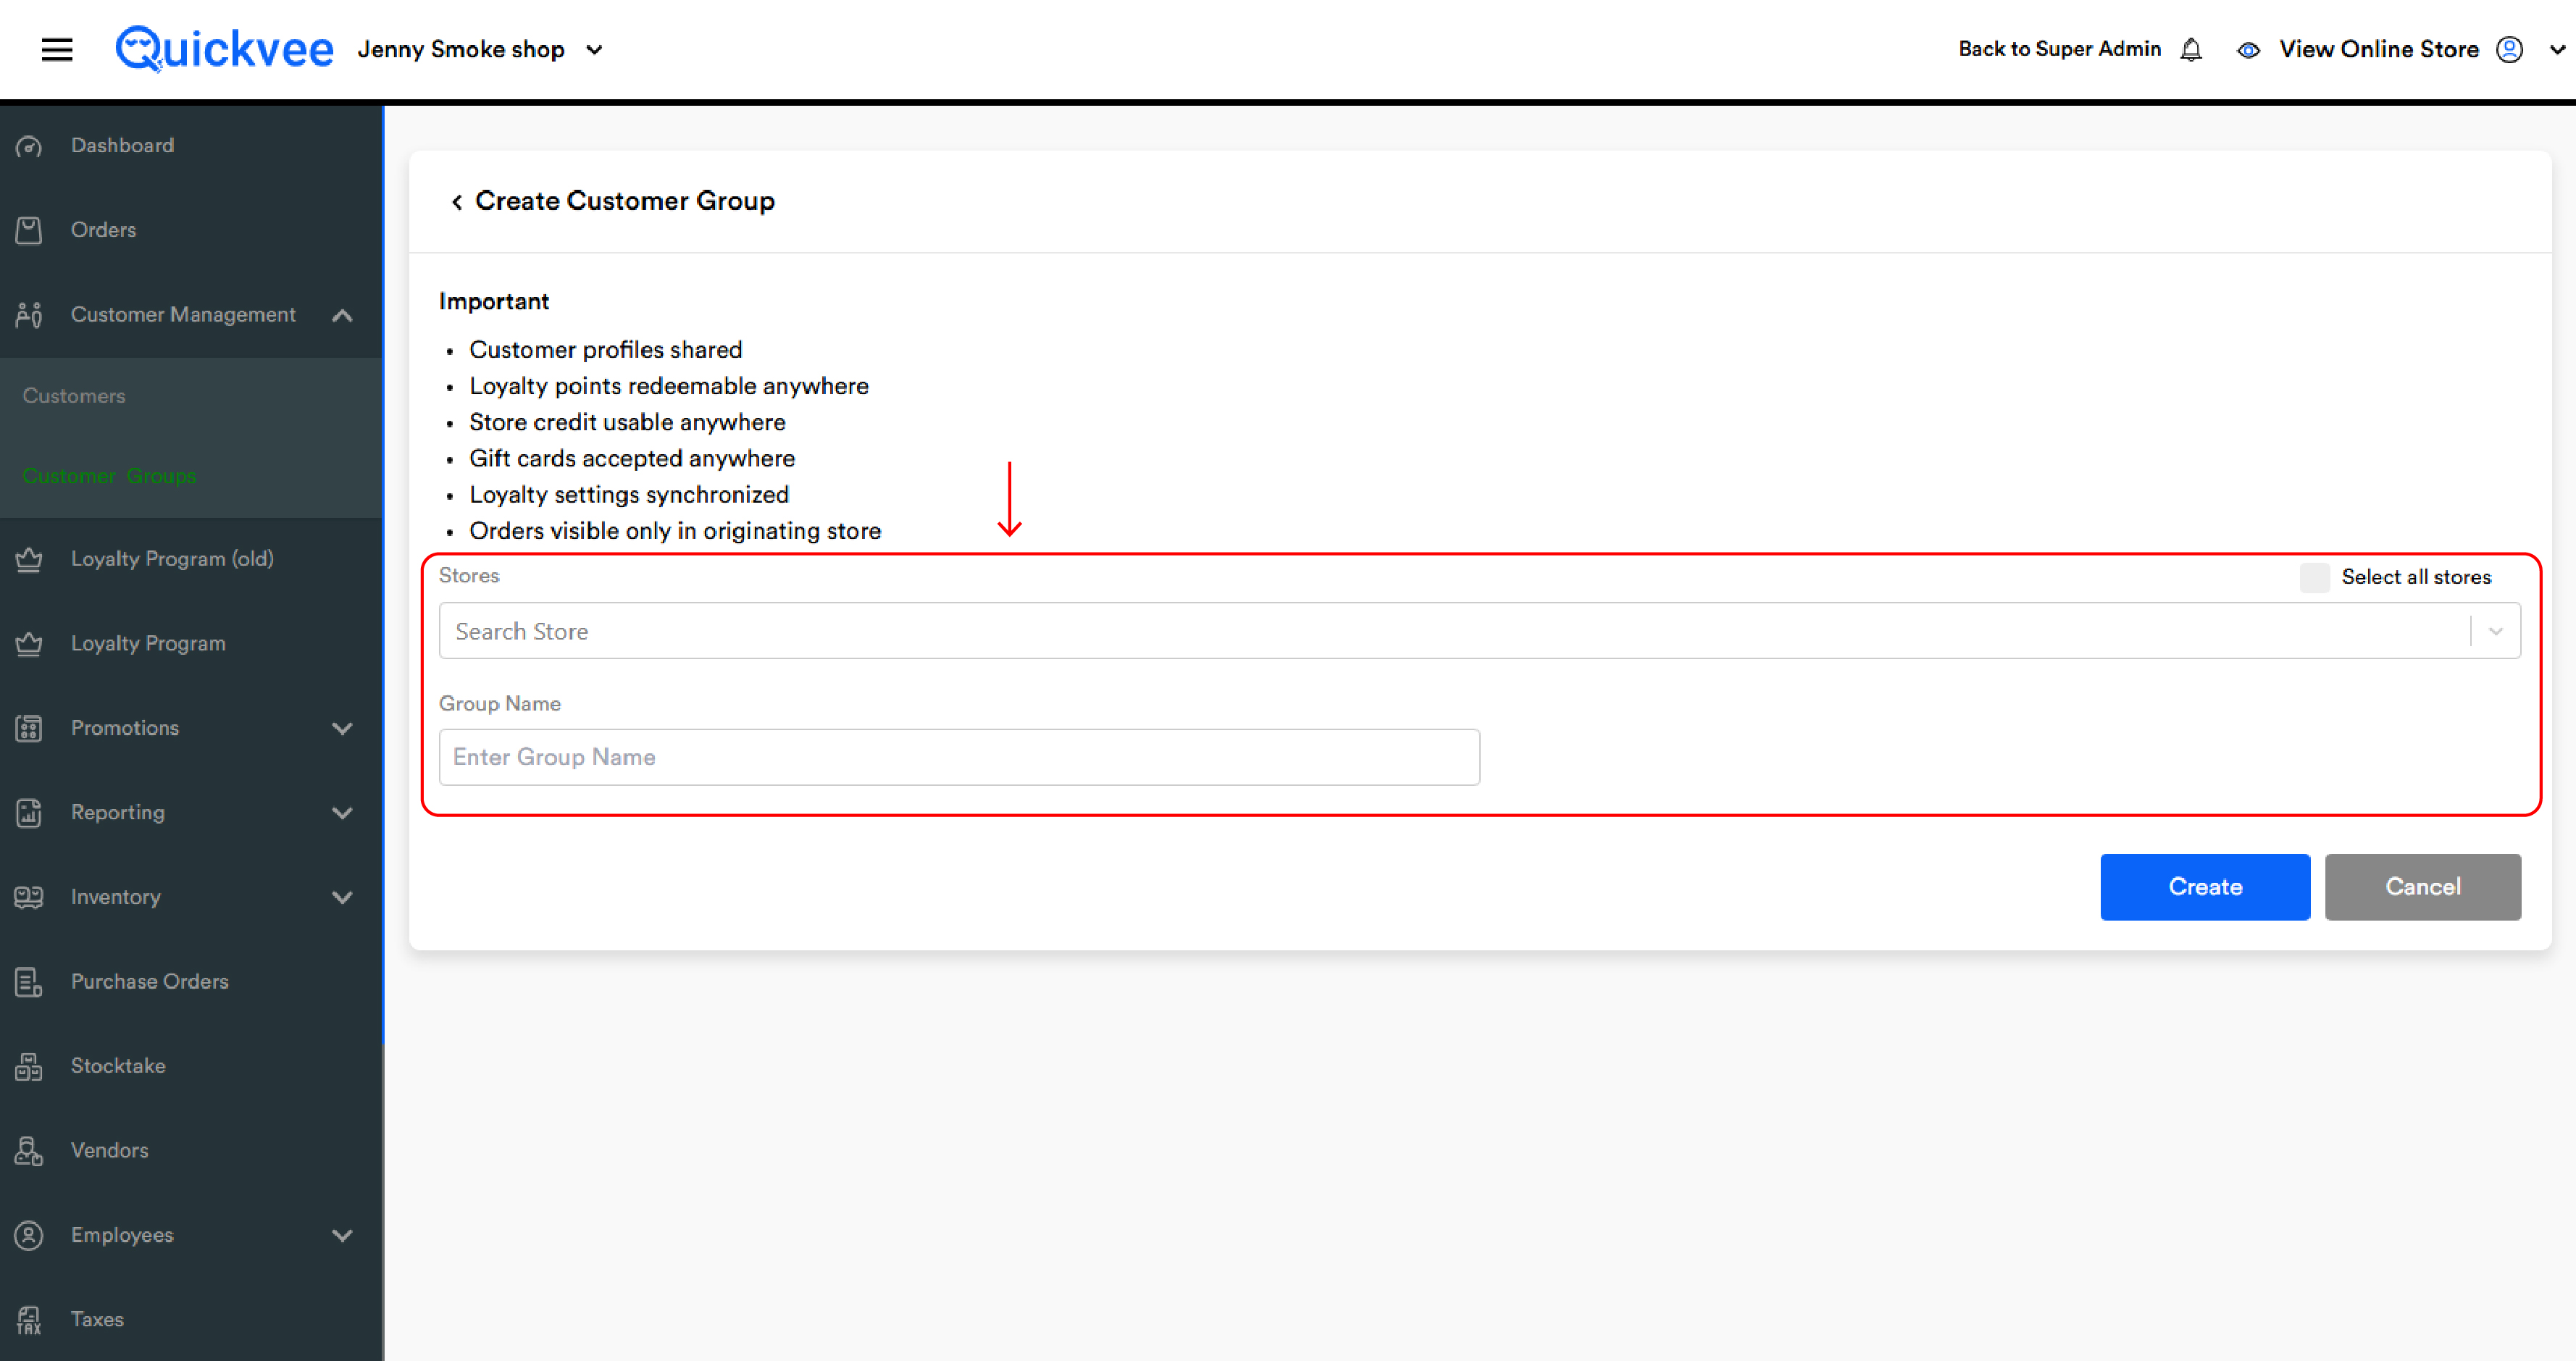
Important
-
Customer profiles shared
-
Loyalty points redeemable anywhere
-
Store credit usable anywhere
-
Gift cards accepted anywhere
-
Loyalty settings synchronized
-
Orders visible only in originating store
Then the form has two fields:
|
Field |
What it does |
|---|---|
|
Stores |
Multi-select of every store on your account. Type in Search Store to filter, or tick Select all stores (top-right of the field) to include every store at once. Each selected store appears as a removable chip. |
|
Group Name |
The display name for the group (e.g. All Merge Group, East Coast Stores, Downtown Pair). |
Click Create to save the group, or Cancel to back out.
A store can only belong to one Customer Group at a time. Adding a store to a new group removes it from any other group it was previously in. The system enforces this automatically.
Editing a Customer Group
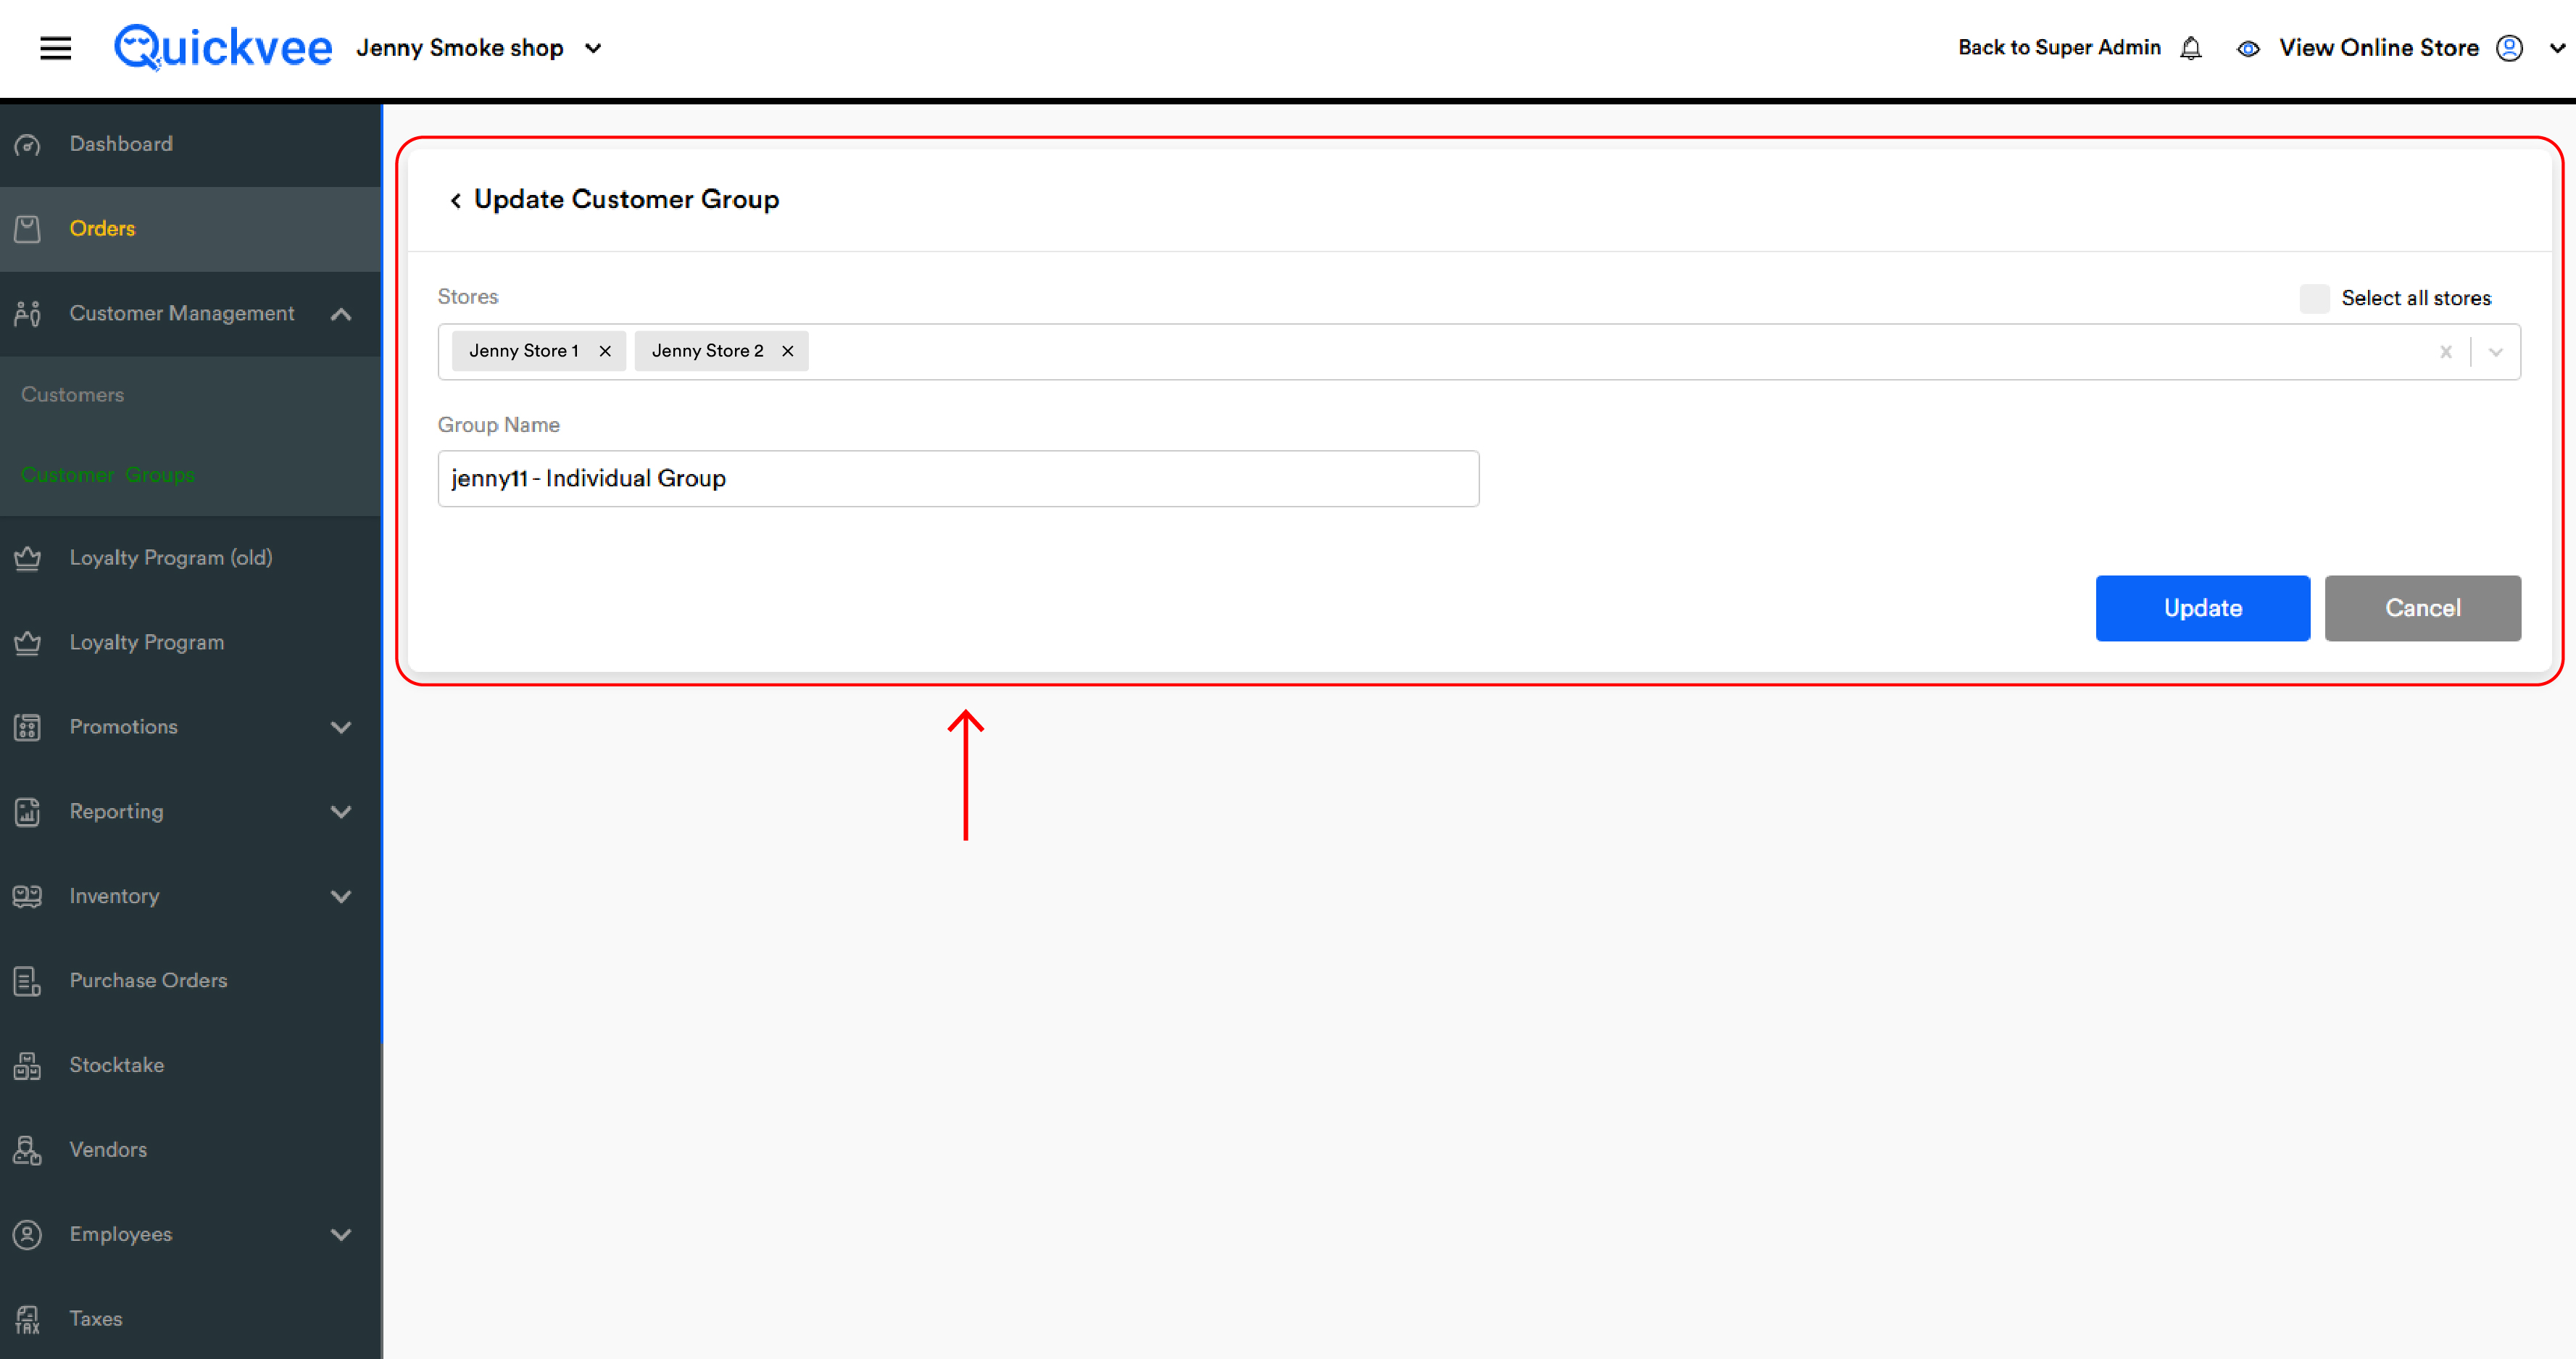
Click the edit pencil next to any group in the list. The Update Customer Group screen opens with:
|
Field |
What it does |
|---|---|
|
Stores |
Add new stores (search and pick) or remove existing stores (click the × on the chip). |
|
Group Name |
Rename the group. |
|
Select all stores (checkbox, top-right) |
Quickly bulk-add every store on your account. |
Click Update to save changes, or Cancel to discard.
Removing a store from a group — read this first
If you remove a store from a group, the system shows a confirmation:
Removing a store from this group will stop future customer and loyalty syncing for that store and will require re-login on Web and POS.
Click Confirm to proceed or Cancel to back out. Once you confirm:
-
The removed store stops syncing customers, loyalty points, store credit, and gift cards with the rest of the group.
-
Every cashier in the removed store needs to log out and log back in on the POS for the change to take effect — same on the web backend.
-
Customers who had merged profiles between the removed store and the rest of the group remain in the group for the other stores; the removed store gets its own copy of those profiles going forward.
Plan store-removal changes for a low-traffic window. Because every active cashier needs to log out and back in, doing this mid-shift can disrupt your team. The cleanest time to add or remove stores is before opening or after closing.
Configuring loyalty for a group
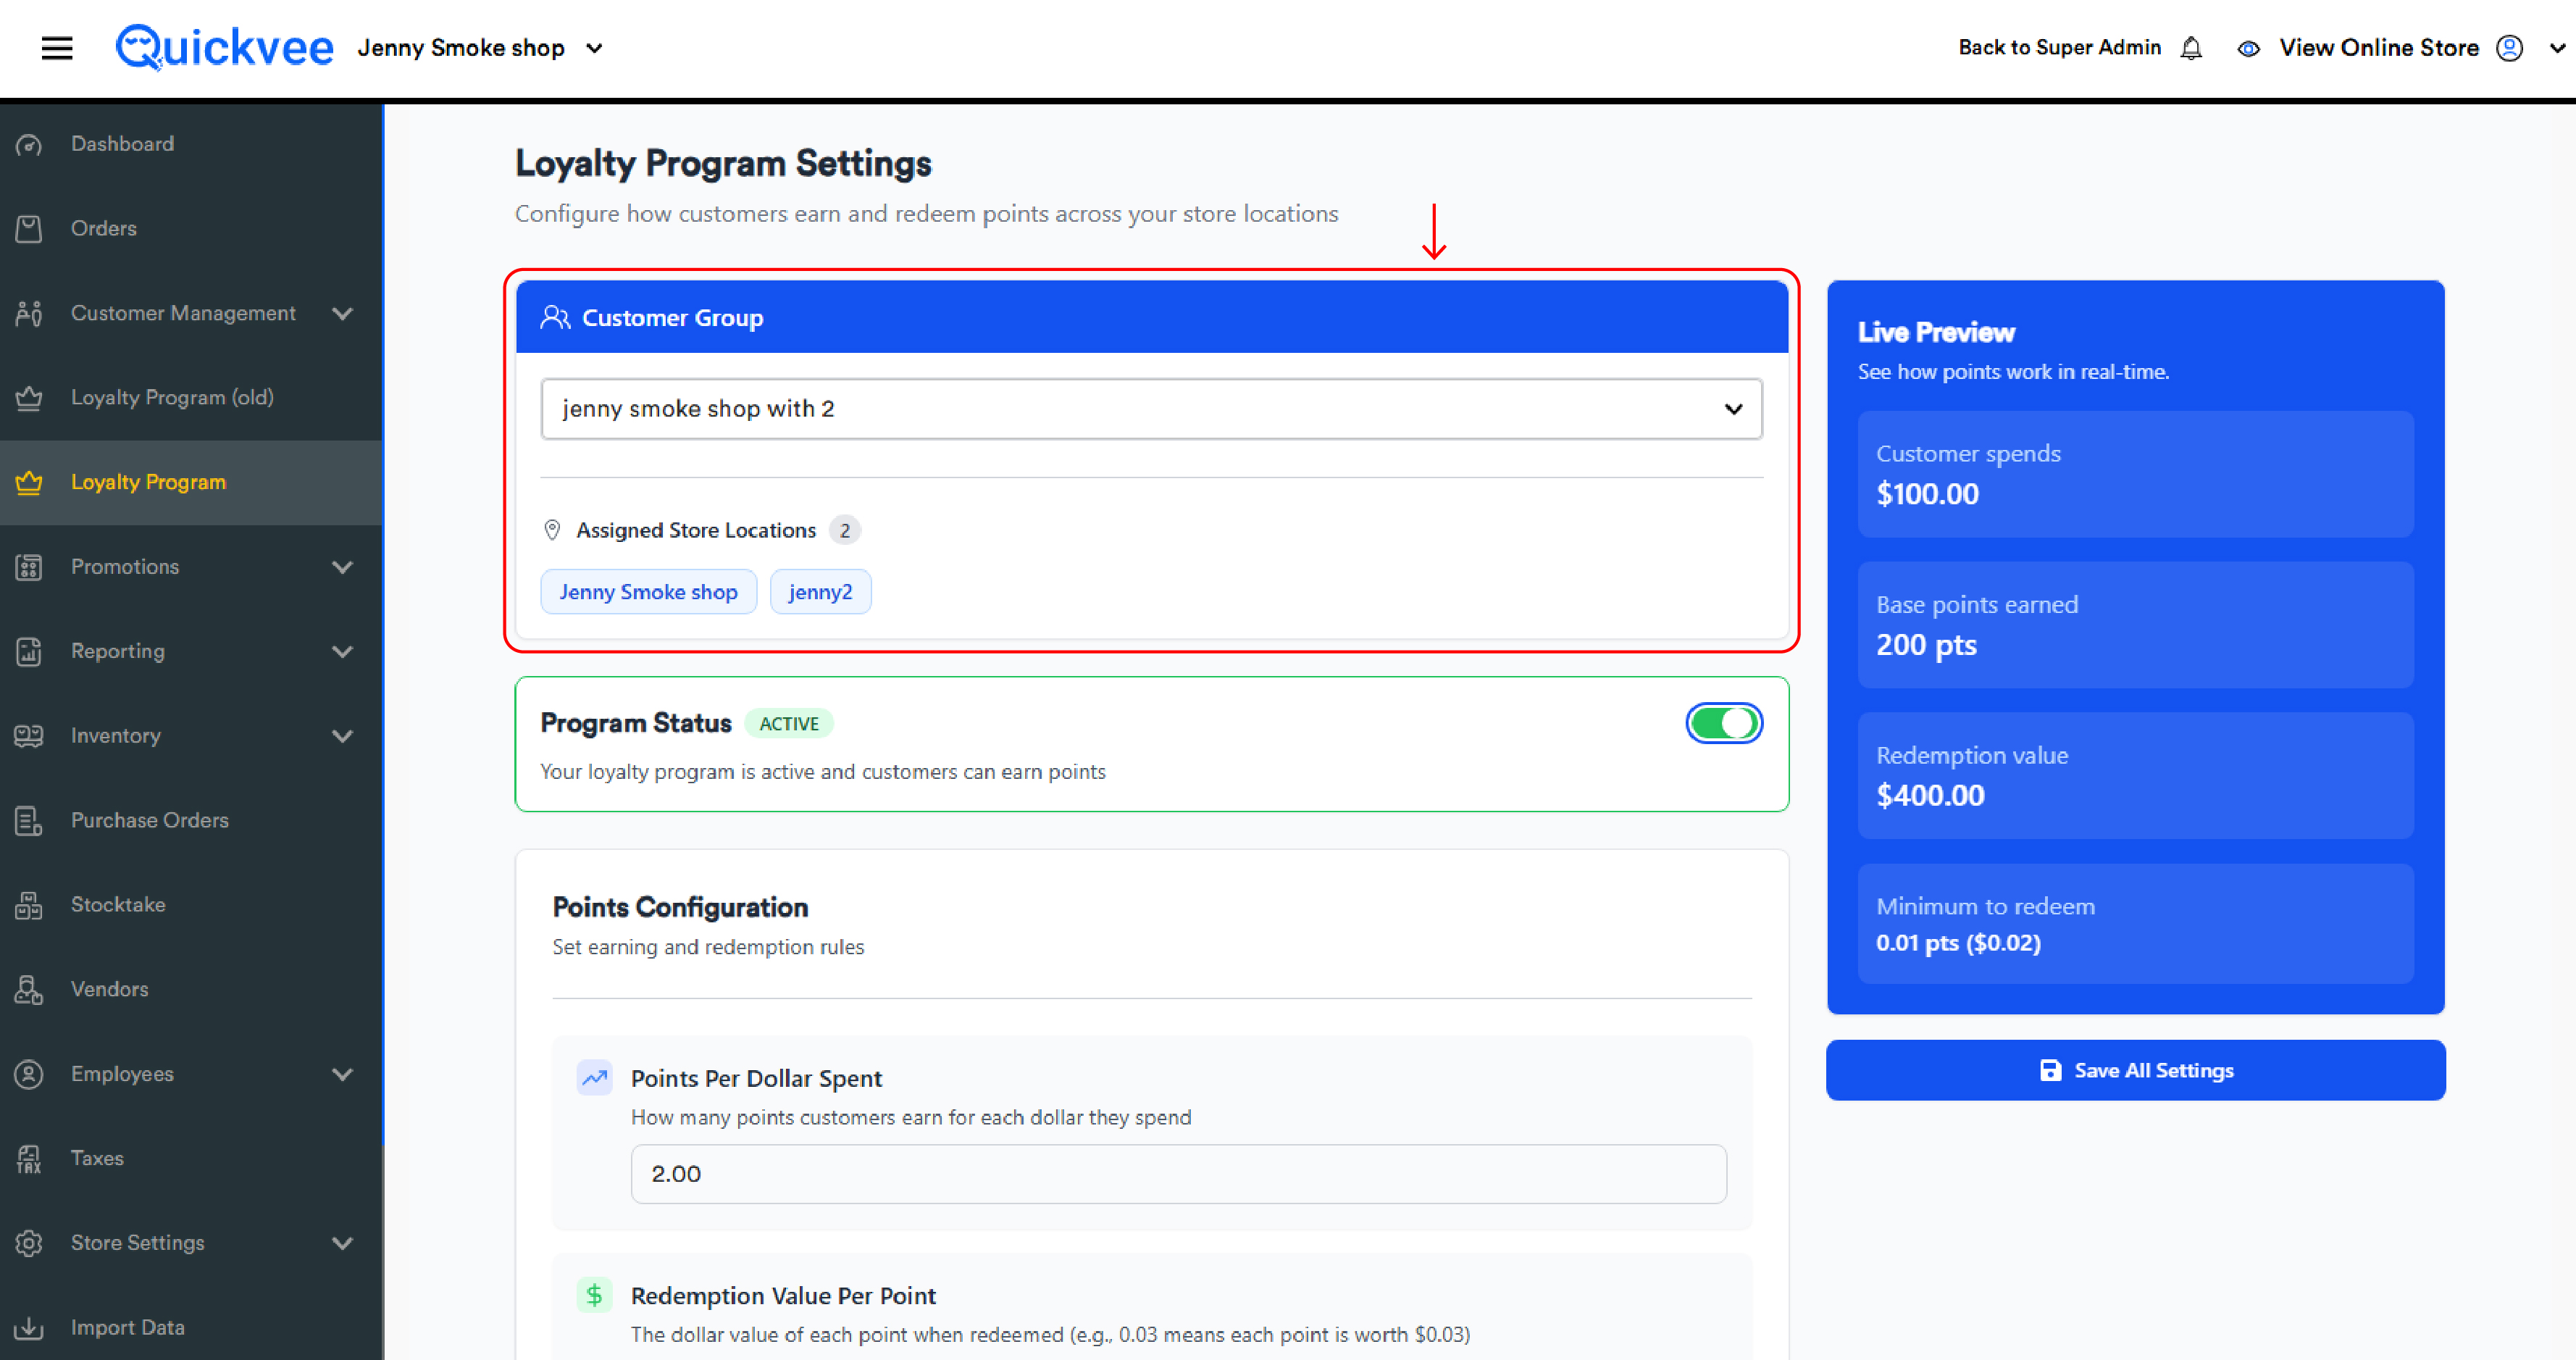
Once the group exists, the Loyalty Program module is where you set the rules. From the sidebar, go to Loyalty Program. The page opens with a group selector at the top:
|
Element |
What it does |
|---|---|
|
Customer Group (dropdown) |
Pick which group you're configuring. Every group has its own independent loyalty settings. |
|
Assigned Store Locations |
A read-only display of which stores are in the selected group — shows the count and the store-name chips. |
Program Status
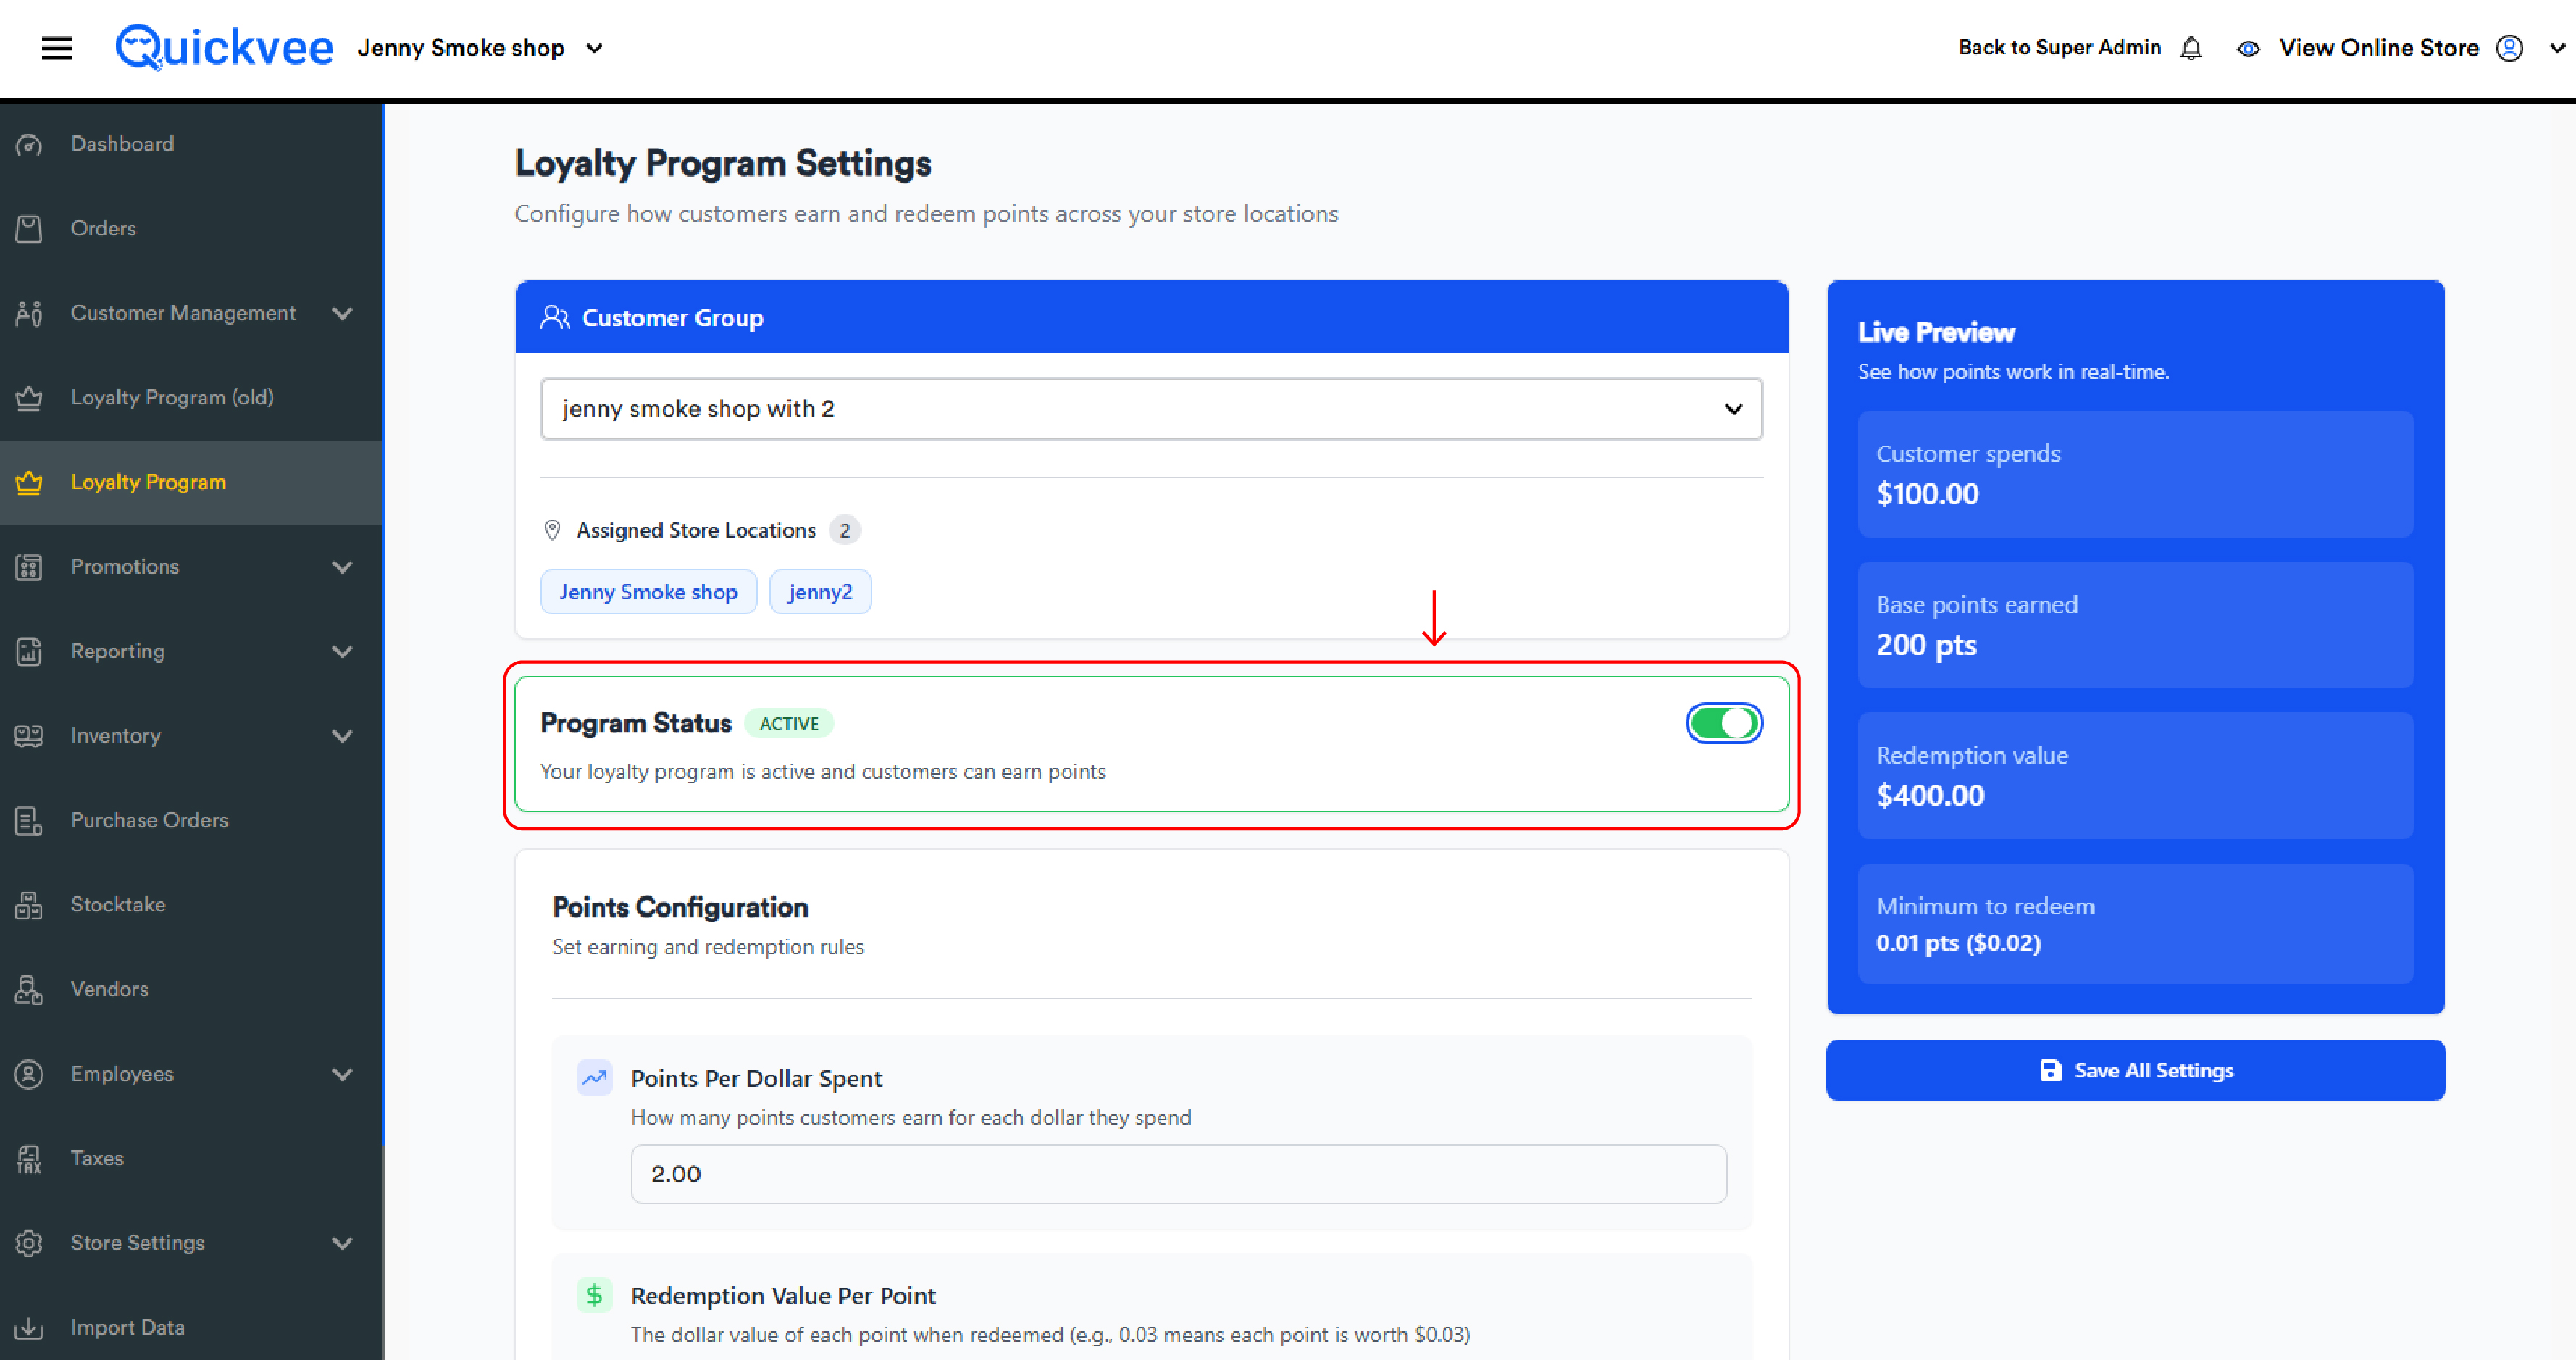
|
Control |
What it does |
|---|---|
|
Program Status (Active / Inactive) |
When Active, customers can earn and redeem points across the group. When Inactive, the program is paused — no new earns, no redemptions. Existing balances are preserved. |
The status bar shows a green badge when active.
Points Configuration
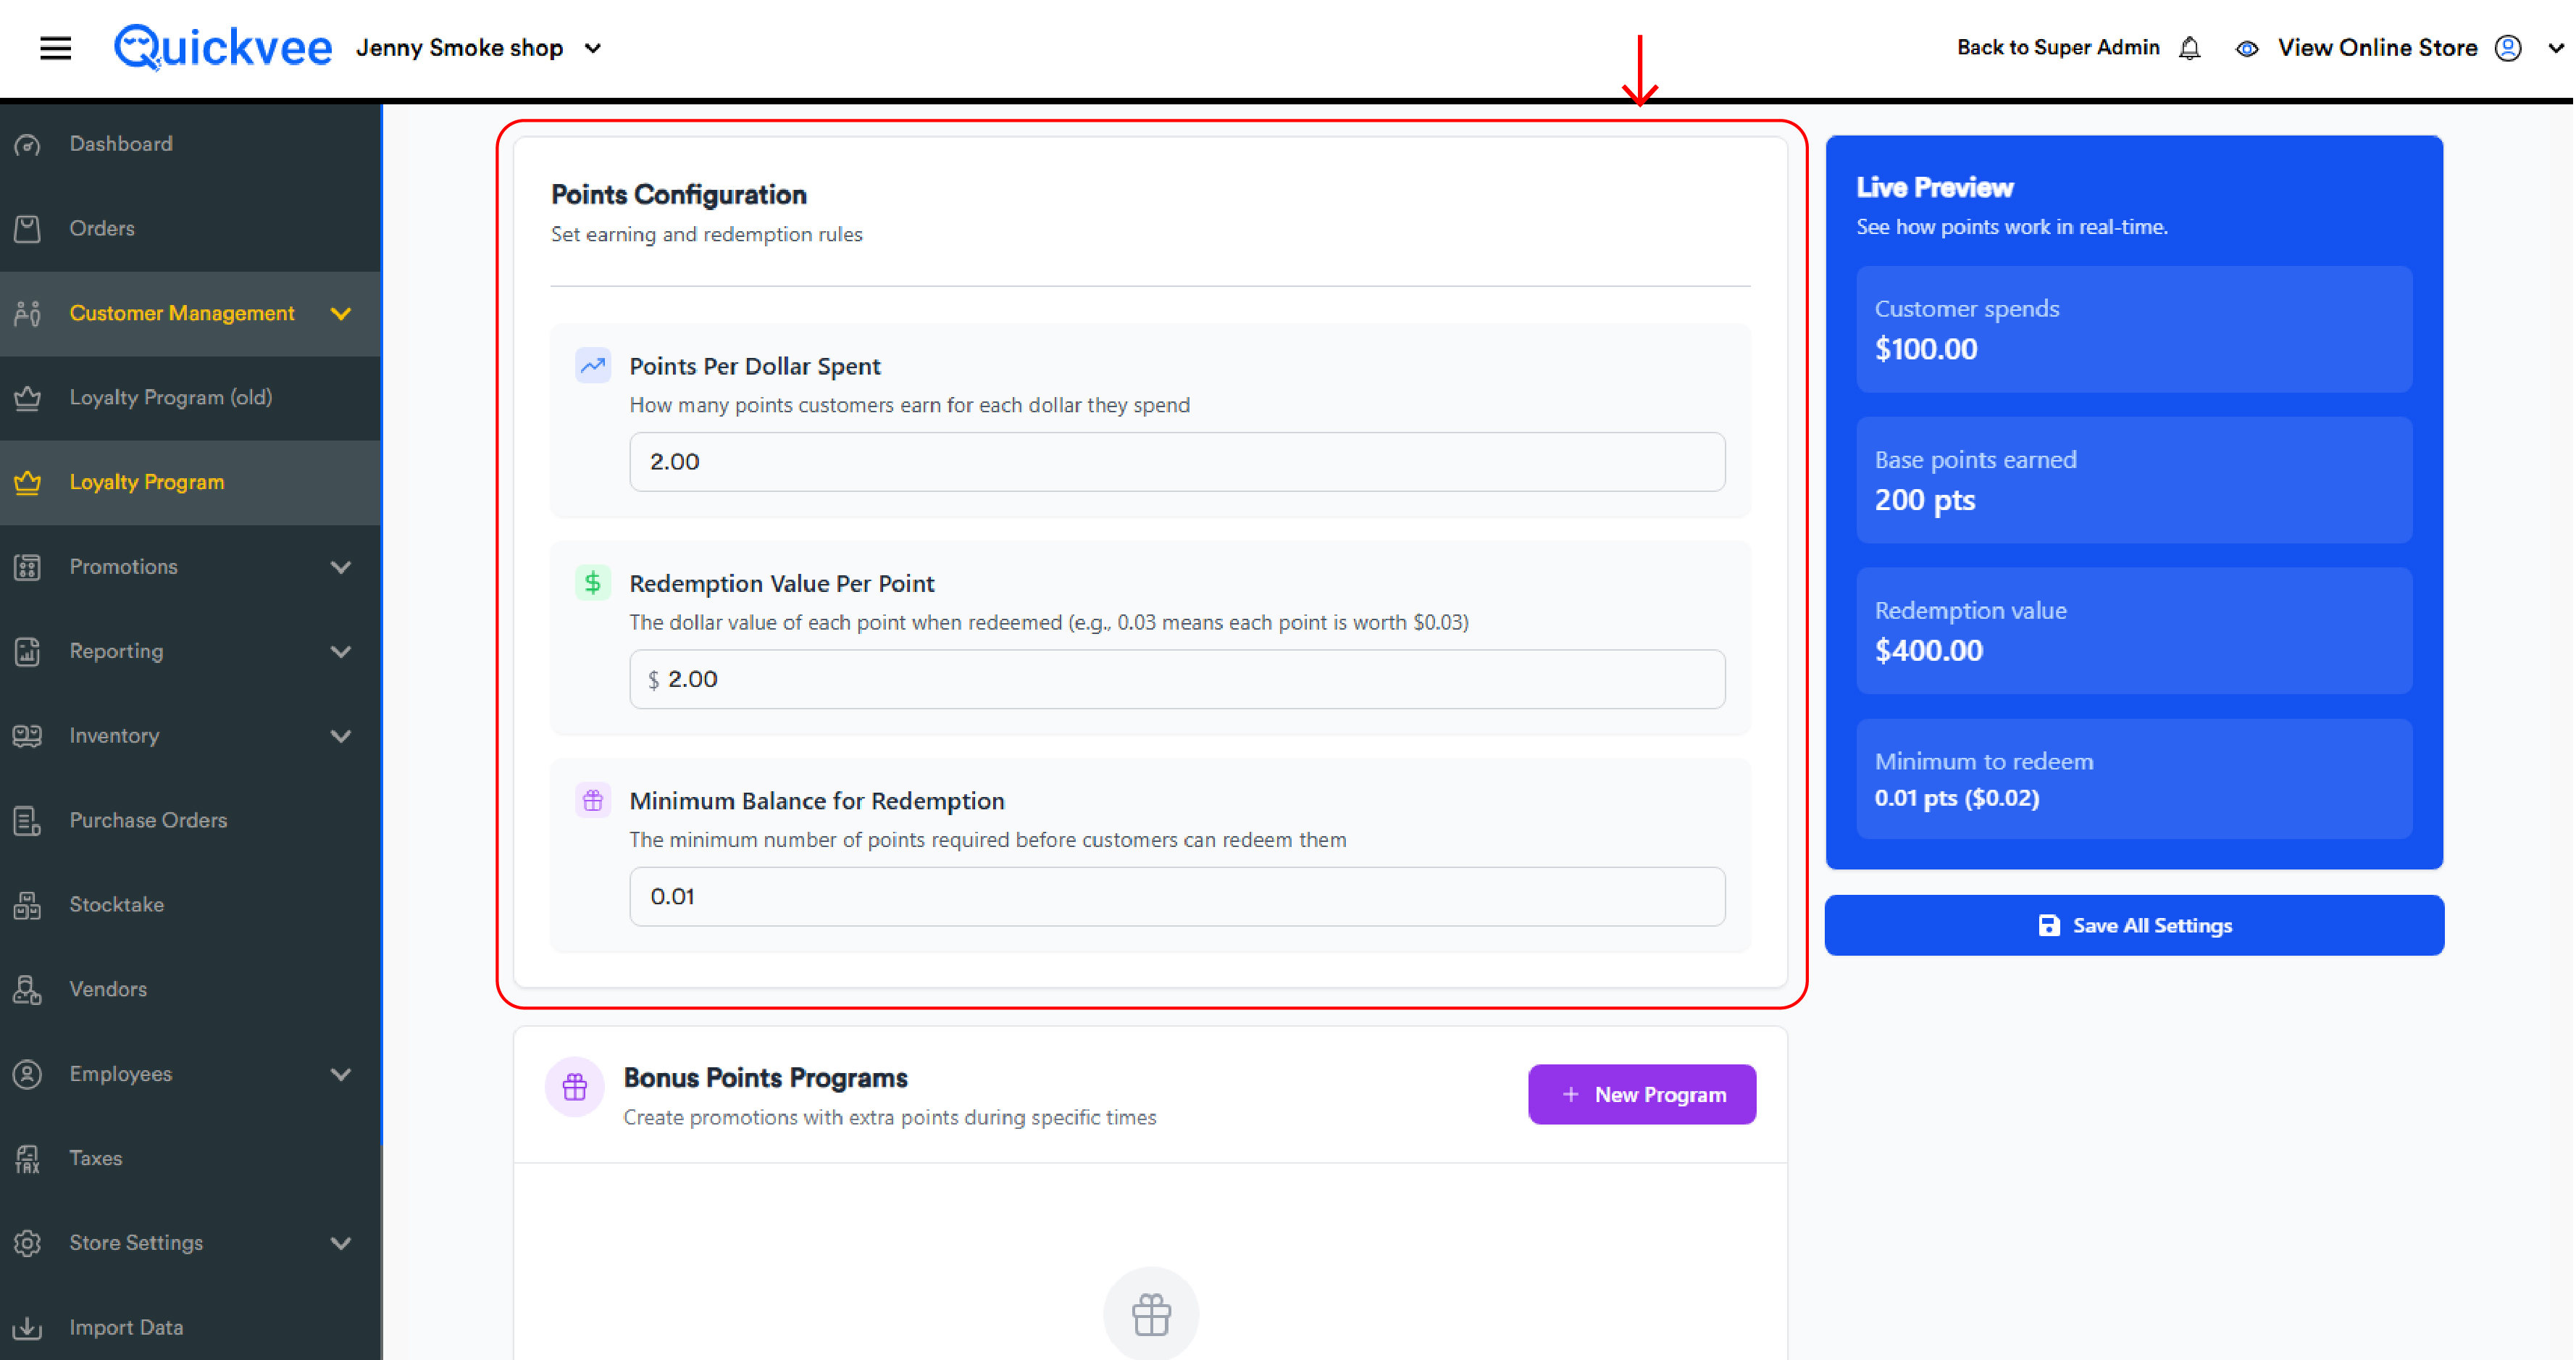
|
Field |
What it does |
|---|---|
|
Points Per Dollar Spent |
Base loyalty points a customer earns for each $1 spent. 1.00 means 1 point per dollar; 0.25 means 1 point per $4. |
|
Redemption Value Per Point |
The dollar value of a single point when redeemed. $1.00 means each point is worth $1 off; $0.03 means each point is worth 3 cents. |
|
Minimum Balance for Redemption |
The minimum points a customer must have before they can redeem any at checkout. Prevents micro-redemptions on small balances. |
Live Preview panel
On the right side of the page, the Live Preview panel shows how your current settings translate to the customer experience, updating in real time as you change values:
|
Preview tile |
What it shows |
|---|---|
|
Customer spends |
A reference spend amount ($100.00 by default). |
|
Base points earned |
The points that reference spend would generate at your current rate. |
|
Redemption value |
The dollar value of those points at your current redemption rate. |
|
Minimum to redeem |
The minimum balance for redemption, with its dollar value in parentheses. |
When you're satisfied, click Save All Settings (blue, bottom of the right panel).
Each group has its own loyalty configuration. Switching the Customer Group dropdown loads a different set of settings — they don't carry over between groups. Three groups means three independent loyalty programs.
Bonus Points Programs
Below the core Points Configuration sits the Bonus Points Programs section — for limited-time promotions that award extra points on top of the base rate. Common uses: weekend events, weekday slow-day boosts, holiday promotions, customer appreciation days.
Click + New Program to open the form:
-20260610-150310.jpg?cb=40b1e4b36c43ba6116a6d3acde7ef7b2)
|
Field |
What it does |
|---|---|
|
Program Name |
Display name (e.g. Summer Deal, Winter Promo, Tuesday Boost). |
|
Additional Bonus Points Per Dollar |
Extra points awarded per dollar spent during the promotion window — added to the base points. Setting 0.25 on a base rate of 1.00 pts/$ means customers earn 1.25 pts/$ during the promo. |
|
Start Date / End Date |
The calendar window the promotion is active. |
|
Active Days |
Pick which days of the week the bonus applies (Mon–Sun). Tap to toggle. |
|
Limit to Specific Hours (checkbox) |
When ticked, the bonus only applies during a specific time window within each active day (e.g. 4 PM – 7 PM for an after-work bonus). |
|
Repeat Weekly (checkbox) |
When ticked, the program continues weekly on the selected days even after the end date. Use for permanent recurring promotions; leave off for one-time campaigns. |
Click Save Changes to add the program. It appears in the list with a toggle and edit pencil, showing the program name and an ACTIVE/INACTIVE badge, a summary line ($1 Spent = X.XX Points), the date range, the active days, a toggle to enable/disable without deleting, and an edit pencil.
Tip: The toggle and edit controls let you keep last year's Winter Deal in the system as a template — disable it, edit the dates next December, and re-enable. No need to recreate from scratch each season.
Stacking is additive. If two bonus programs are active at the same time, both add to the base earn rate. A 1 pt/$ base with two active 0.25 pt/$ bonuses gives customers 1.50 pts/$. Be intentional with overlapping promotions.
Assigning a customer to a group
Customers belong to a Customer Group from the moment they're created. The Add New Customer modal (from the Customers page) includes a Customer Group dropdown alongside the standard fields:
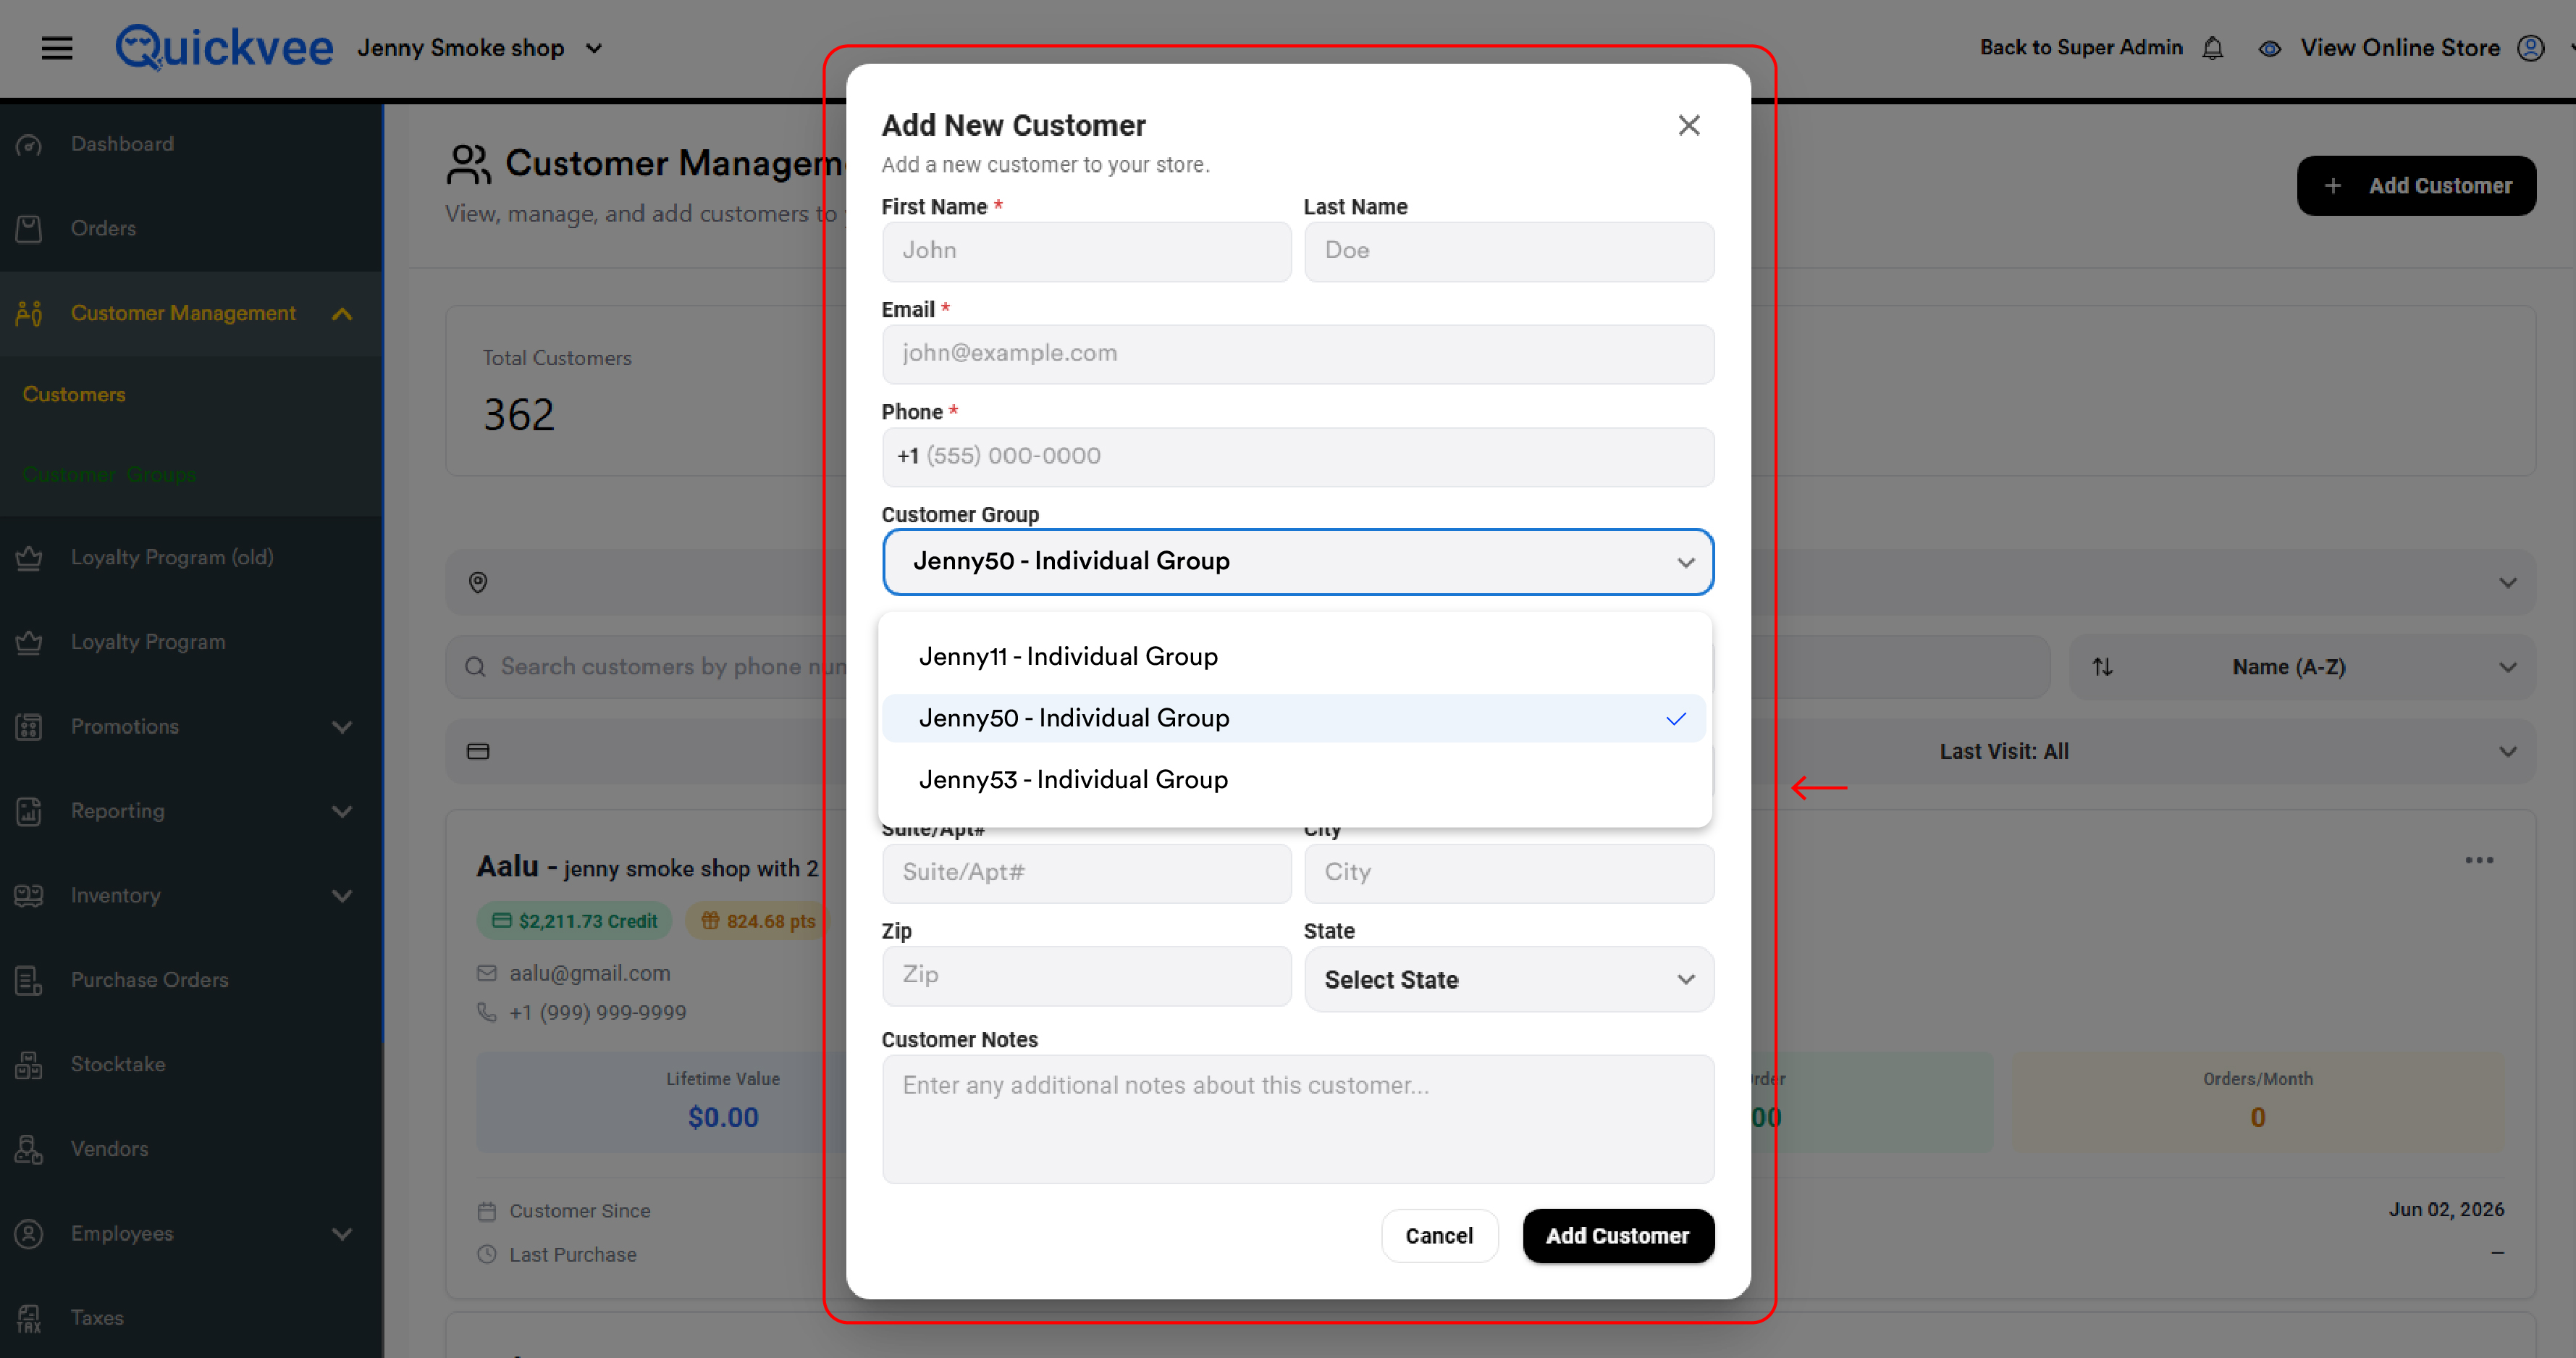
|
Field |
What it does |
|---|---|
|
First Name / Last Name |
Required. |
|
Email / Phone |
Required. |
|
Customer Group |
Dropdown of every active group on your account. Drives where the customer can earn and redeem loyalty, use store credit, and use gift cards. |
|
Suite/Apt# / City / Zip / State |
Optional address fields. |
|
Customer Notes |
Optional internal note. |
The Customer Group is set at creation.
Filtering customers by group
The Customer Management → Customers page includes a Customer Group filter at the top of the list. Use it to view all customers in one group together, filter to a single location's Individual Group for store-specific outreach, or compare loyalty engagement between groups by switching the filter. An All Customer Groups option shows every customer across every group.
How it looks on the POS
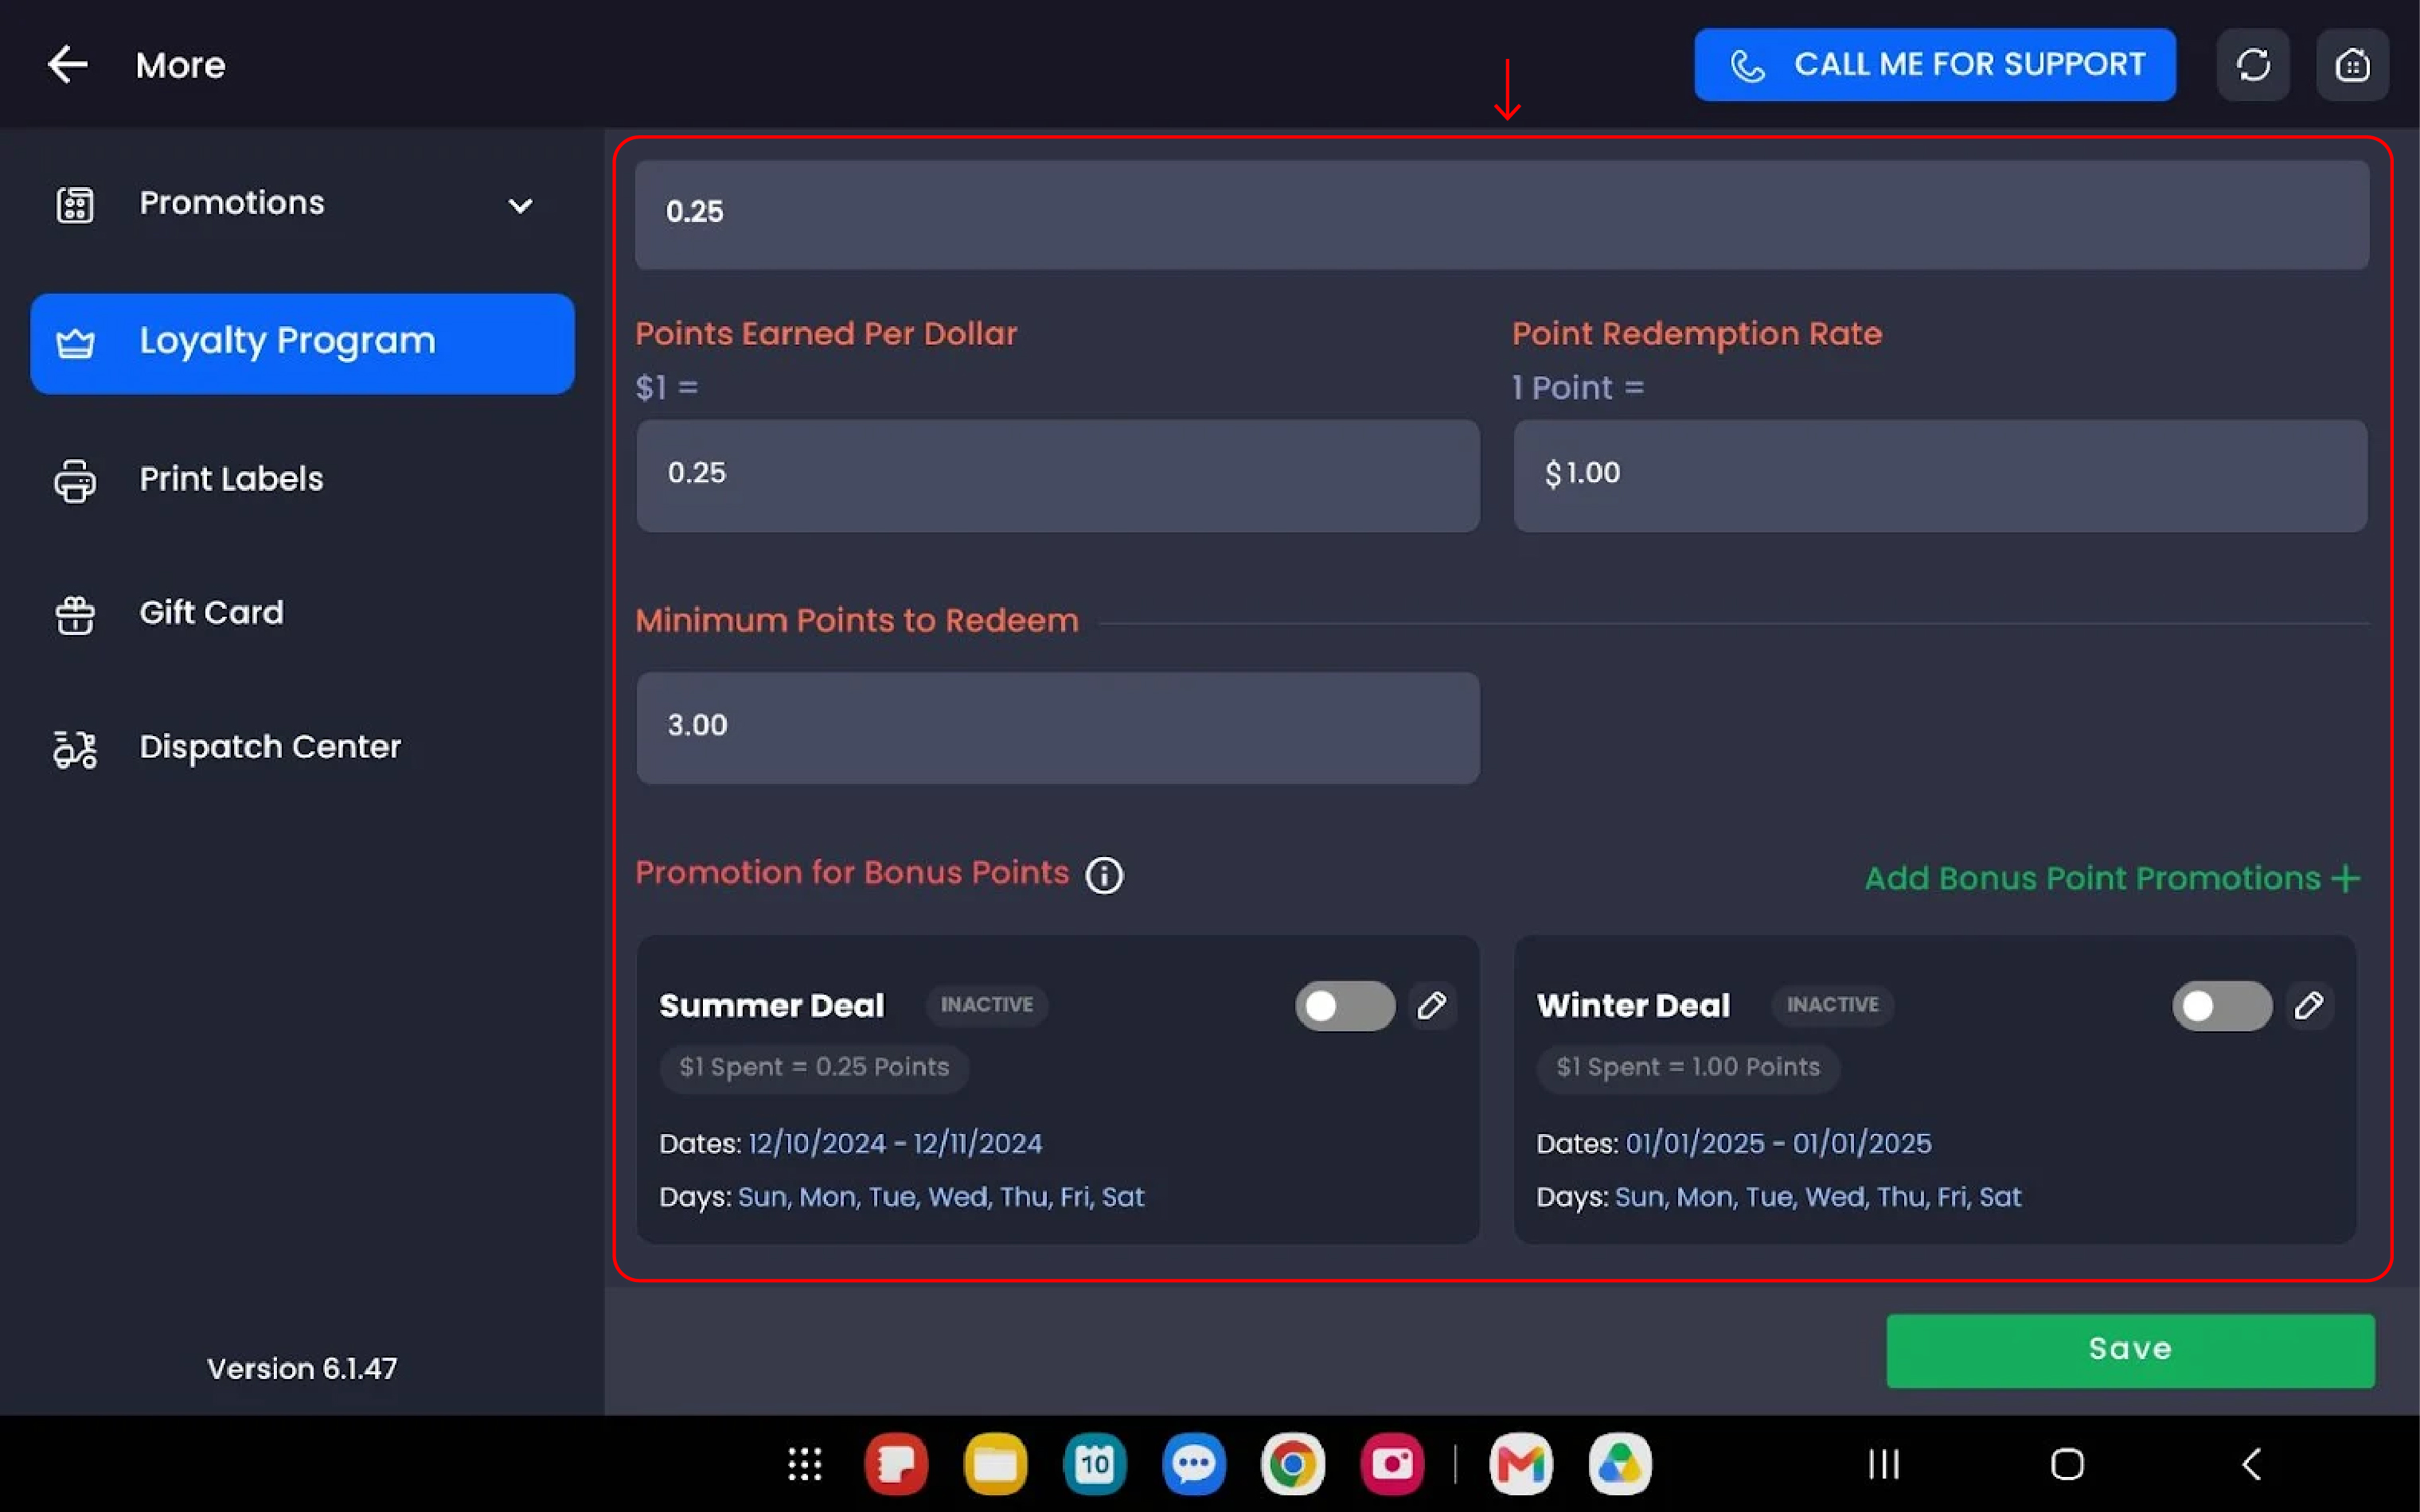
The same loyalty configuration you set on the web backend powers the POS register and the merchant POS app. On the POS, under More → Loyalty Program, your team sees the live points earn rate, redemption rate, and minimum balance (read-only at the cashier level), plus the Promotion for Bonus Points section where Summer Deal, Winter Deal, and any other configured promotion appear with their date ranges and active days.
Active bonus programs show a green border and an ACTIVE badge. Cashiers don't need to do anything special for bonus points to apply — the system reads the current date and time and automatically awards the right total. The Create or Edit Bonus Point Promotions dialog is available on the POS too, with the same fields as the web backend; edits sync back to the web backend automatically, group-wide.
Related articles
-
Set up your loyalty program — base points and redemption rules
-
Manage customers on the POS — looking up and adding customers at the register
-
Manage customers in the web backend — customer profiles, credit, and points